I-FIRST
This is manual guide for IIUM Feedback, Inquiries, and Support Tracking System (I-FIRST)
- How do I sign in to the I-FIRST Portal?
- How do I create and submit a case in the I-FIRST Portal?
- How do I view the status and resolution of my case lodged in the I-FIRST Portal?
- How do I inquire about my submitted case in the I-FIRST Portal?
- How Manager Manage New Ticket From User?
- How Supervisor Assign The Ticket to PIC?
- How PIC Update Progress of The Ticket?
- Person In Charge Job Done The Ticket
- Manager Close The Ticket
- Ticket Management For Agent/Support
- Ticket Management For Supervisor
- Ticket Management For ServiceDesk Manager
- Super Admin - Manage Module
- Super Admin - Manage Role
- Super Admin - Manage Agent
- Super Admin - Manage Counters
- Super Admin - Manage Ticket Type
- Super Admin - Manage Ticket Status
- Super Admin - Manage Service Level Agreement
- Super Admin - Manage Email Notifications
- Super Admin - Manage Service Category
- Super Admin / Manager / Supervisor - Manage Service
- Super Admin / Manager / Supervisor - Manage Service Detail
- Super Admin / Manager / Supervisor - Manage Service Specification
- How to Clear Cache Browser (Google Chrome)
- How can I view the section and unit under my KCDIO?
How do I sign in to the I-FIRST Portal?
1. Open IIUM HelpDesk through helpdesk.iium.edu.my. You will view the portal of IIUM HelpDesk.
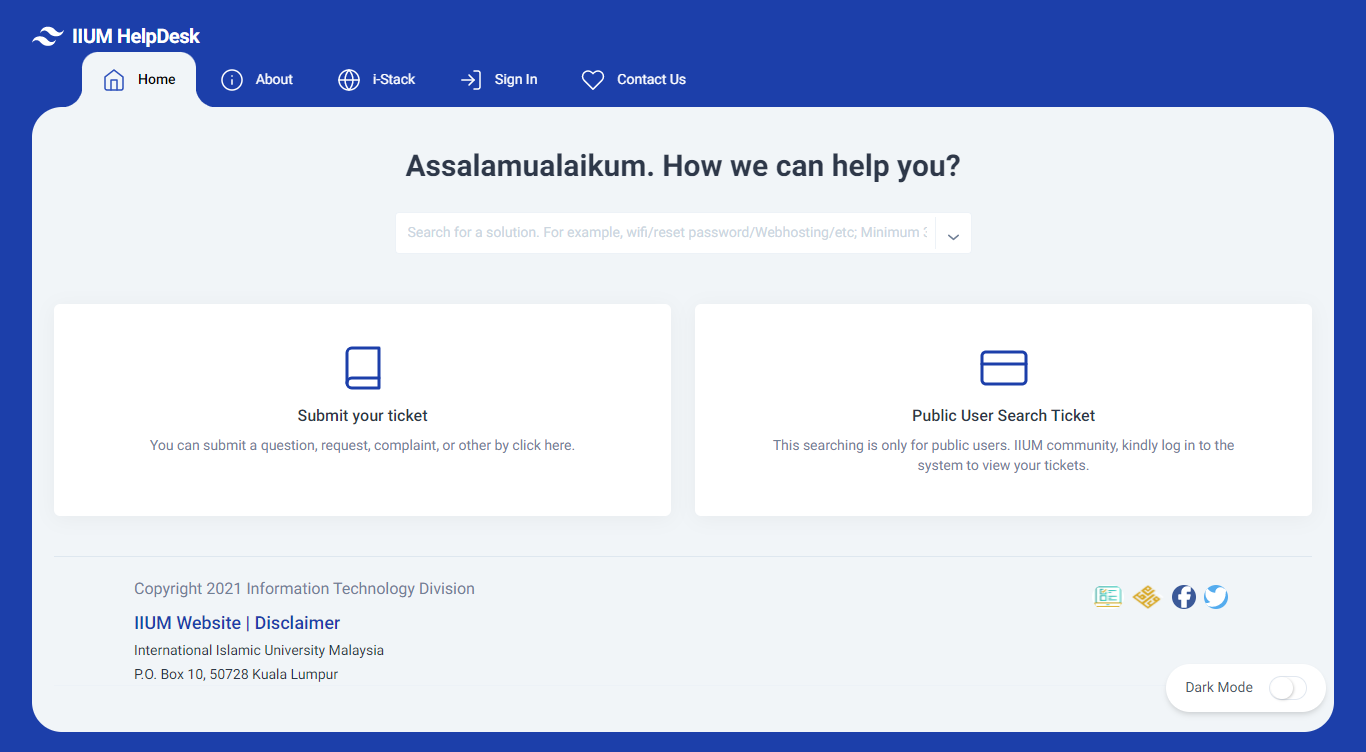
2. On top of the portal, click the menu Sign In.

3. For students and staff of IIUM, please log in using IIUM ID by clicking the button IIUM community.
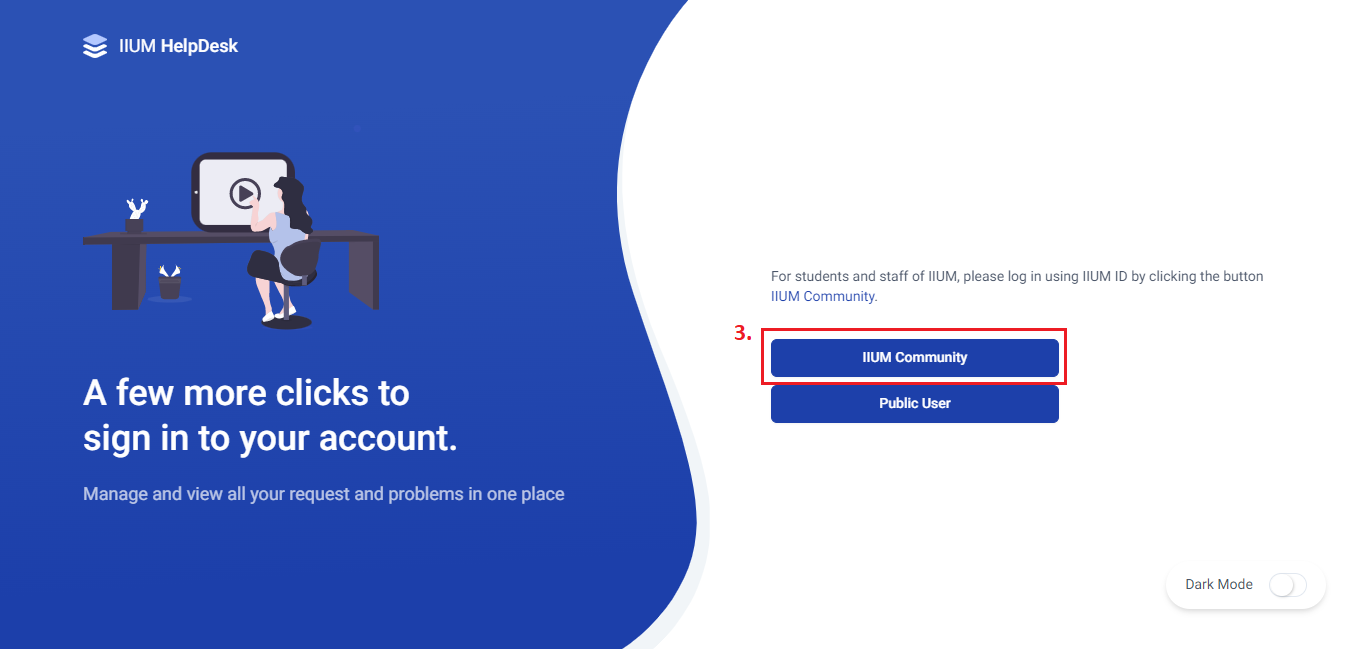
4. Fill in your matric number or staff's email ID and password. Click button LOGIN.

5. After logging in to IIUM HelpDesk Portal, you will be viewing the request form.
How do I create and submit a case in the I-FIRST Portal?
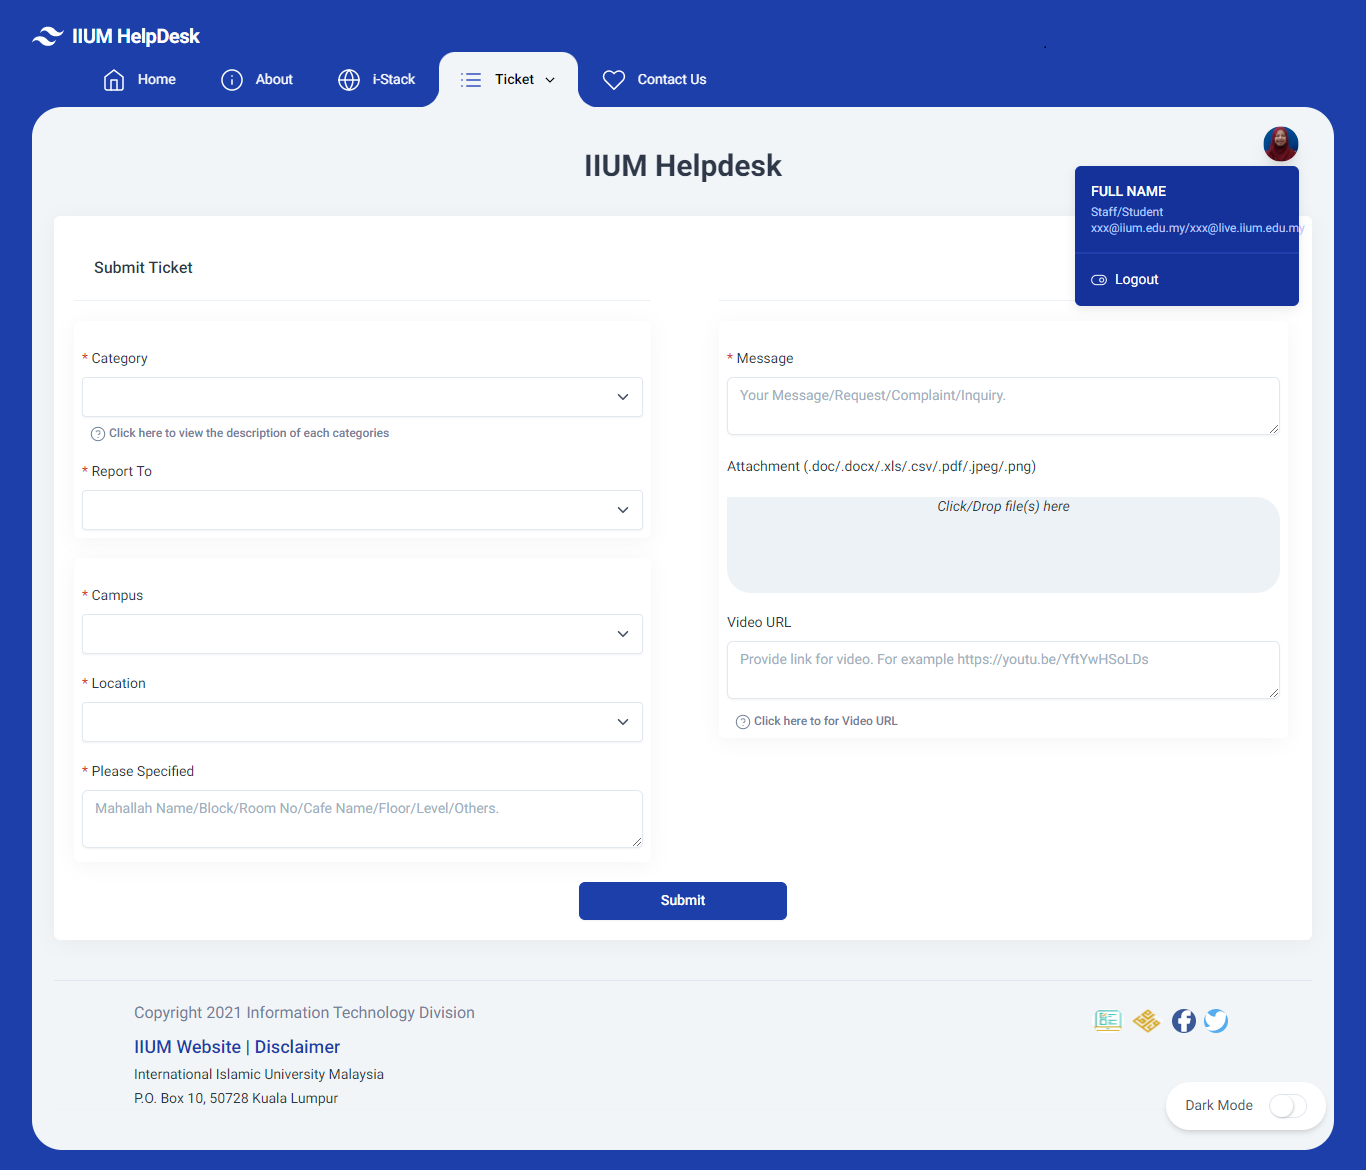
1. After logging in to IIUM HelpDesk Portal, you will be viewing the request form.
* if you are on the main page, on top of the portal, click menu Ticket -> New Ticket

2. Choose the category of ticket you want to submit.

* You may click "Click here to view the description of each category" for more details.

3. Choose the counter/KCDIO to submit the ticket.
* For example, if the request is related to ICT services, you may choose Information Technology Division.
* These counter only available to registered KDCIO. If the KCDIO is not on the list, you may walk in to the KCDIO.

4. Choose the campus where the problem happens.
* For example, if there is a problem with the printer in ITD Lab, you may choose IIUM Gombak Campus.

5. Choose the location where the problem happens.
* For example, if there is a problem with the door broken at Rauf Building, you may choose Rauf Building.

6. Describe more on the location the problem happen.
* For example, a problem happens at Mahallah. Write Down "Mahallah Ali, Block B, Room Number 12".

7. Write down your message

8. If there is an attachment, you may drag and drop the file or click the box.

9. If you have a video of the problem, you may insert the URL of the video.

* You may click "Click here for Video URL" for more details.

10. Submit your ticket by clicking the button Submit

How do I view the status and resolution of my case lodged in the I-FIRST Portal?
1. After logging in to IIUM HelpDesk Portal, you will be viewing the request form.
2. On top of the portal, click menu Ticket -> My Ticket

3. You may view the list of your tickets.
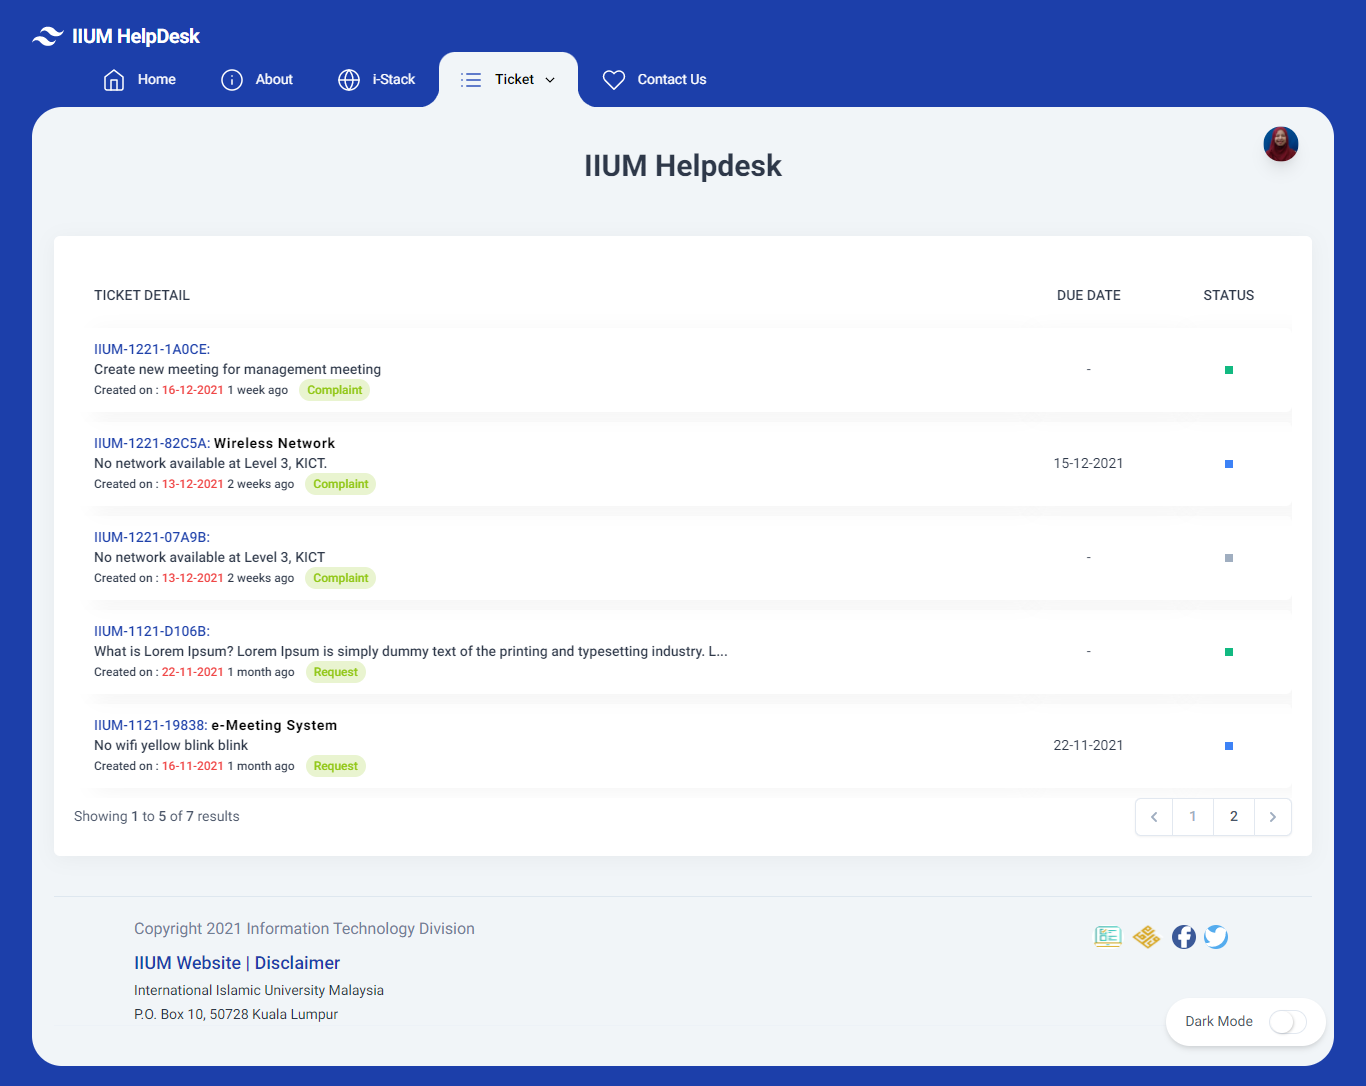
4. You may click one of the tickets in the list to view the ticket's progress.
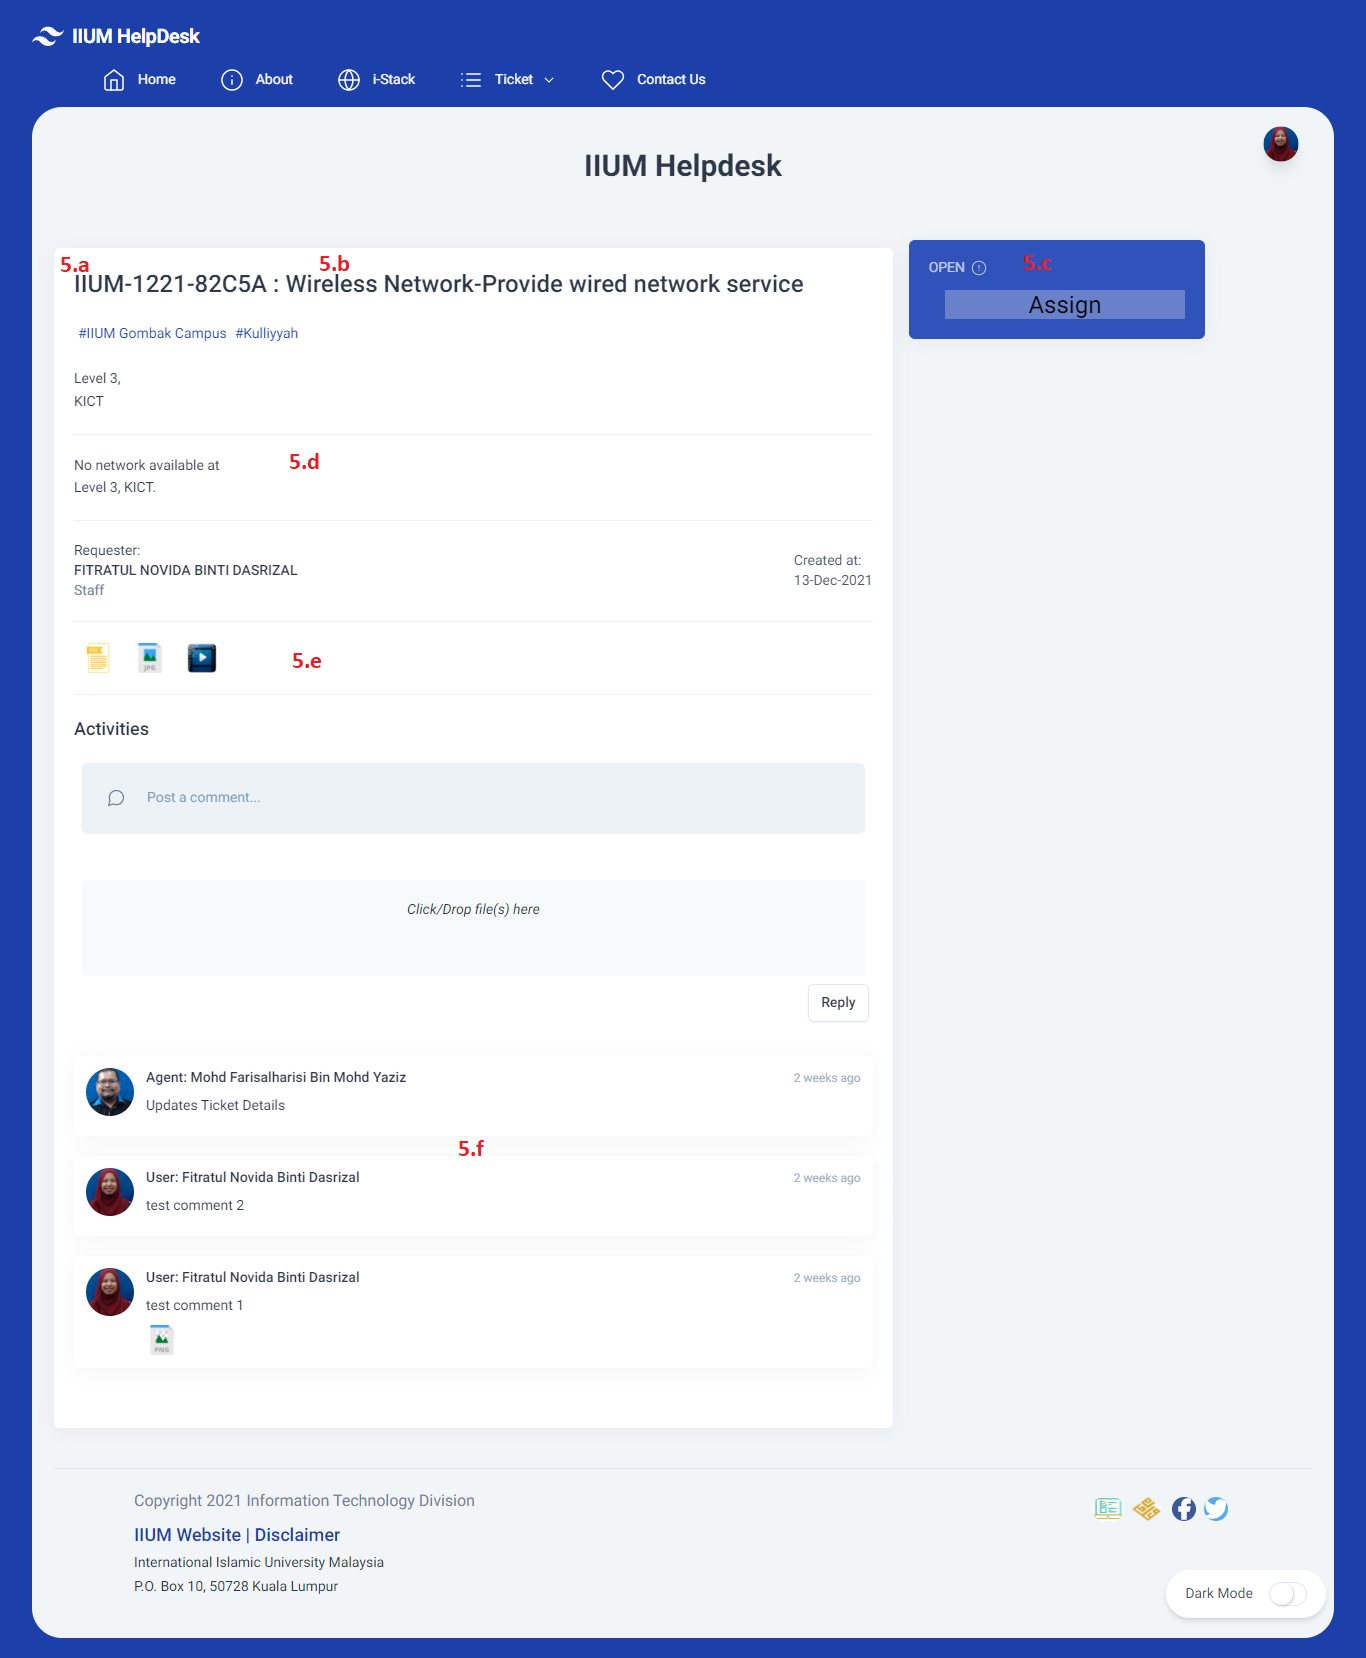
* For example, ticket number IIUM-1221-82C5A

5. You may view all the details related to your ticket.
a. Ticket Number
b. Service Name
c. The status of the ticket
d. Message and location
e. Attachment and Video URL
7. Activities and comments
How do I inquire about my submitted case in the I-FIRST Portal?
You can leave a comment on the ticket details through the IIUM HelpDesk Portal. Not applicable for a close ticket.
1. After logging in to IIUM HelpDesk Portal, you will be viewing the request form.
2. On top of the portal, click menu Ticket -> My Ticket
3. You may view the list of your tickets.
4. You may click one of the tickets in the list to view the ticket's progress.
* For example, ticket number IIUM-1221-82C5A

How Manager Manage New Ticket From User?
The manager will receive a notification of a new ticket assigned to their KCDIO.
The notification is shown below.

The manager logs in to the IIUM HelpDesk to view and manage the ticket.
1. On top of the portal, click the menu Administrator


The view of ticket management is shown below.
The manager may click Ticket Listing for more details on ticket management.

3. The manager may filter or search the new ticket by typing new in the form. A new ticket will have the warning triangle icon. Click the new ticket to manage and assign it to the workgroup or unit.

The view of the ticket is shown below.
The manager may click Ticket View for more details on the ticket description.
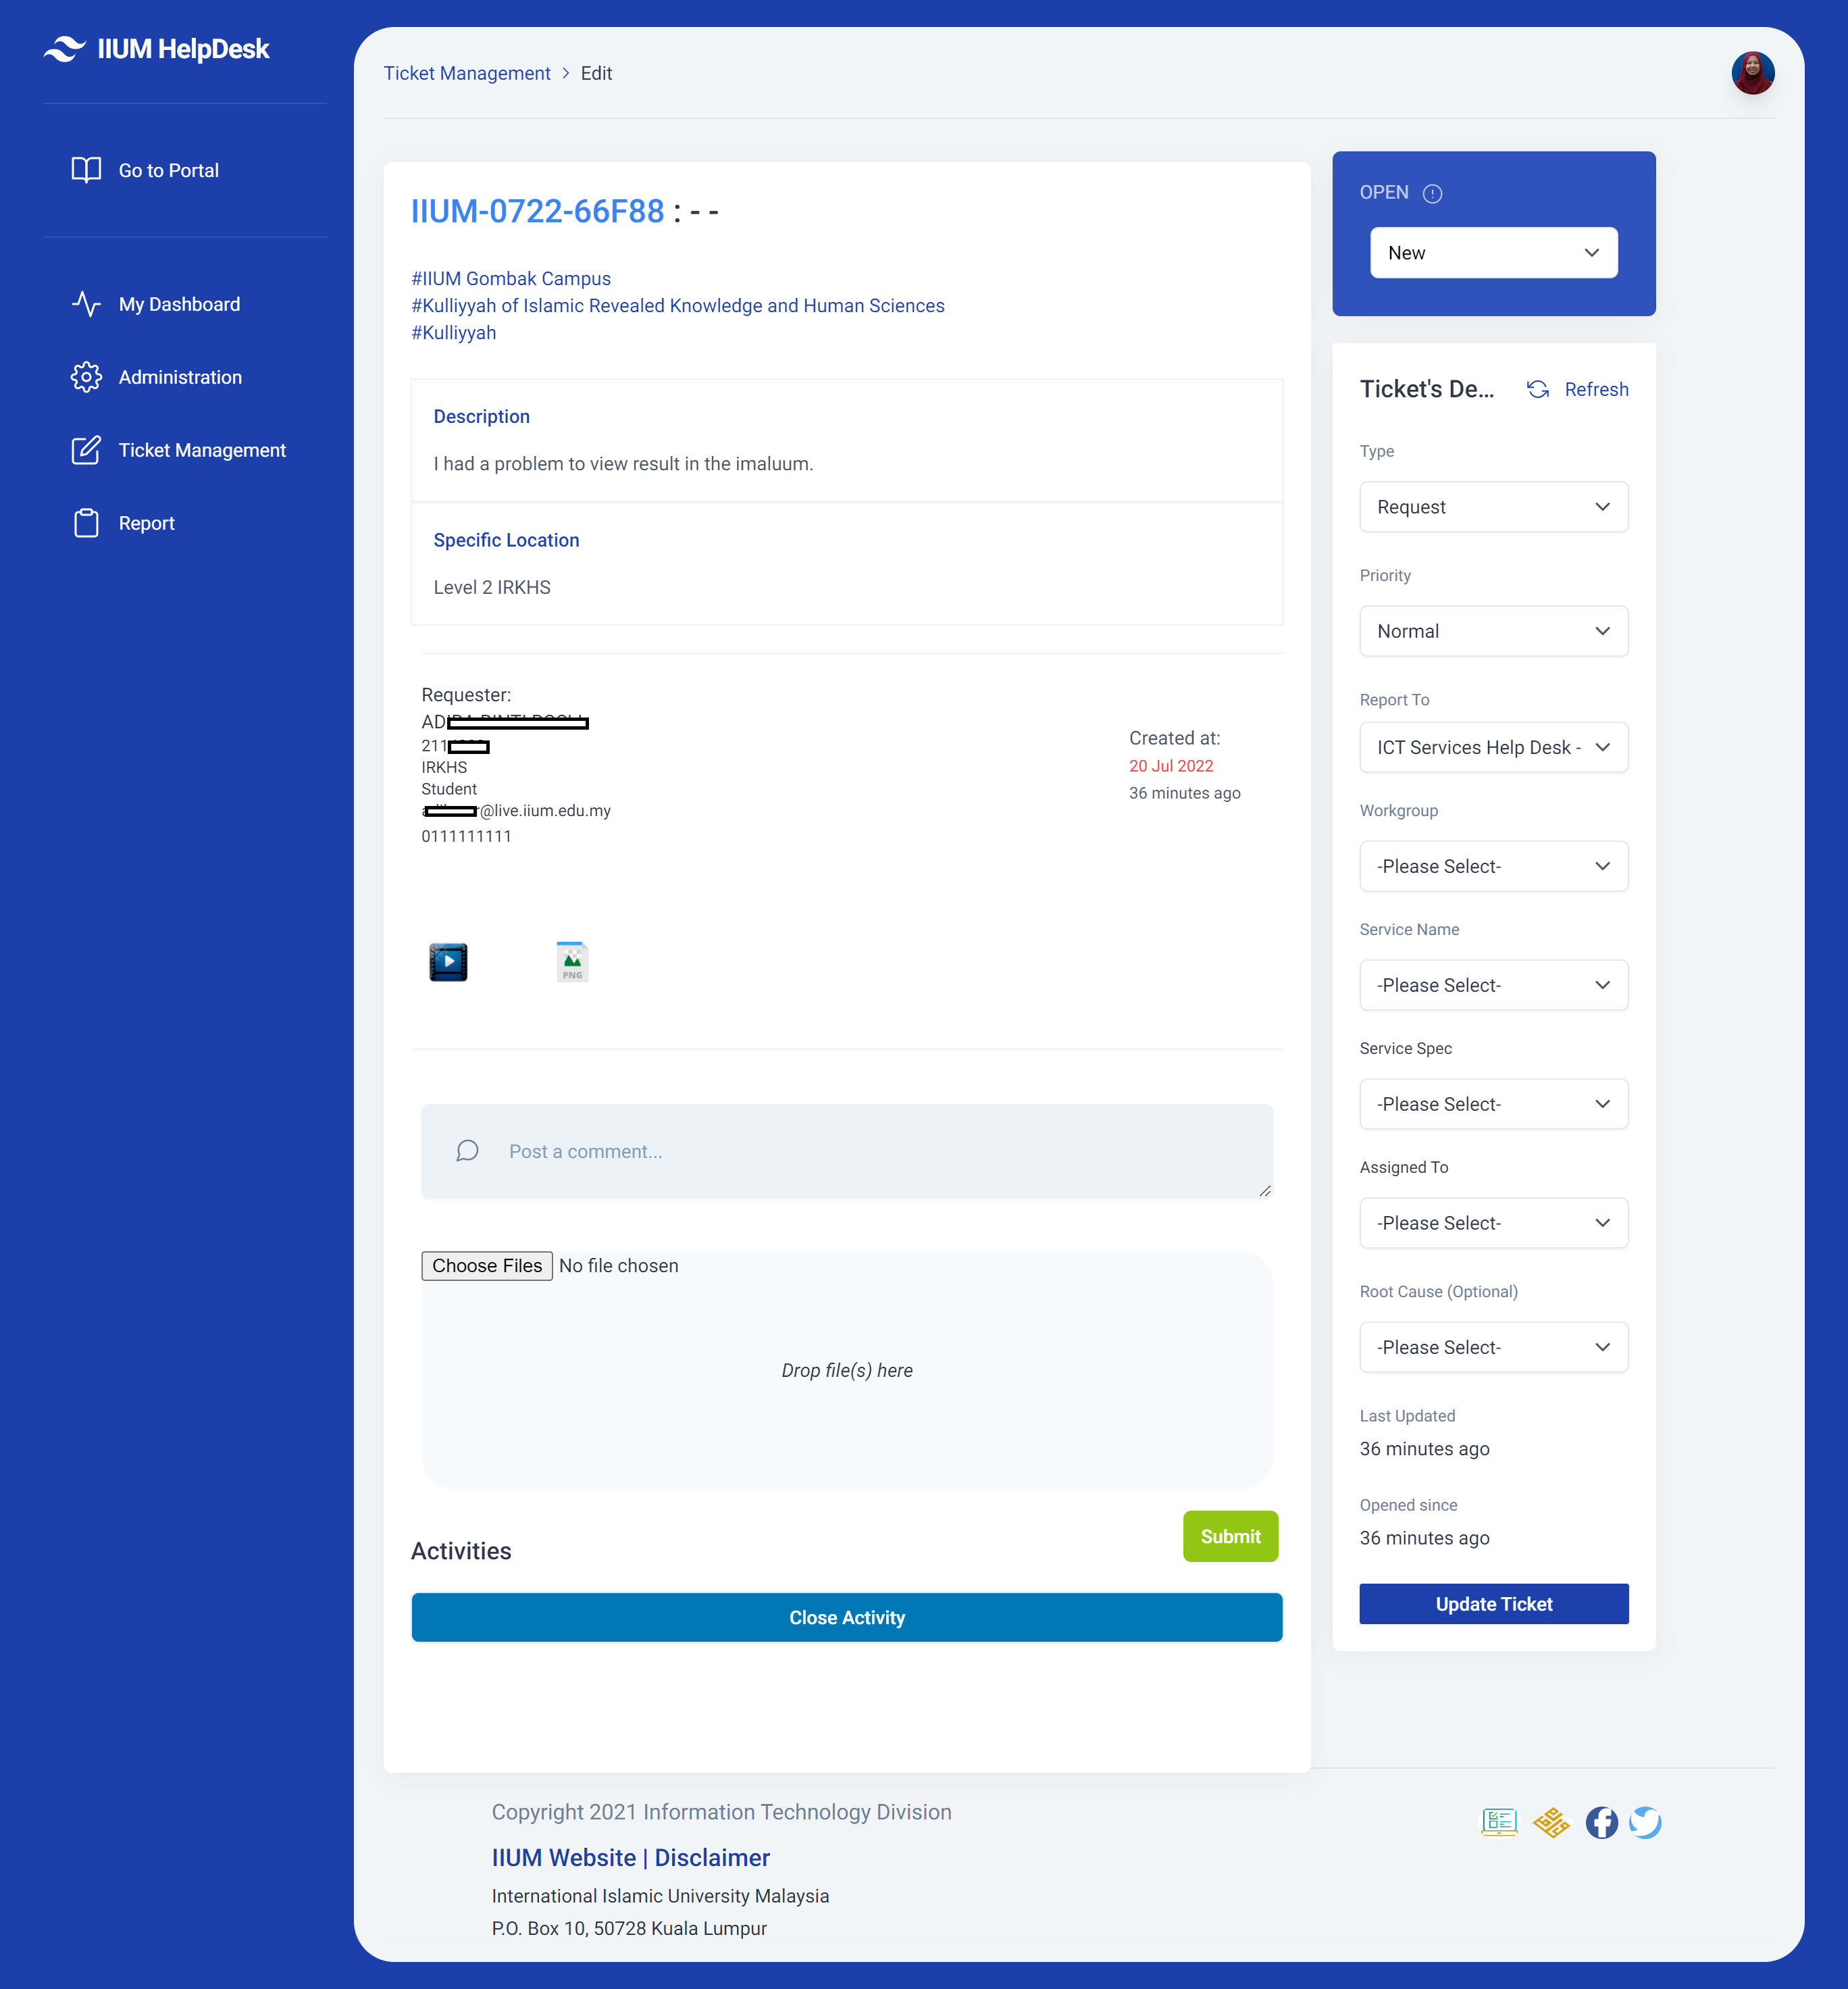
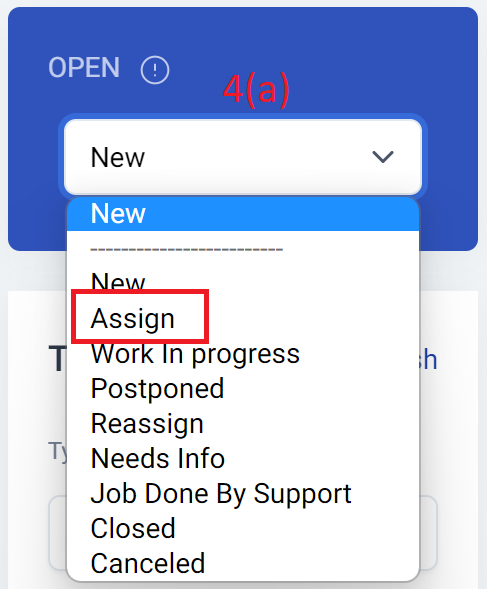
4. There are some items to be selected by the manager to update the ticket
a) Status of ticket: Assign
b) Workgroup or unit: For example Collaborative & Web Services


Once update, there will be a success alert pop up in the ticket management

5. Next, the ticket will assign to the person in charge
a) The team leader or supervisor may assign the ticket to the person in charge
OR
b) The person in charge may pick up the ticket in the ticket management
Click Here
How Supervisor Assign The Ticket to PIC?
The supervisor logs in to the IIUM HelpDesk to view and manage the ticket.
1. On top of the portal, click the menu Administrator
The view of ticket management is shown below.
The supervisor may click Ticket Listing for more details on ticket management.
3. A new ticket will have the warning triangle icon. Click the new ticket to manage and assign it to the person in charge.

The view of the ticket is shown below.
The supervisor may click Ticket View for more details on the ticket description.
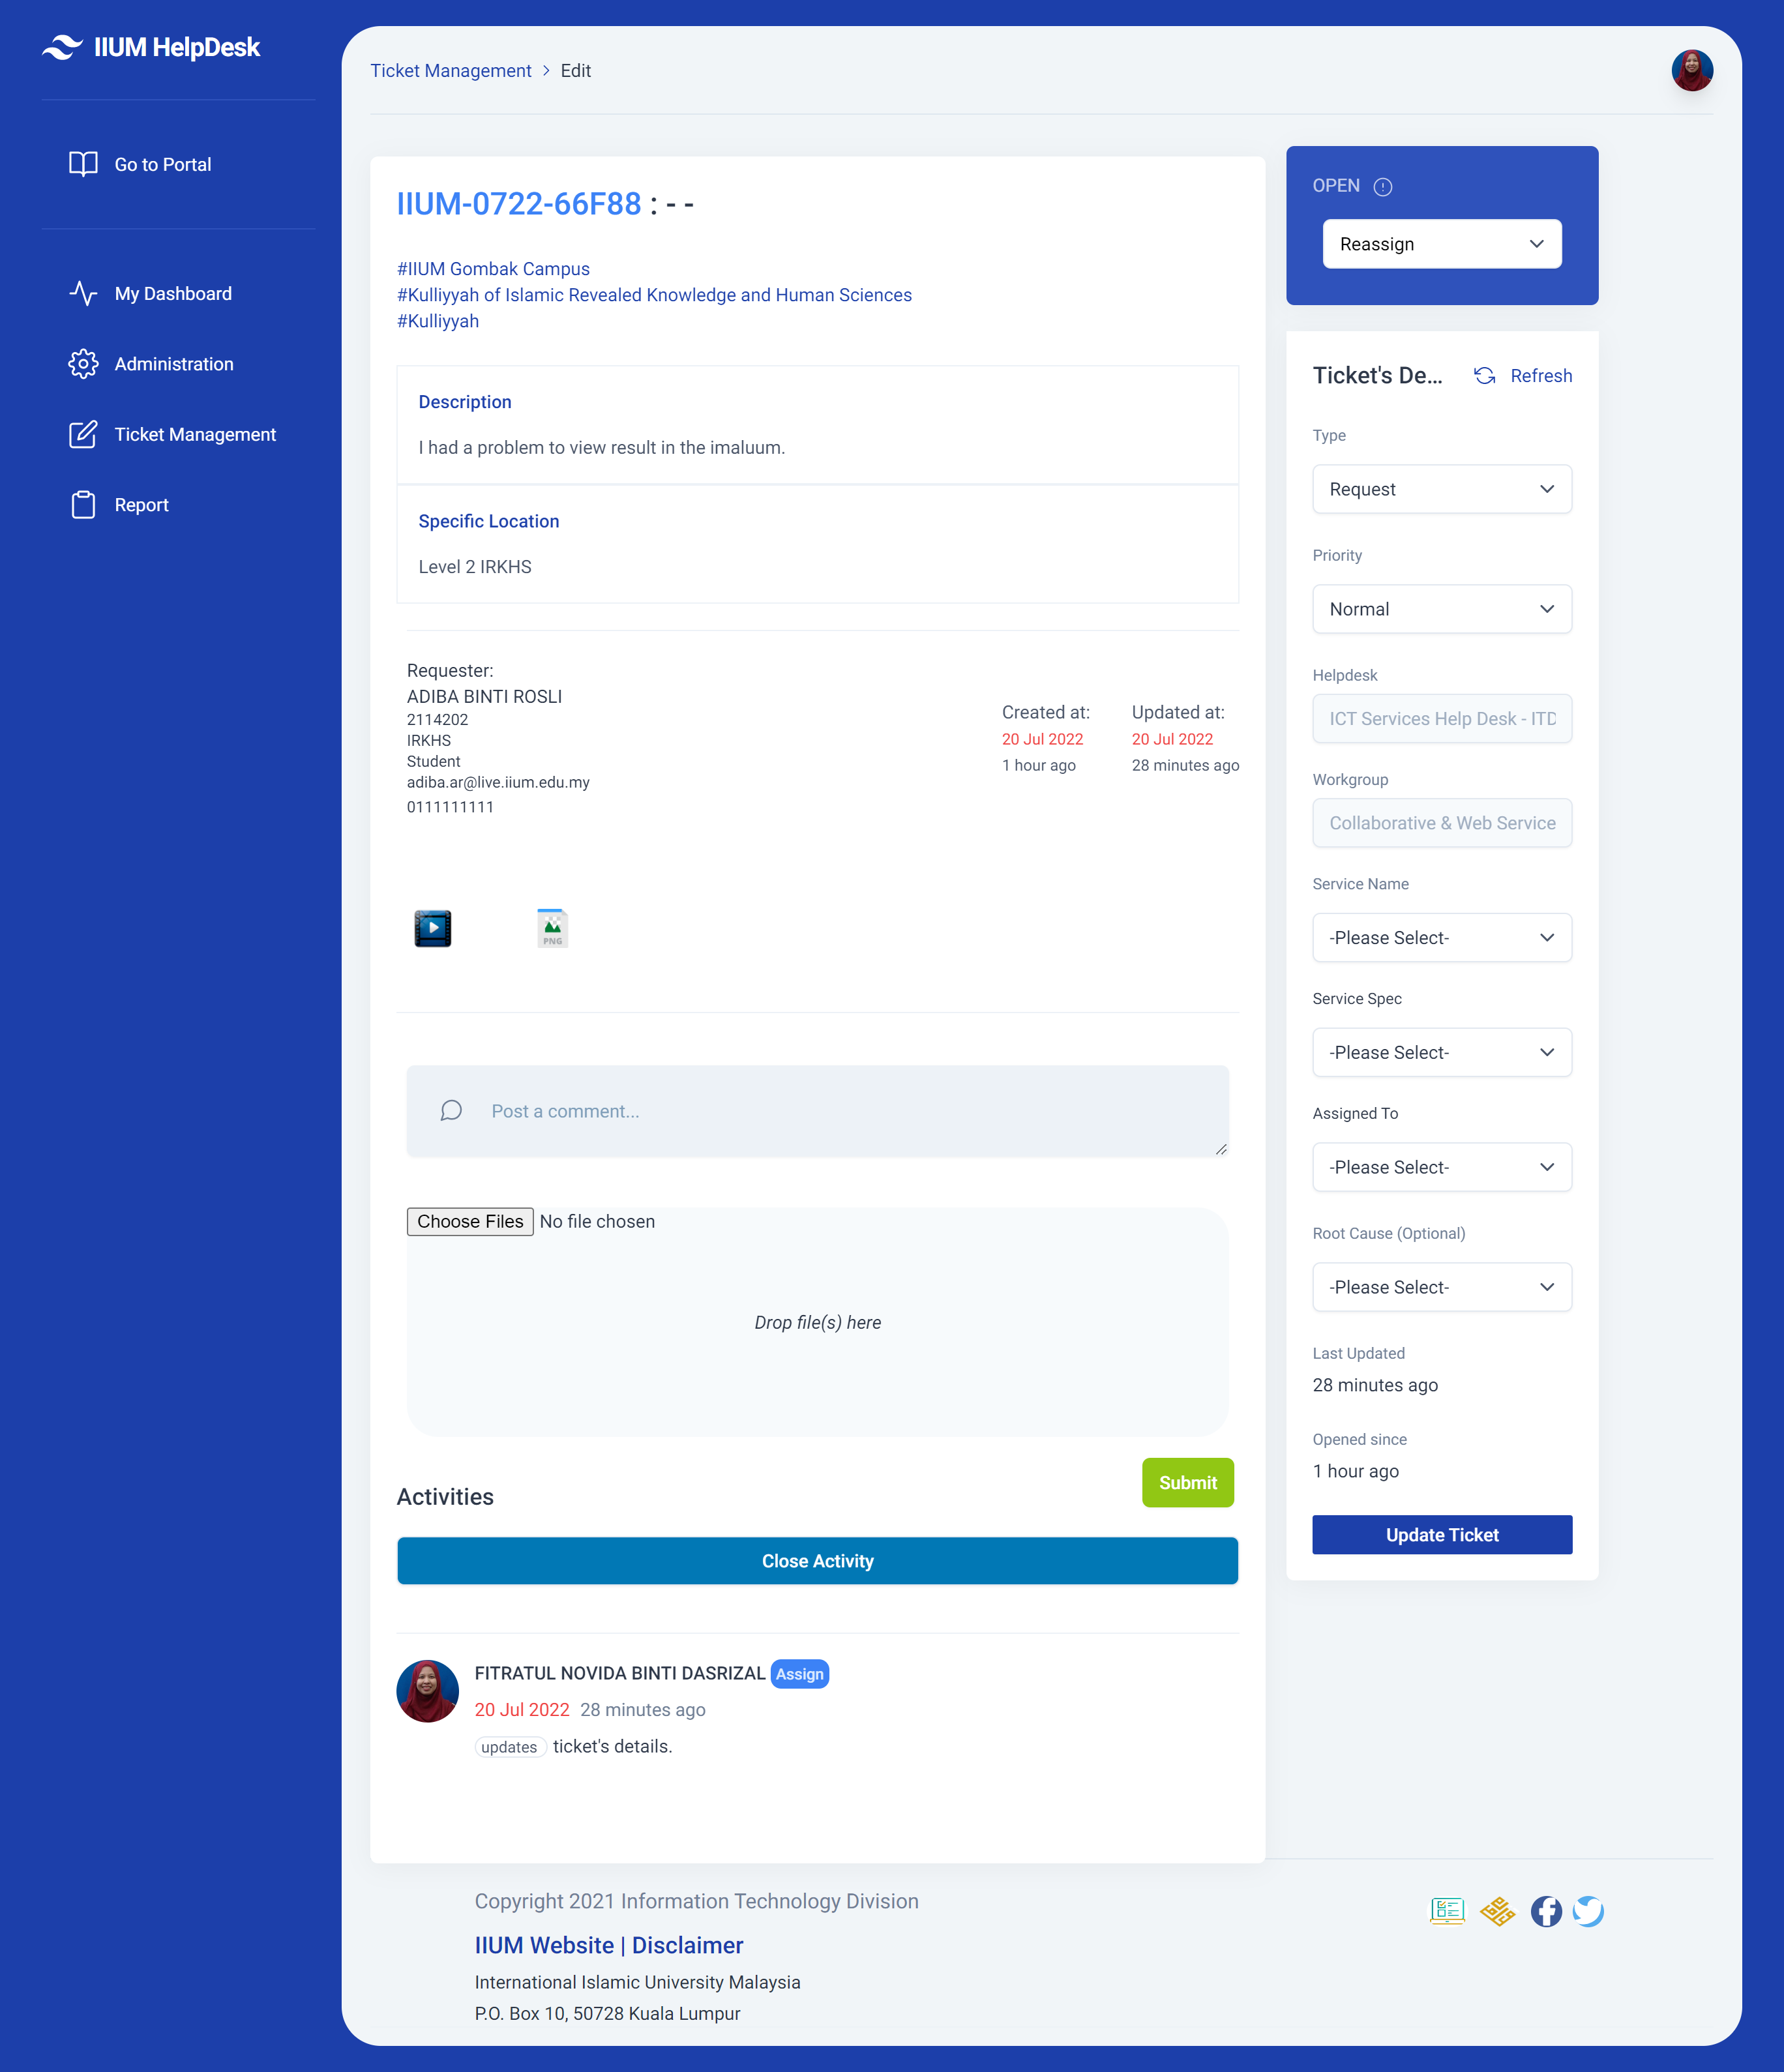
4. There are some items to be selected by the supervisor to update the ticket
a) Service Name: For example i-Ma'luum Student Portal
b) Service Spec: For example Application System/Reports/Statistics Problem
c) Assigned To: For example Muhammad Aiman Hakim


Once update, there will be a success alert pop up in the ticket management

5. Next, the person in charge will update and manage the ticket
Click Here
How PIC Update Progress of The Ticket?
The person in charge will receive a notification of a new ticket assigned to them.
The notification is shown below.

The person in charge logs in to the IIUM HelpDesk to view and manage the ticket.
1. On top of the portal, click the menu Administrator
The view of ticket management is shown below.
The person in charge may click Ticket Listing for more details on ticket management.
3. The person in charge may filter or search the ticket by typing their name in the form. Click the new ticket to update the progress.

The view of the ticket is shown below.
The person in charge may click Ticket View for more details on the ticket description.
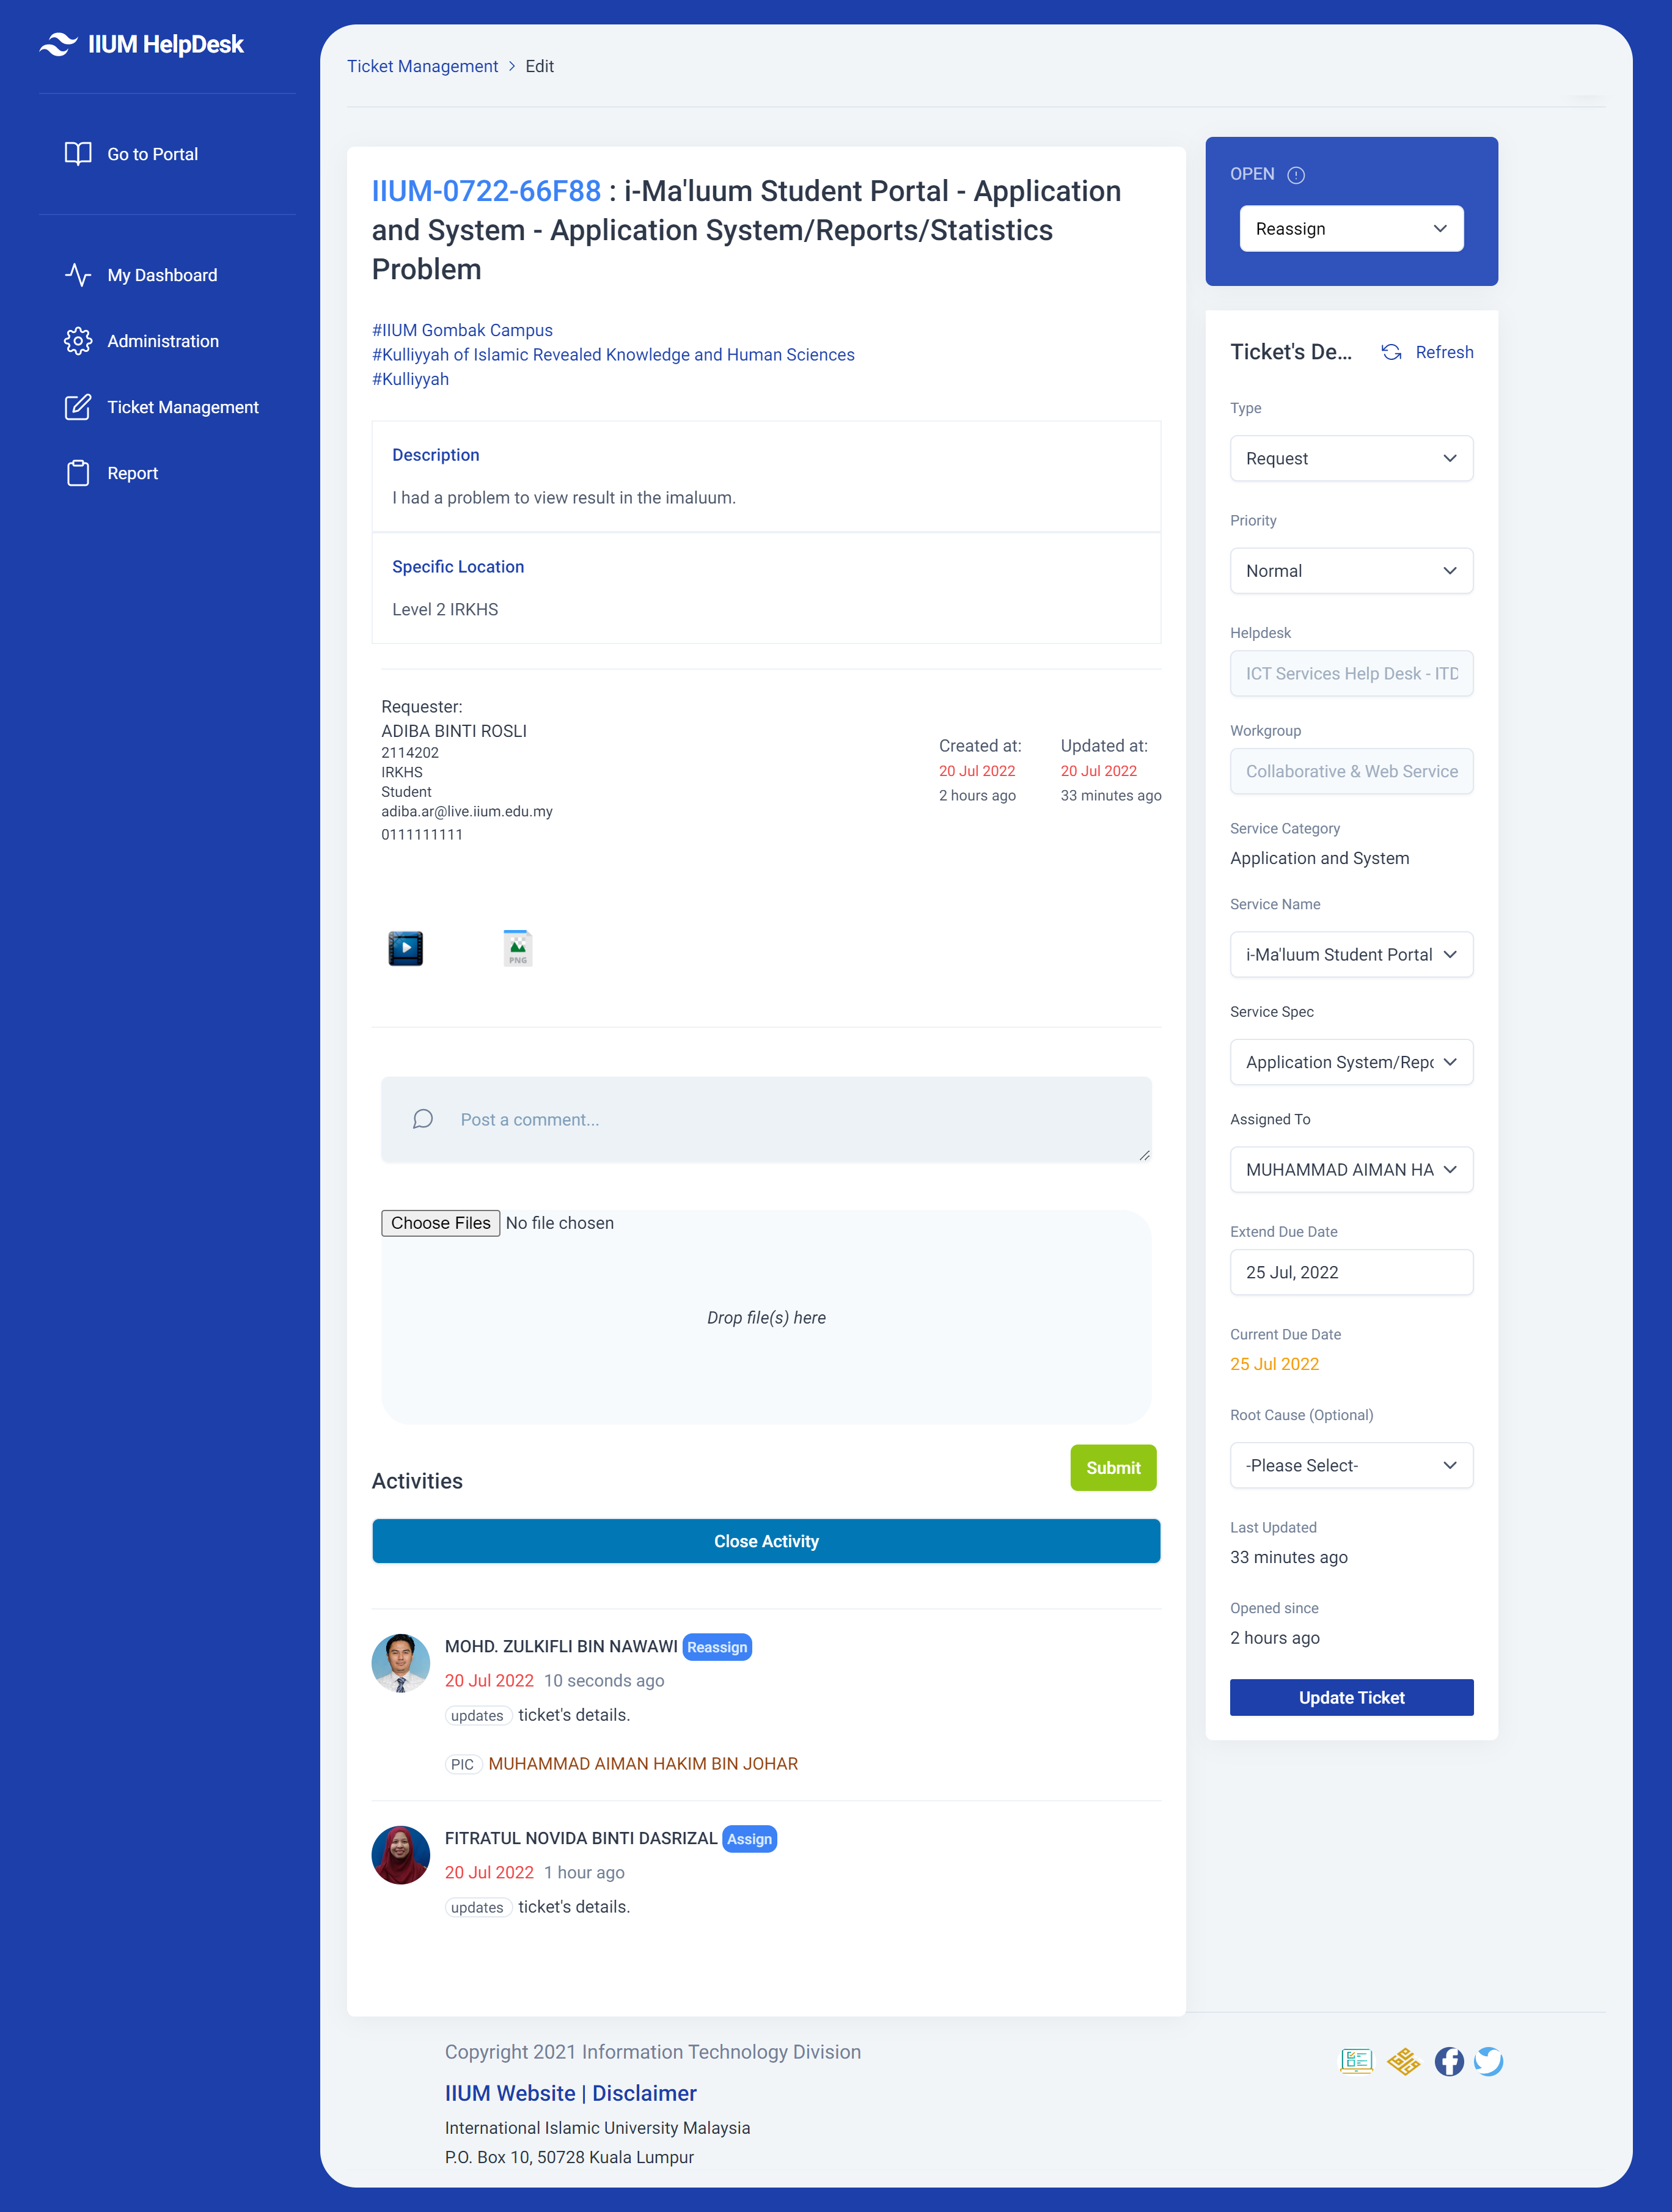
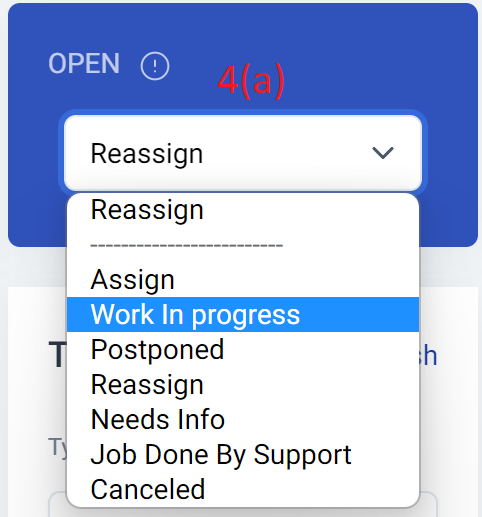
4. There are some items to be selected by the manager to update the ticket
a) Status of ticket: Work In Progress
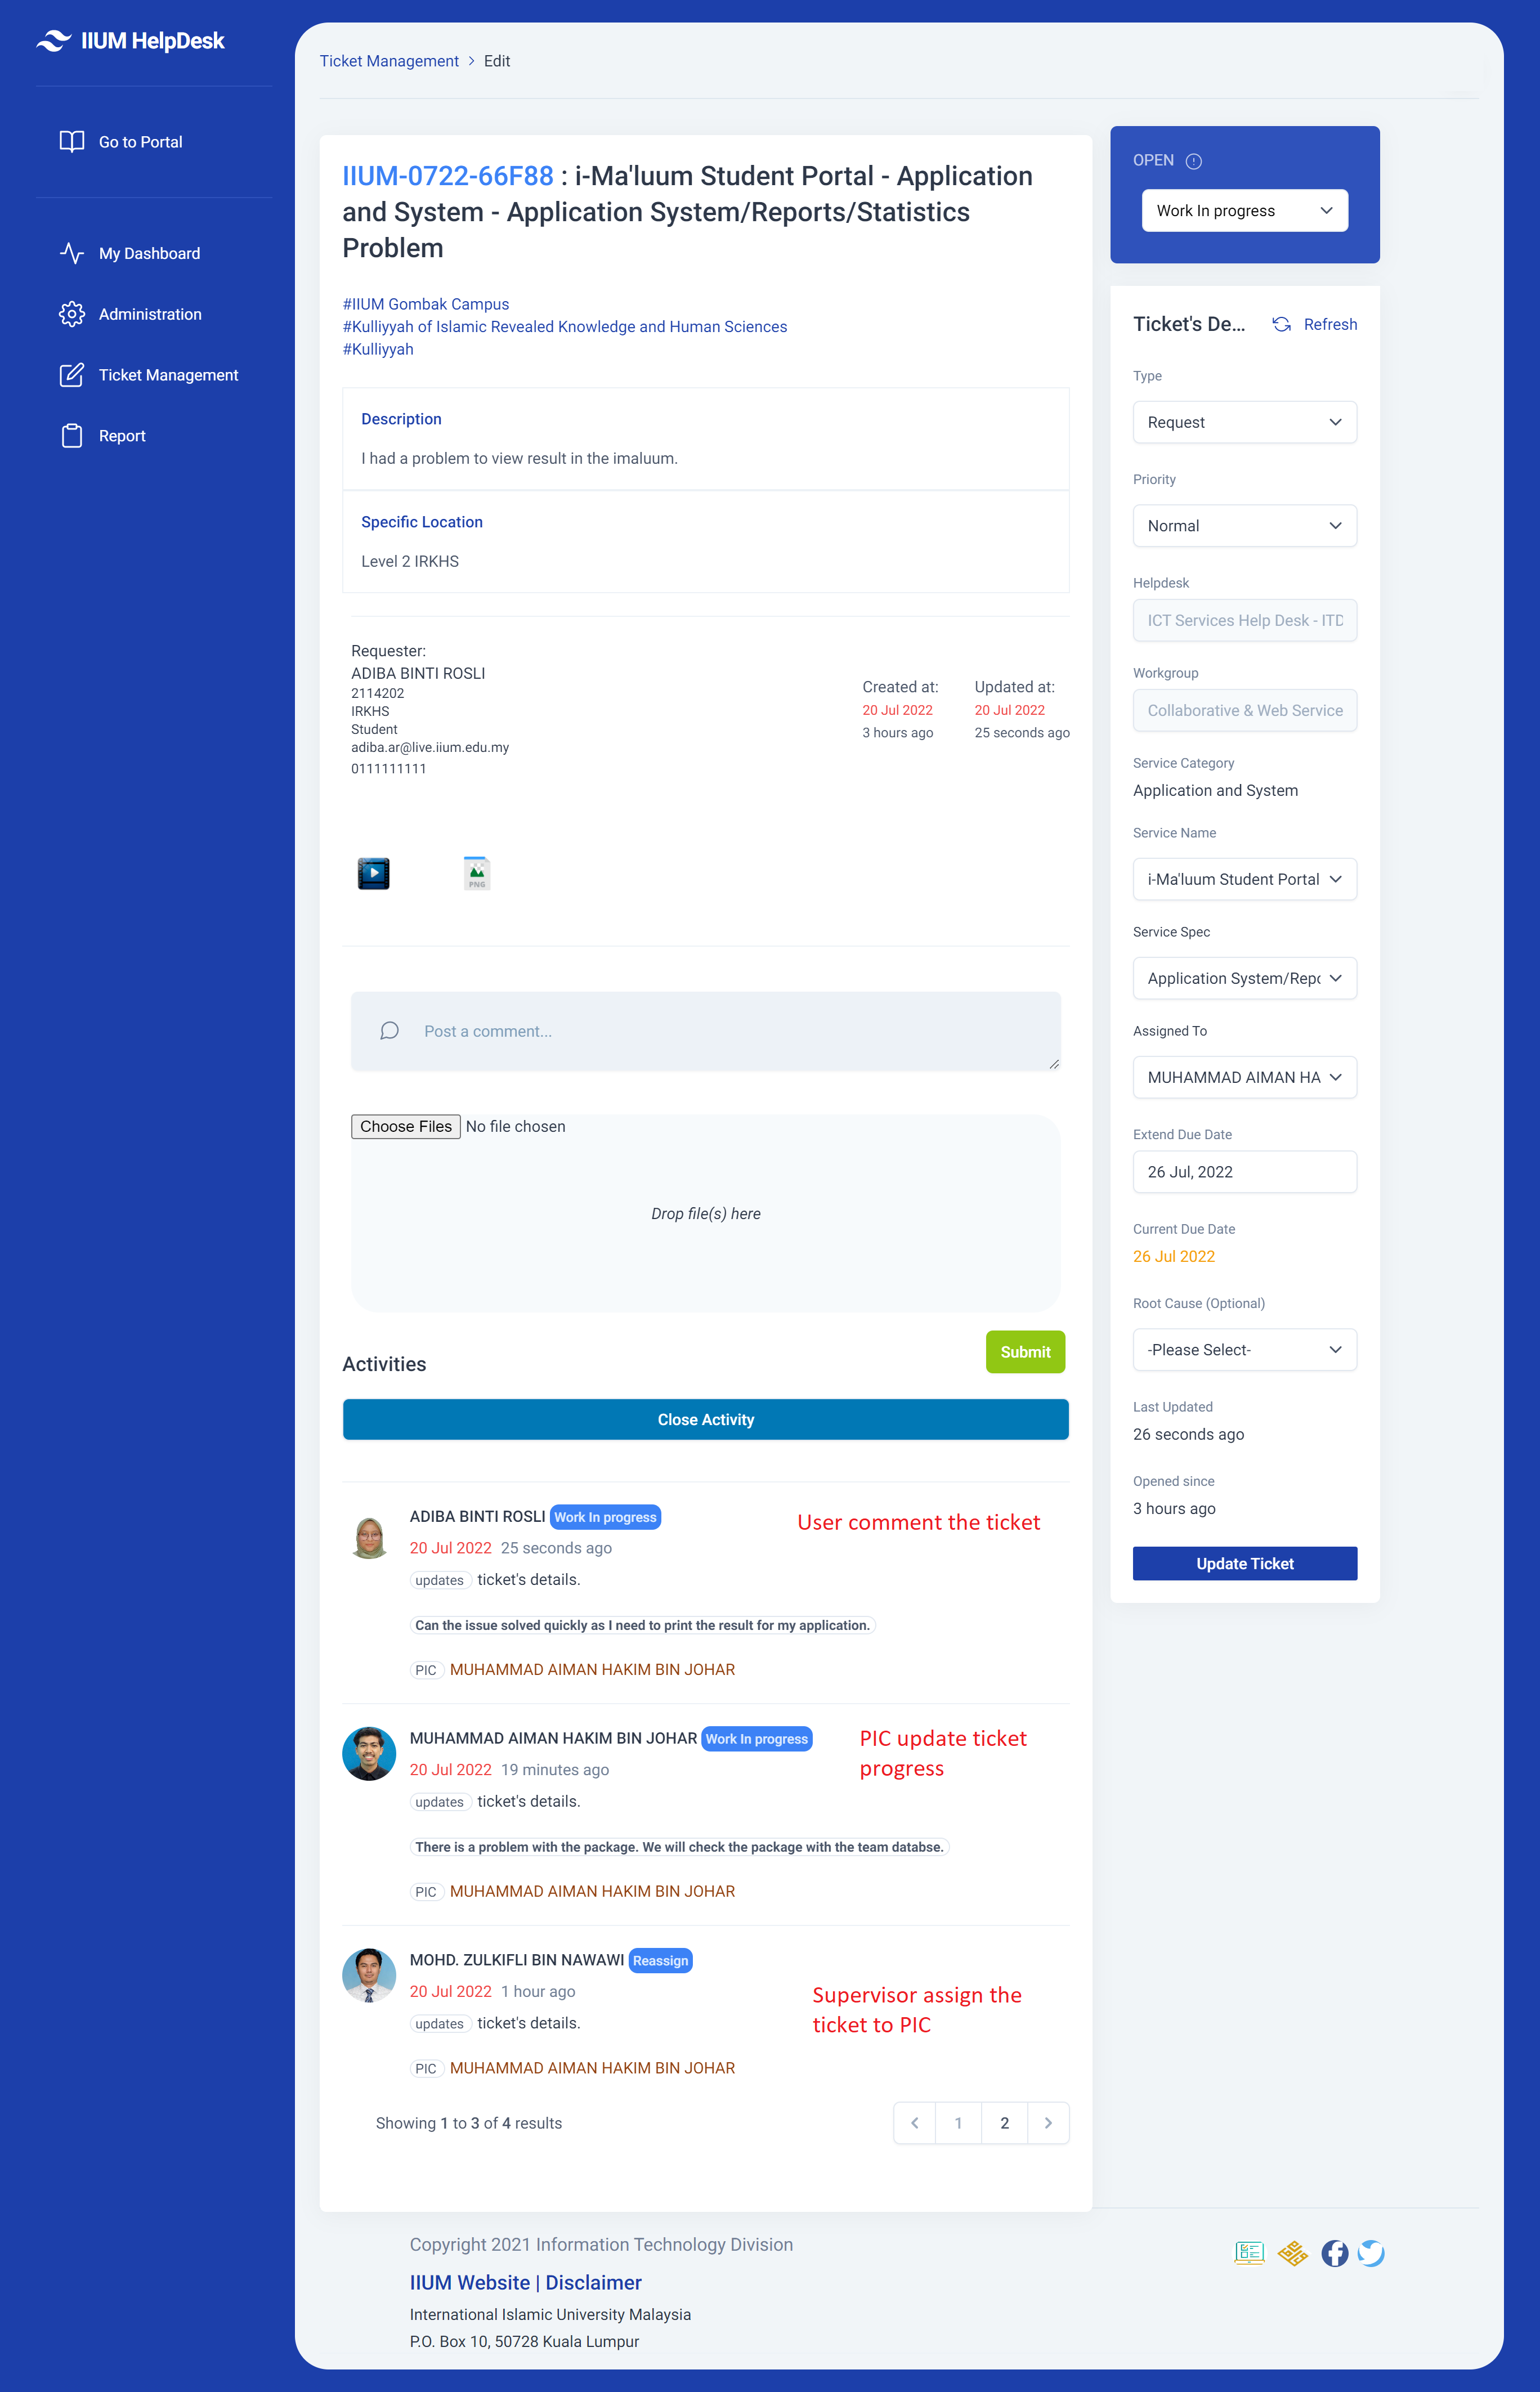
b) Ticker Progress: For example, There is a problem with the package. We will check the package with the team databse.

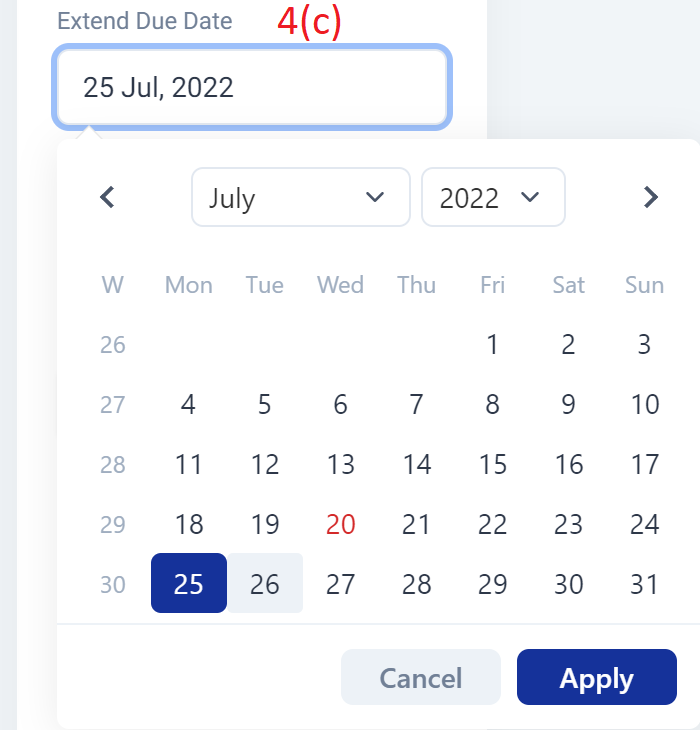

Once update, there will be a success alert pop up in the ticket management
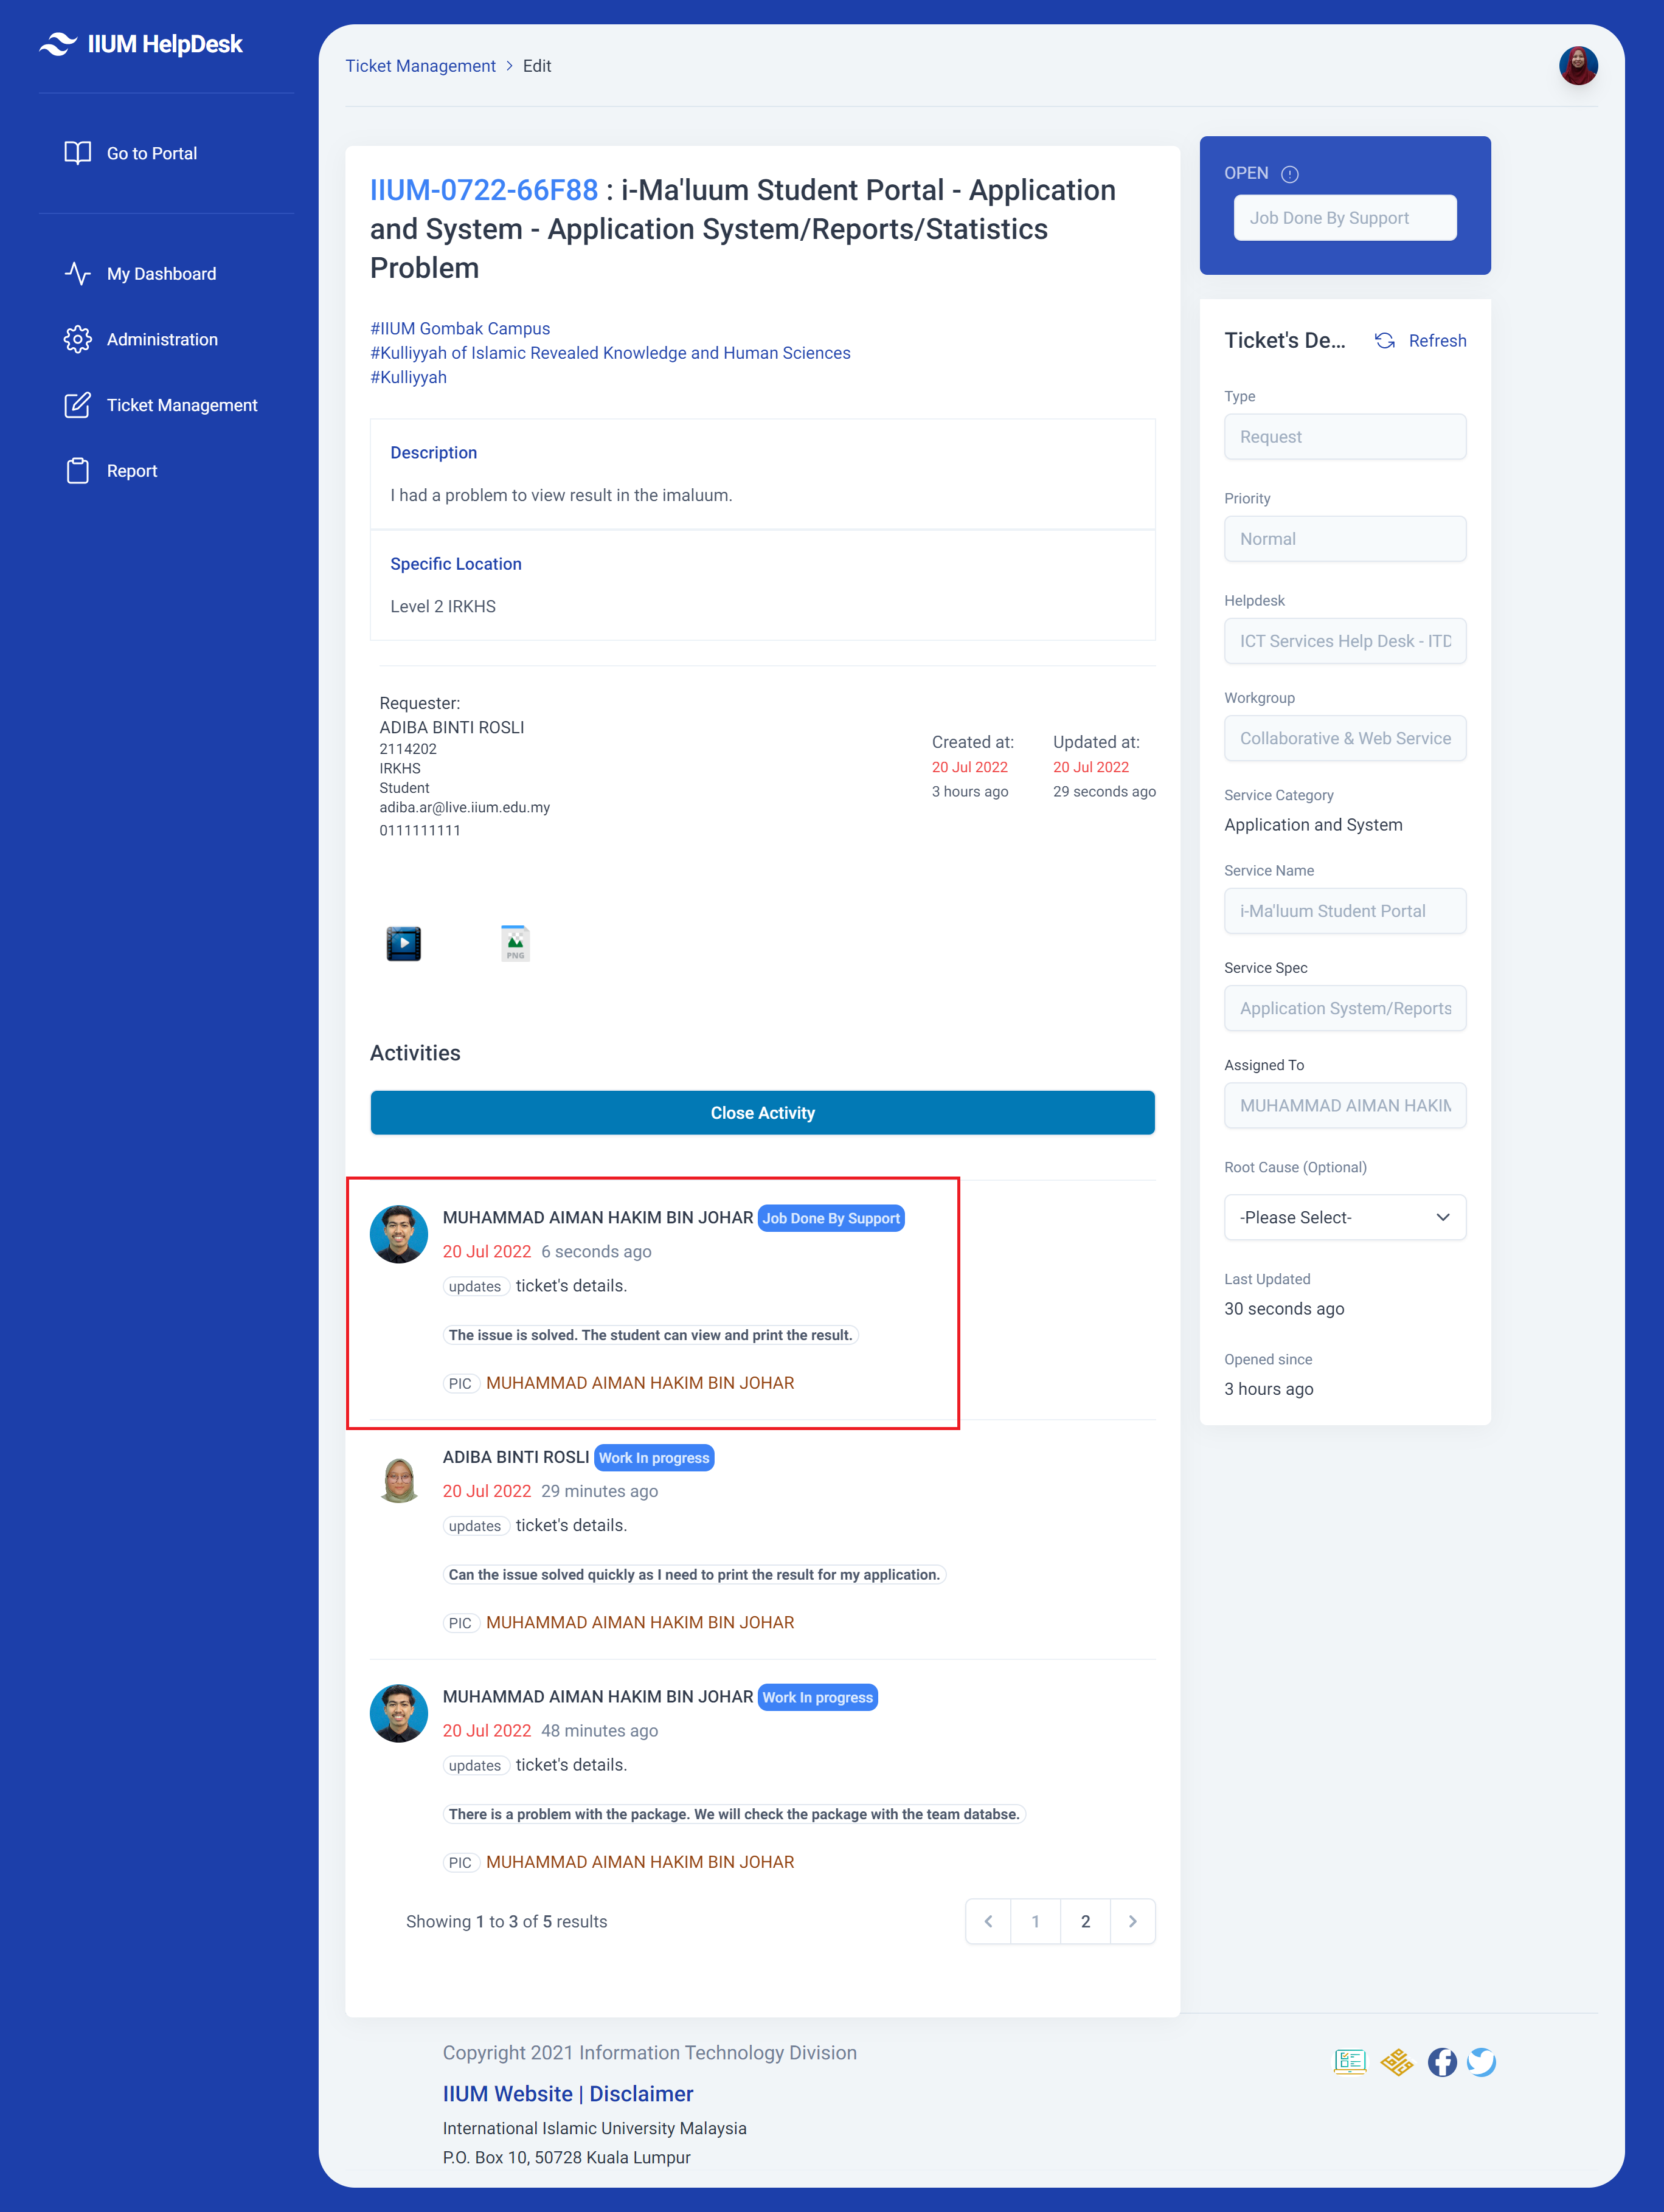
Person In Charge Job Done The Ticket
The person in charge logs in to the IIUM HelpDesk to view and manage the ticket.
1. On top of the portal, click the menu Administrator
The view of ticket management is shown below.
The person in charge may click Ticket Listing for more details on ticket management.
3. The person in charge may filter or search the ticket by typing their name in the form. Click the new ticket to update the progress.
The view of the ticket is shown below.
The person in charge may click Ticket View for more details on the ticket description.
4. There are some items to be selected by the manager to update the ticket
a) Status of ticket: Job Done
b) Ticker Progress: For example, The issue is solved. The student can view and print the result.


Once update, there will be a success alert pop up in the ticket management
Manager Close The Ticket
The manager logs in to the IIUM HelpDesk to view and manage the ticket.
1. On top of the portal, click the menu Administrator
The view of ticket management is shown below.
The manager may click Ticket Listing for more details on ticket management.
3. The manager may filter or search the ticket by typing JDS in the form. Click the ticket to close the ticket.

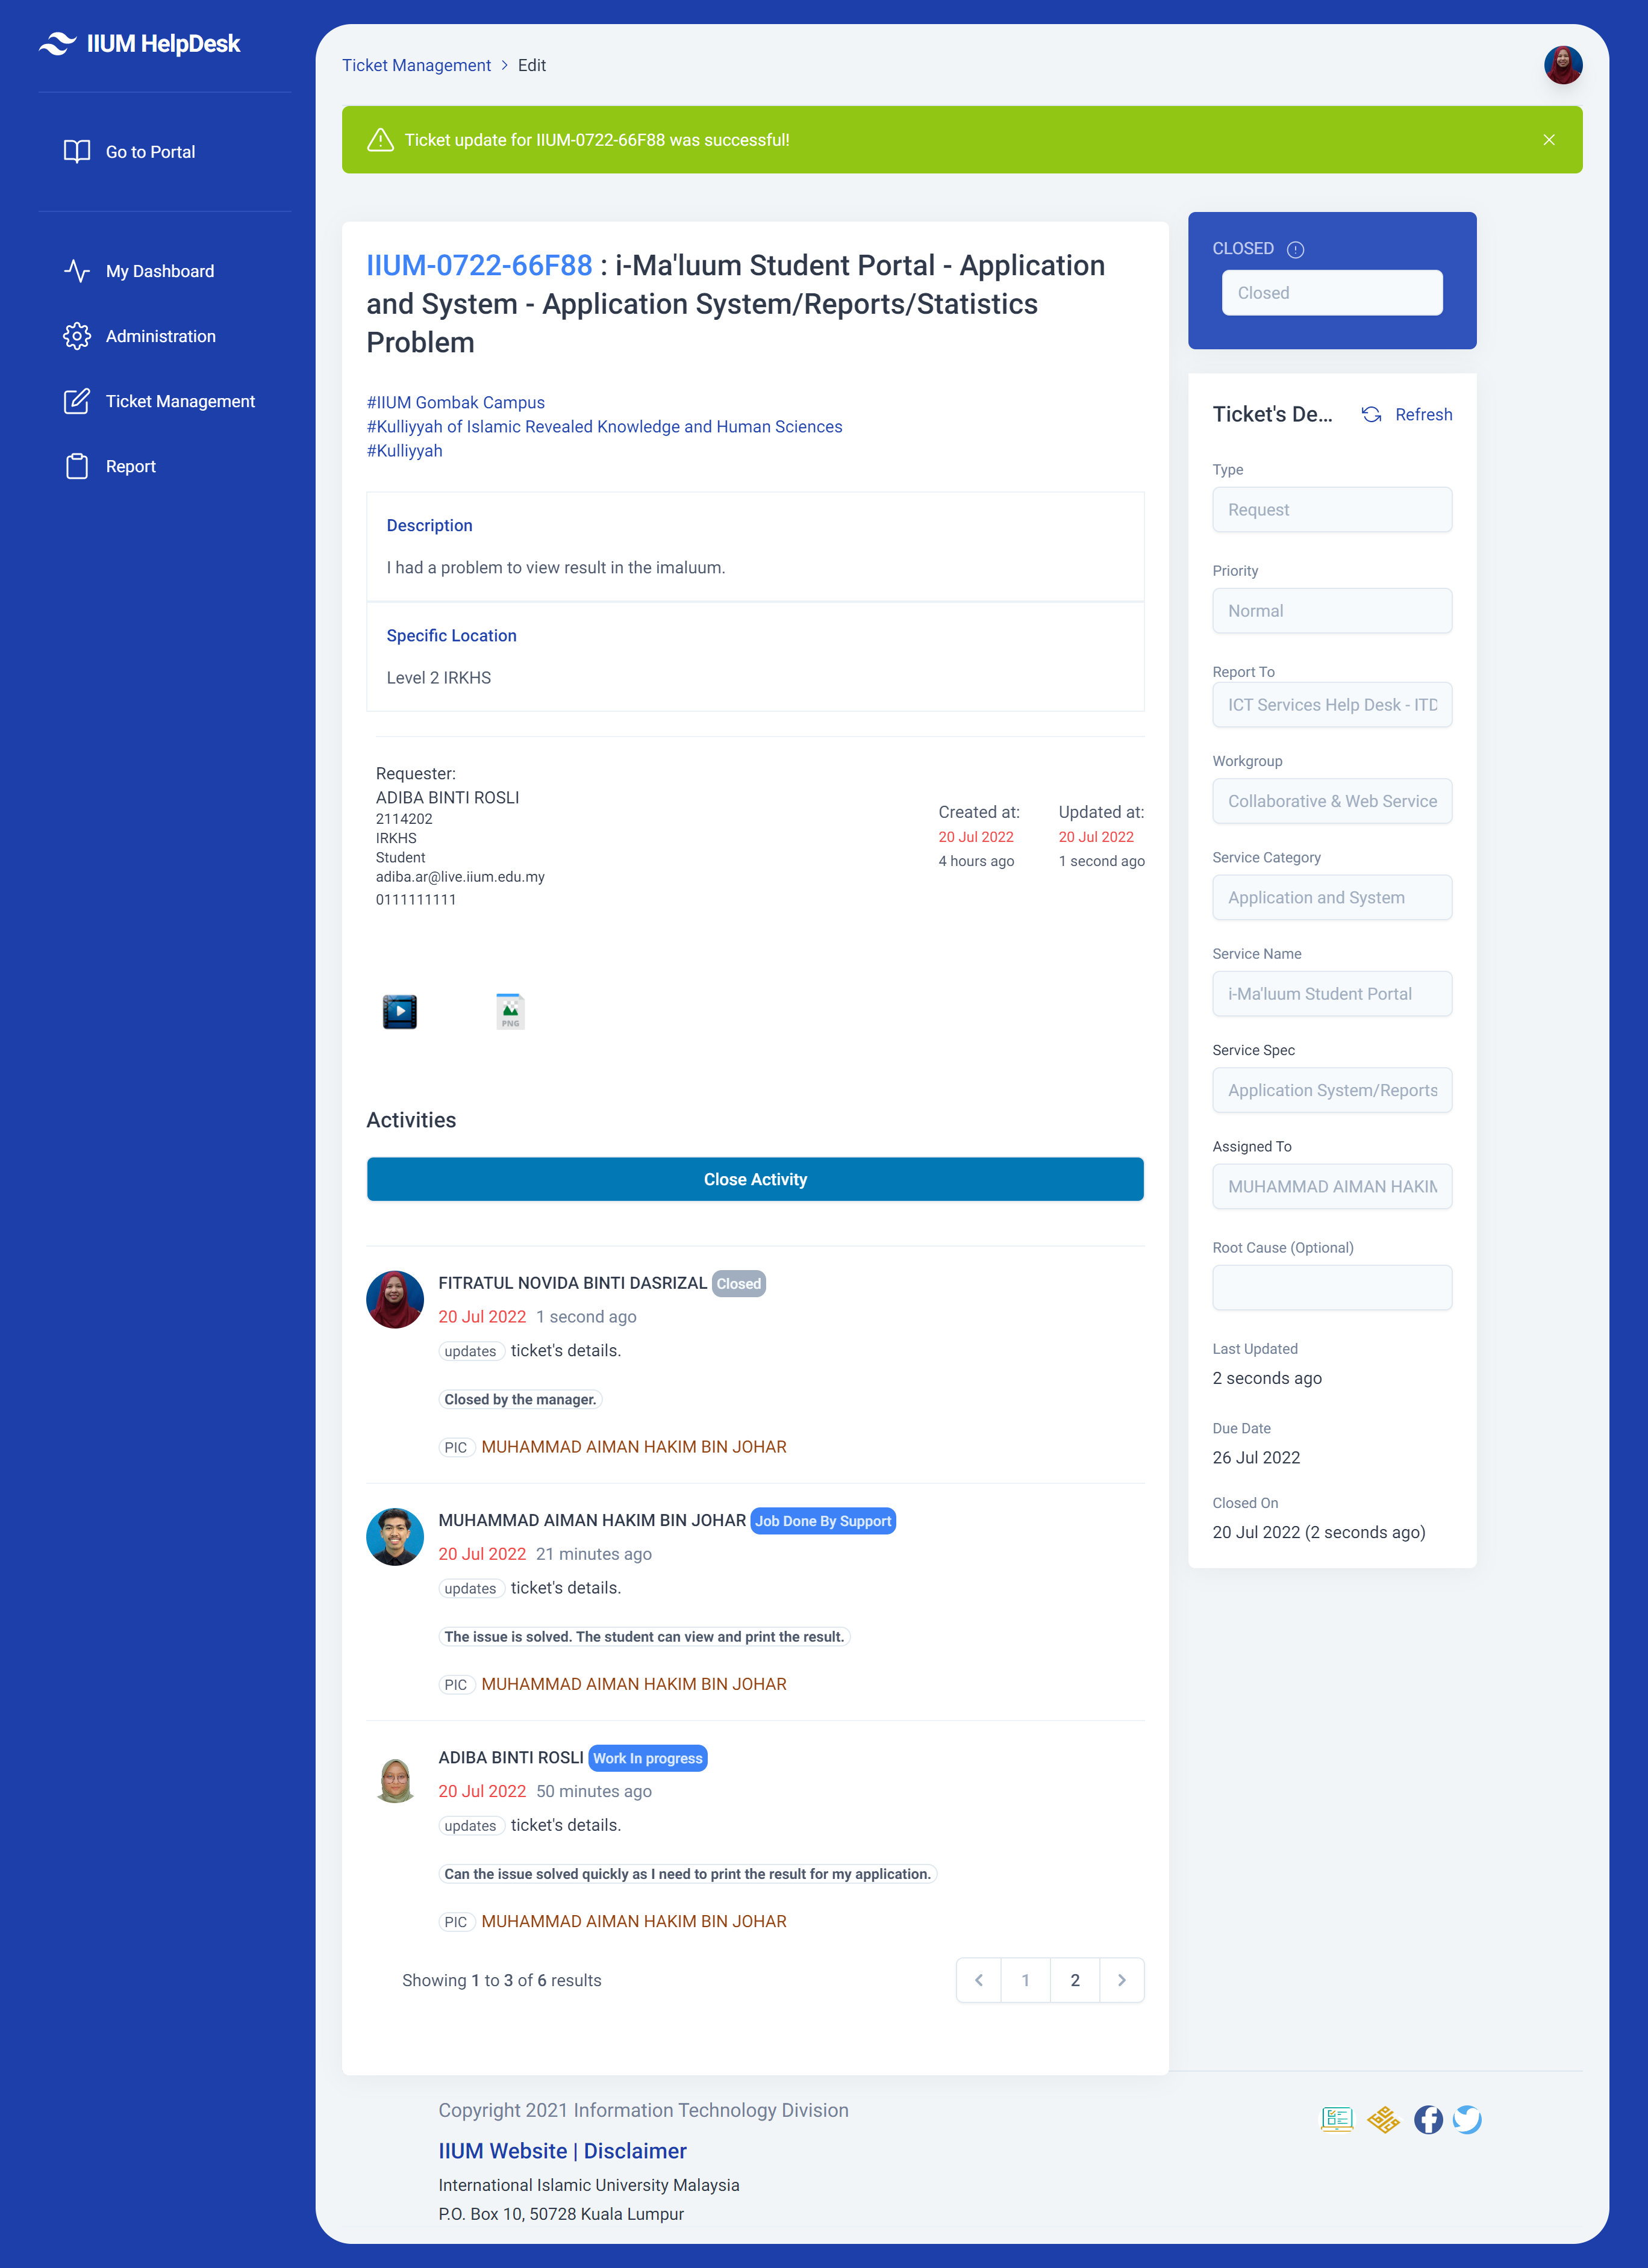
The view of the ticket is shown below.
The manager may click Ticket View for more details on the ticket description.
4. There are some items to be selected by the manager to update the ticket
a) Status of ticket: Close
b) Ticker Progress: For example, Closed by the manager.


Once update, there will be a success alert pop up in the ticket management
Ticket Management For Agent/Support
How to Login
Two Ways
1) Click on this link: Ticket Listing (iium.edu.my)
Or
2) Click on the Sign In [1], then click on IIUM Community [2] .Click on the Administrator [3] and then click on Ticket Management [4].
Notes: Login is using CAS credentials.


Ticket Listing
- This is the main list of currently available tickets for the agents/support. From here on, an agent is a synonym to support.
- The tickets are listed based on the agent's unit; either the ones that had been assigned to an agent or not yet been assigned to any agent.
- Canceled or Closed tickets are not shown. However, it can be searched based on its Ticket's Status Code
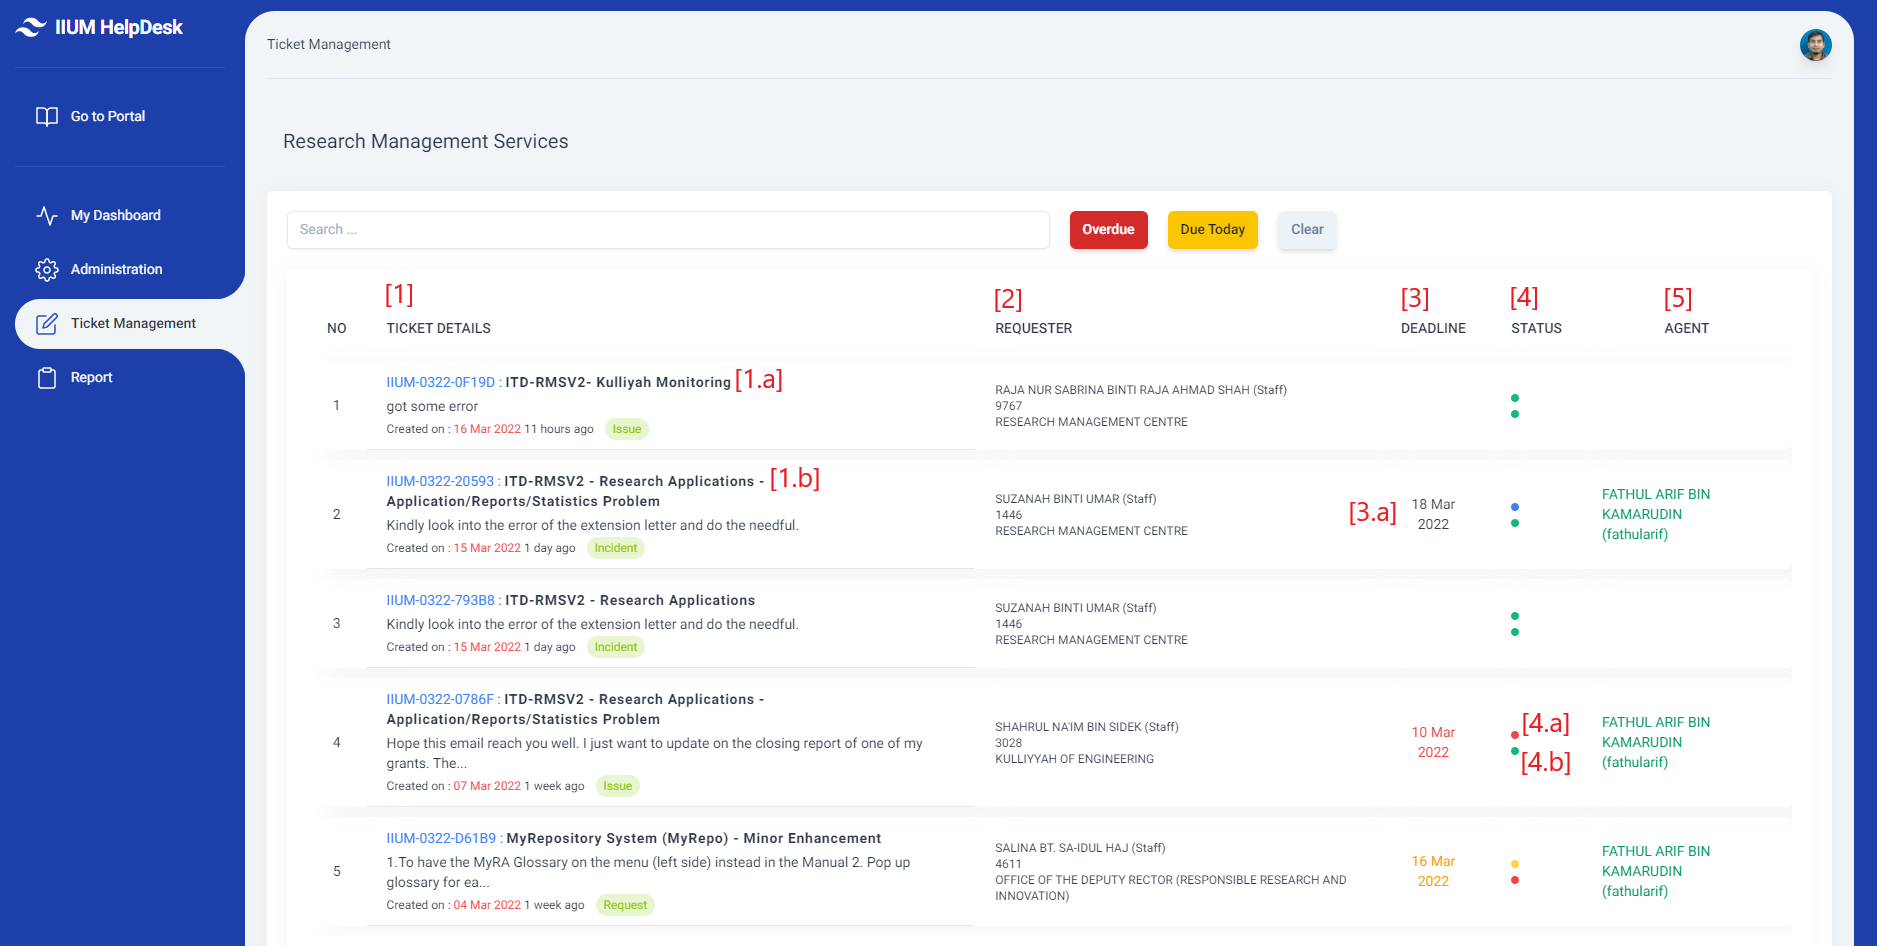
Ticket Table
Ticket Details [1]
- Shows the Ticket ID, Service Name, Service Details, Description, Date of Creation, and Ticket Type
- Click on the cell listed under the TICKET DETAILS column to update or view more info on the ticket
- A ticket will have its ticket's ID e.g IIUM-0322-Y782. The number on the middle of the dash -0322- represents the month and year the ticket was created at. -MMYY-
- Some tickets will include only Service Name [1. a] and some will include both Service Name - Service Details [1. b]. The Service Details will only appear once an agent has been assigned to the ticket. As such, a Due Date / Deadline [3] will also appear. For more info on how to assign a ticket to an agent, please visit the Ticket View Page
- A snippet of the ticket's description is shown under the Services. Click on the description to view more.
- The green-colored badge shows the ticket's type. Details on the left of it show the date of the ticket's creation
- The available types and its code are as follow
- Complaint - COM
- Incident - INC
- Inquiry - INQ
- Issue - ISU
- Request - REQ
- Standard Change - STC
- Suggestion - SUG
Requester [2]
- Shows the Name, Staff/Student Number, and KCDIO of the requester
- For more details on the requester, click on the Ticket ID [1. a]
Deadline [3]
- Shows the Due Date of the ticket
- An unassigned ticket does not have a Due Date. It will appear once the ticket has been assigned to an agent [3. a]
- The black-colored Due Date shows a ticket that has not yet reached the due
- The red-colored Due Date shows a ticket that has exceeded the due
- The yellow-colored Due Date shows a ticket that has reached the due
Status [4]
- Shows the Ticket Status and Ticket Priority
- The top-colored dot [4. a] represents Ticket Status whereas the bottom-colored dot [4. b] represents Ticket Priority
- Hover the colored-dot will show the description of each status and priority
- If the ticket's Due Date has been reached or exceeded, the current status displayed will be replaced with Due and Overdue respectively. The real status can be viewed by clicking on the ticket details [1]
- For Ticket Status,
- the green-colored dot shows the status New
- the blue-colored dot shows the status Assign, Reassign, Work In Progress, Job Done By Support, Ready to Test, and Needs Info
- the red-colored dot shows the status either Canceled or Overdue
- the yellow-colored dot shows the status Due
- the gray-colored dot shows the status Closed
- For Ticket Priority,
- the green-colored dot shows the status Normal
- the red-colored dot shows the status Higher
- the yellow-colored dot shows the status Medium
- The available statuses and its code are as follow
- Assign - ASG
- Canceled - CCL
- Closed - CLO
- Job Done By Support- JDS
- New - NEW
- Needs Info - NIF
- Postponed - POS
- Reassign - RSG
- Work In progress - WIP
- The available priorities and its code are as follow
- Higher - H
- Medium - M
- Normal - N
Agent [5]
- Shows the Agent's Name and UserId
- The details will only be displayed once the ticket has been assigned to an agent
Ticket Search

Search [1]
- Shows the input field for querying ticket's information
- Below shows the list of available terms that can be searched within the search field
- Ticket Id
- Ticket Type
- Ticket Status Code, Name
- Ticket's Description
- Requester's Name, Email, Staff Number, UserId
- A ticket with Closed or Canceled status can be searched here; e.g CLO or CCL
Overdue [2]
Due Today [3]
Clear [4]
Ticket View
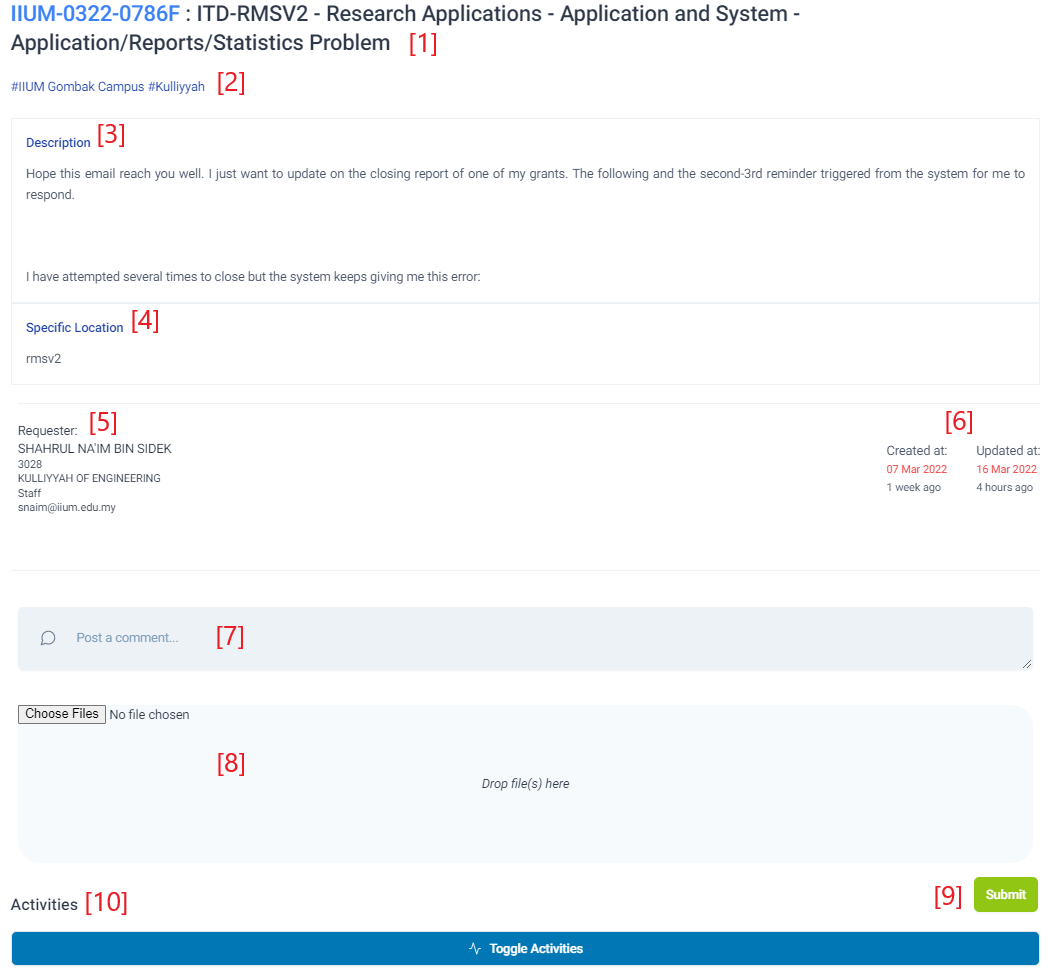
Ticket Info
- [1] shows the Ticket ID, Service Name, Service Category, and Service Details
- Ticket ID is always available. However, Service Name only appeared if it has been set by Supervisor or ServiceDesk Manager
- Service Detail only appeared if both an Agent and Service Specification has been assigned. Assigning an Agent and Service Specification can be performed by an Agent, Supervisor or ServiceDesk Manager.
- [2] shows the Campus and Location of the ticket
- [3] shows the Description of the ticket. Clicking on the header can toggle open and close
- [4] shows the Specific Location of the ticket. Clicking on the header can toggle open and close
- [5] shows the Requester's Detail of the ticket.
- [6] shows the Date Created and Date Updated of the ticket.
- Attachment may be included by requester which appears below [5] and [6]. Clicking on the attachment will open a new window to view the attachment
- [7] shows an input field to provide progress, comment, or info for the ticket
- [8] shows an input field to upload attachments when providing progress, comment, or info for the ticket
- [9] shows the Submit button to submit the progress, comment, info, or attachments for the ticket. This button can be used alongside with Update Ticket button to update the ticket
- [10] shows the Activities of the ticket. Clicking the Toggle Activities button will open or close the Activities
Ticket Activities
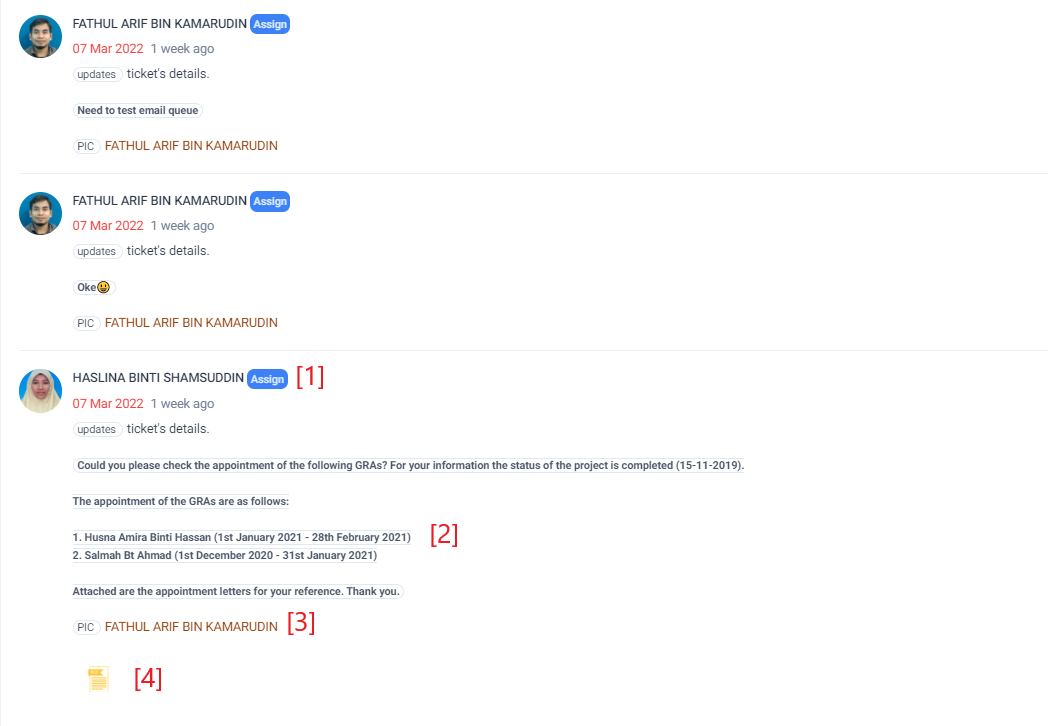
- [1] shows the Agent's/Requester's Name and Ticket Status of the ticket
- [2] shows the description, progress, comment, or info of the ticket
- [3] shows the PIC of the ticket
- [4] shows the Attachments of the ticket
Ticket Details
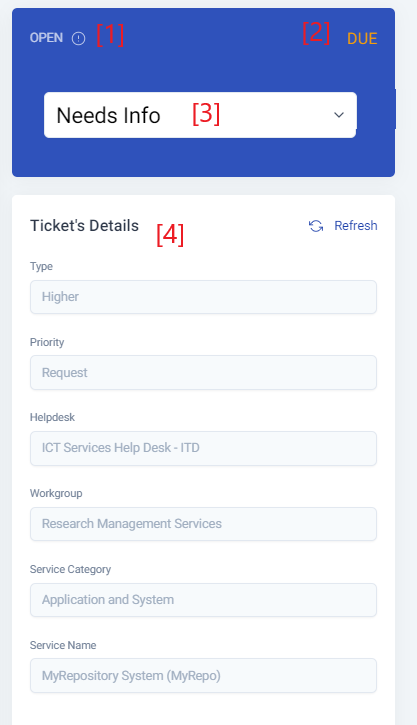
- [1] shows the ticket's State. It will show Open until the ticket's status is changed to Canceled or Closed. The ticket's State then will reflect a similar status
- [2] shows the status of Due or Overdue if the Due Date has been reached or exceeded respectively
- [3] shows the current Ticket Status. Agent, Supervisor, and ServiceDesk Manager can change its status
- [4] shows the overall ticket's details. An Agent cannot change the gray-out details. Since an Agent cannot change the details of the Ticket Type, Priority, and Service Name, it is the responsibility of the Supervisor to help make those changes on Agent's behalf
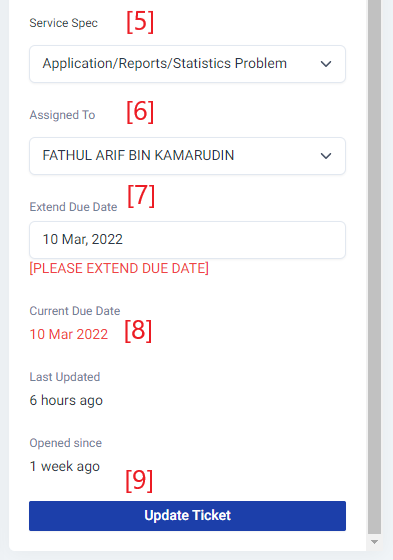
- [5] shows the Service Specification of the ticket. If selected, the PIC must also be selected
- The Service Specification list is dependent on the Service Name
- As such, if the Service Name is not specified, the Service Specification list will show empty
- If that is the case, the Supervisor can help to specify the Service Name only or Service Name, Service Specification, and PIC altogether
- [6] shows the PIC of the ticket. If selected, the Service Specification must also be selected
- The list shows the Unit Members, Unit Supervisor, and ServiceDesk Manager of the same KCDIO
- If the ticket is wrongly assigned to the Unit or KCDIO, an Agent or Supervisor can assign the ticket to the ServiceDesk Manager. Providing justification via the comment section is recommended
- [7] shows Extend Due Date field.
- An Agent is allowed to extend the due date if the Due Date has been reached or exceeded or the Current Due Date needs to be extended for any particular reason
- [PLEASE EXTEND DUE DATE] will be shown if the Due Date has been reached or exceeded
- [8] shows the Current Due Date. The default color is yellow and will change to red if the Due Date has been reached or exceeded
- [9] shows Update Ticket button. This button can be used alongside with Submit button to update the ticket
Ticket Management For Supervisor
How to Login
Two Ways
1) Click on this link: Ticket Listing (iium.edu.my)
Or
2) Click on the Sign In [1], then click on IIUM Community [2] .Click on the Administrator [3] and then click on Ticket Management [4].
Notes: Login is using CAS credentials.
Ticket Listing
- This is the main list of currently available tickets for the Supervisor. From here on, an Agent is a synonym to Support.
- The tickets are listed based on the selected unit [1]; either the ones that had been assigned to the Supervisor (if the Supervisor is on the same selected unit), an Agent (of the selected unit), or not yet been assigned to any Agent or Supervisor.
- Canceled or Closed tickets are not shown. However, it can be searched based on its Ticket's Status Code
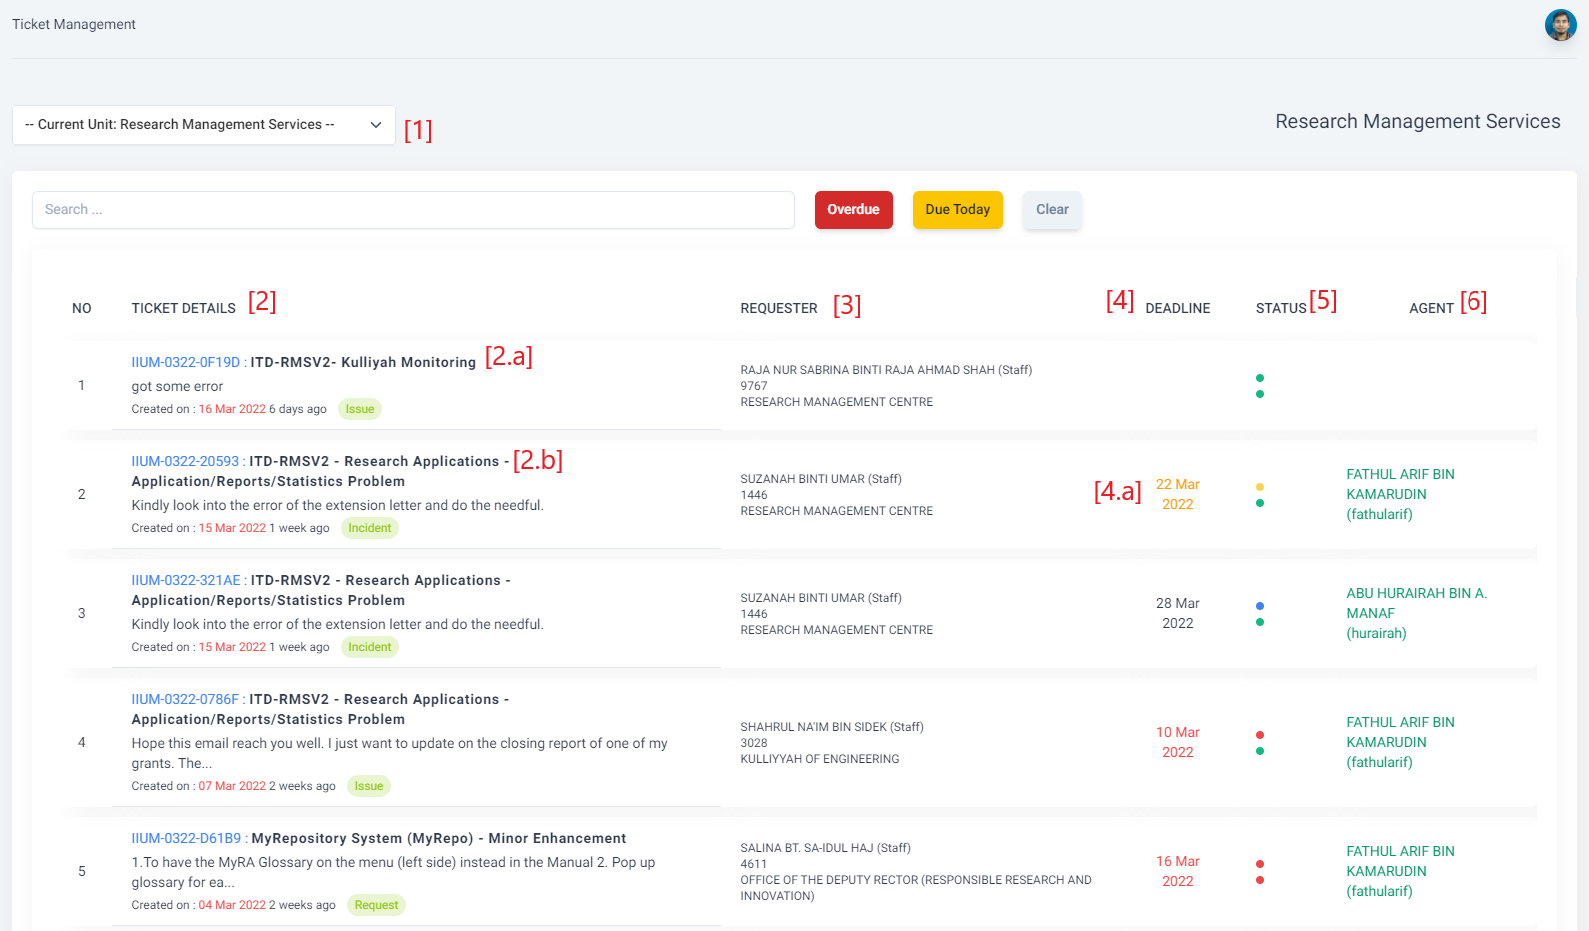
Ticket Table
Unit/Workgroup [1]
- Shows the selected Supervisor's and Subordinate's Unit. The Unit is also known as Workgroup
- Supervisor's own Unit is indicated by --Current Unit:
- The tickets are listed based on the Unit Name. Selecting different Unit Name (Subordinate's) will list out tickets of that particular Unit
Ticket Details [2]
- Shows the Ticket ID, Service Name, Service Details, Description, Date of Creation, and Ticket Type
- Click on the cell listed under the TICKET DETAILS column to update or view more info on the ticket
- A ticket will have its ticket's ID e.g IIUM-0322-Y782. The number on the middle of the dash -0322- represents the month and year the ticket was created at. -MMYY-
- Some tickets will only include only Service Name [2. a] and some will include both Service Name - Service Details [2 b]. The Service Details will only appear once an agent has been assigned to the ticket. As such, a Due Date / Deadline [4] will also appear. For more info on how to assign a ticket to an agent, please visit the Ticket View Page
- A snippet of the ticket's description is shown under the Services. Click on the description to view more.
- The green-colored badge shows the ticket's type. Details on the left of it show the date of the ticket's creation
- The available types and its code are as follow
- Complaint - COM
- Incident - INC
- Inquiry - INQ
- Issue - ISU
- Request - REQ
- Standard Change - STC
- Suggestion - SUG
Requester [3]
- Shows the Name, Staff/Student Number, and KCDIO of the requester
- For more details on the requester, click on the Ticket ID [2. a]
Deadline [4]
- Shows the Due Date of the ticket
- An unassigned ticket does not have a Due Date. It will appear once the ticket has been assigned to an agent [4. a]
- The black-colored Due Date shows a ticket that has not yet reached the due
- The red-colored Due Date shows a ticket that has exceeded the due
- The yellow-colored Due Date shows a ticket that has reached the due
Status [5]
- Shows the Ticket Status and Ticket Priority
- The top-colored dot [5. a] represents Ticket Status whereas the bottom-colored dot [5. b] represents Ticket Priority
- Hover the colored-dot will show the description of each status and priority
- If the ticket's Due Date has been reached or exceeded, the current status displayed will be replaced with Due and Overdue respectively. The real status can be viewed by clicking on the ticket details [2]
- For Ticket Status,
- the green-colored dot shows the status New
- the blue-colored dot shows the status Assign, Reassign, Work In Progress, Job Done By Support, Ready to Test, and Needs Info
- the red-colored dot shows the status either Canceled or Overdue
- the yellow-colored dot shows the status Due
- the gray-colored dot shows the status Closed
- For Ticket Priority,
- the green-colored dot shows the status Normal
- the red-colored dot shows the status Higher
- the yellow-colored dot shows the status Medium
- The available statuses and its code are as follow
- Assign - ASG
- Canceled - CCL
- Closed - CLO
- Job Done By Support- JDS
- New - NEW
- Needs Info - NIF
- Postponed - POS
- Reassign - RSG
- Work In progress - WIP
- The available priorities and its code are as follow
- Higher - H
- Medium - M
- Normal - N
Agent [6]
- Shows the Agent's Name and UserId
- The details will only be displayed once the ticket has been assigned to an agent
Ticket Search
Search [1]
- Shows the input field for querying ticket's information
- Below shows the list of available terms that can be searched within the search field
- Ticket Id
- Ticket Type
- Ticket Status Code, Name
- Ticket's Description
- Requester's Name, Email, Staff Number, UserId
- A ticket with Closed or Canceled status can be searched here; e.g CLO or CCL
Overdue [2]
Due Today [3]
Clear [4]
Ticket View
Ticket Info
- [1] shows the Ticket ID, Service Name, Service Category, and Service Details
- Ticket ID is always available. However, Service Name only appeared if it has been set by Supervisor or ServiceDesk Manager
- Service Detail only appeared if both an Agent and Service Specification has been assigned. Assigning an Agent and Service Specification can be performed by an Agent, Supervisor or ServiceDesk Manager.
- [2] shows the Campus and Location of the ticket
- [3] shows the Description of the ticket. Clicking on the header can toggle open and close
- [4] shows the Specific Location of the ticket. Clicking on the header can toggle open and close
- [5] shows the Requester's Detail of the ticket.
- [6] shows the Date Created and Date Updated of the ticket.
- Attachment may be included by requester which appears below [5] and [6]. Clicking on the attachment will open a new window to view the attachment
- [7] shows an input field to provide progress, comment, or info for the ticket
- [8] shows an input field to upload attachments when providing progress, comment, or info for the ticket
- [9] shows the Submit button to submit the progress, comment, info, or attachments for the ticket. This button can be used alongside with Update Ticket button to update the ticket
- [10] shows the Activities of the ticket. Clicking the Toggle Activities button will open or close the Activities
Ticket Activities
- [1] shows the Agent's/Requester's Name and Ticket Status of the ticket
- [2] shows the description, progress, comment, or info of the ticket
- [3] shows the PIC of the ticket
- [4] shows the Attachments of the ticket
Ticket Details
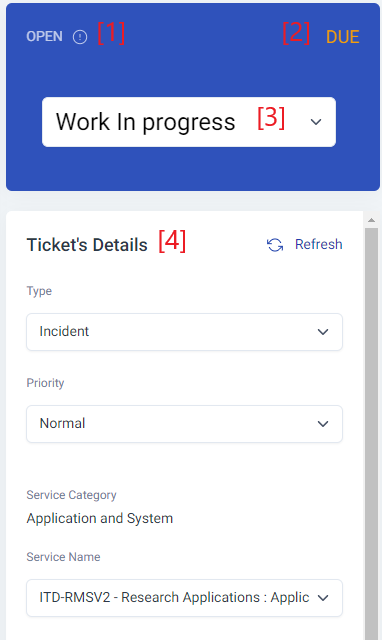
- [1] shows the ticket's State. It will show Open until the ticket's status is changed to Canceled or Closed. The ticket's State then will reflect a similar status
- [2] shows the status of Due or Overdue if the Due Date has been reached or exceeded respectively
- [3] shows the current Ticket Status. Agent, Supervisor, and ServiceDesk Manager can change its status
- [4] shows the overall ticket's details which can be changed by Supervisor. Since an Agent cannot change the details of the Ticket Type, Priority, and Service Name, it is the responsibility of the Supervisor to help make those changes on Agent's behalf
- [5] shows the Service Specification of the ticket. If selected, the PIC must also be selected
- The Service Specification list is dependent on the Service Name
- As such, if the Service Name is not specified, the Service Specification list will show empty
- If that is the case, the Supervisor can help to specify the Service Name only or Service Name, Service Specification, and PIC altogether
- [6] shows the PIC of the ticket. If selected, the Service Specification must also be selected
- The list shows the Unit Members, Unit Supervisor, and ServiceDesk Manager of the same KCDIO
- If the ticket is wrongly assigned to the Unit or KCDIO, an Agent or Supervisor can assign the ticket to the ServiceDesk Manager. Providing justification via the comment section is recommended
- [7] shows Extend Due Date field.
- An Agent or Supervisor is allowed to extend the due date if the Due Date has been reached or exceeded or the Current Due Date needs to be extended for any particular reason
- [PLEASE EXTEND DUE DATE] will be shown if the Due Date has been reached or exceeded
- [8] shows the Current Due Date. The default color is yellow and will change to red if the Due Date has been reached or exceeded
- [9] shows Update Ticket button. This button can be used alongside with Submit button to update the ticket
Ticket Management For ServiceDesk Manager
How To Login
Two Ways
1) Click on this link: Ticket Listing (iium.edu.my)
Or
2) Click on the Sign In [1], then click on IIUM Community [2]. Click on the Administrator [3] and then click on Ticket Management [4].
Notes: Login is using CAS credentials.
Ticket Listing
- This is the main list of currently available tickets for the ServiceDesk Manager. From here on, an Agent is a synonym to Support.
- The tickets are listed based on the selected Unit of ServiceDesk Manager's KCDIO [1]; either the ones that had been assigned to an agent or not yet been assigned to any agent.
- Canceled or Closed tickets are not shown. However, it can be searched based on its Ticket's Status Code
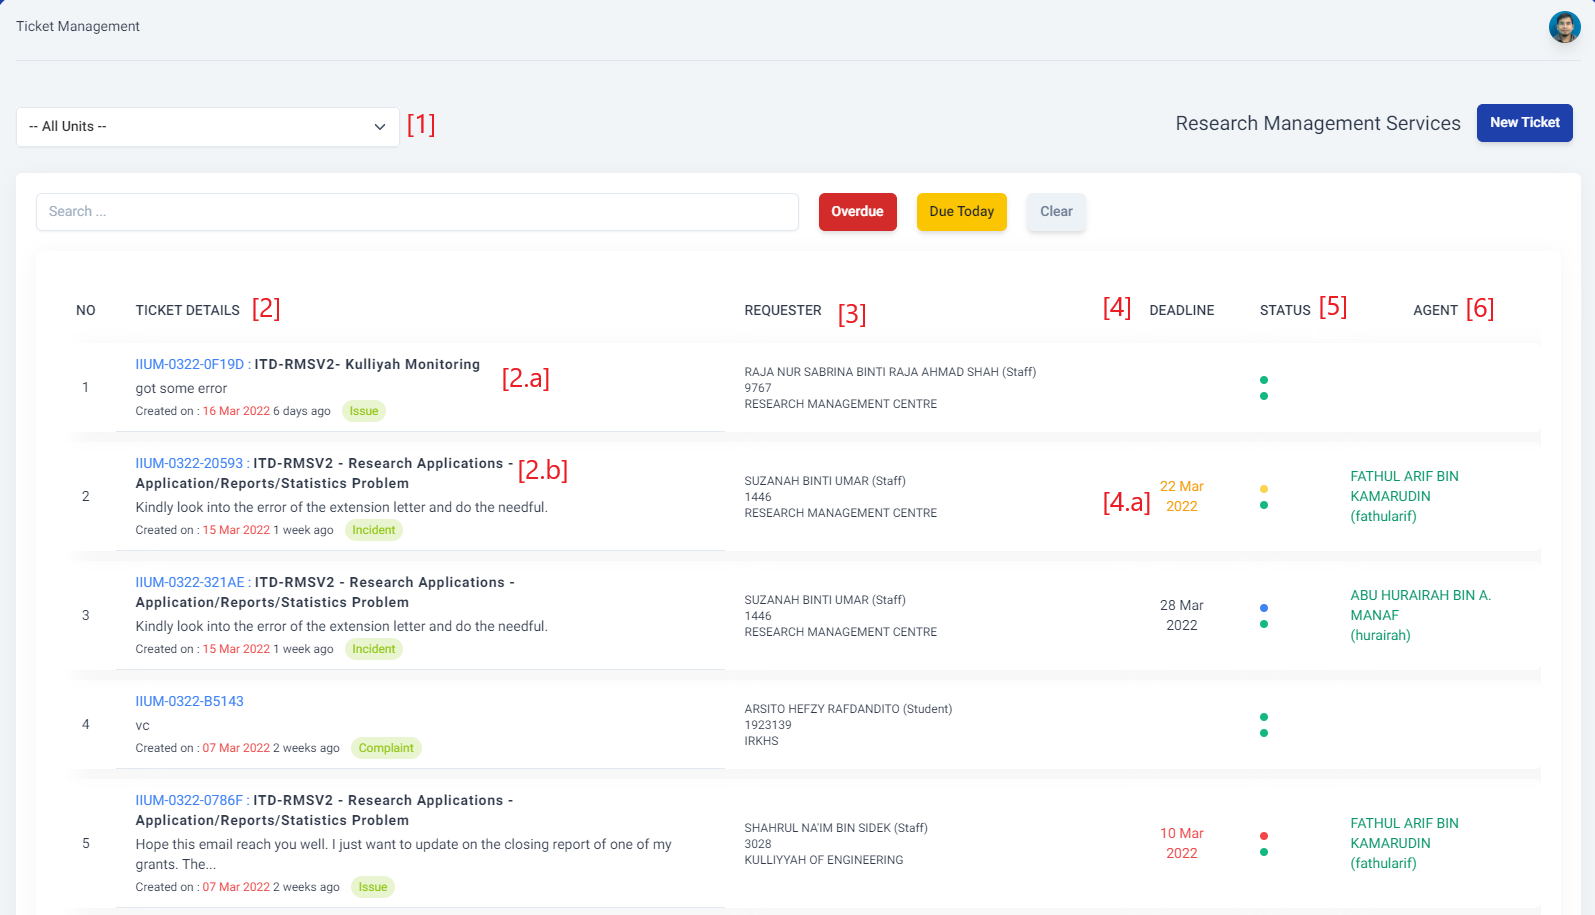
Ticket Table
Unit/Workgroup [1]
- Shows the selected Unit available under ServiceDesk Manager's KCDIO. The Unit is also known as Workgroup
- By default, --All Unit -- is selected which listed out all of the tickets under different Units
- The tickets are listed based on the Unit Name. Selecting different Unit Name will list out tickets of that particular Unit
Ticket Details [2]
- Shows the Ticket ID, Service Name, Service Details, Description, Date of Creation, and Ticket Type
- Click on the cell listed under the TICKET DETAILS column to update or view more info on the ticket
- A ticket will have its ticket's ID e.g IIUM-0322-Y782. The number on the middle of the dash -0322- represents the month and year the ticket was created at. -MMYY-
- Some tickets will only include only Service Name [2. a] and some will include both Service Name - Service Details [2 b]. The Service Details will only appear once an agent has been assigned to the ticket. As such, a Due Date / Deadline [4] will also appear. For more info on how to assign a ticket to an agent, please visit the Ticket View Page
- A snippet of the ticket's description is shown under the Services. Click on the description to view more.
- The green-colored badge shows the ticket's type. Details on the left of it show the date of the ticket's creation
- The available types and its code are as follow
- Complaint - COM
- Incident - INC
- Inquiry - INQ
- Issue - ISU
- Request - REQ
- Standard Change - STC
- Suggestion - SUG
Requester [3]
- Shows the Name, Staff/Student Number, and KCDIO of the requester
- For more details on the requester, click on the Ticket ID [2. a]
Deadline [4]
- Shows the Due Date of the ticket
- An unassigned ticket does not have a Due Date. It will appear once the ticket has been assigned to an agent [4. a]
- The black-colored Due Date shows a ticket that has not yet reached the due
- The red-colored Due Date shows a ticket that has exceeded the due
- The yellow-colored Due Date shows a ticket that has reached the due
Status [5]
- Shows the Ticket Status and Ticket Priority
- The top-colored dot [5. a] represents Ticket Status whereas the bottom-colored dot [5. b] represents Ticket Priority
- Hover the colored-dot will show the description of each status and priority
- If the ticket's Due Date has been reached or exceeded, the current status displayed will be replaced with Due and Overdue respectively. The real status can be viewed by clicking on the ticket details [2]
- For Ticket Status,
- the green-colored dot shows the status New
- the blue-colored dot shows the status Assign, Reassign, Work In Progress, Job Done By Support, Ready to Test, and Needs Info
- the red-colored dot shows the status either Canceled or Overdue
- the yellow-colored dot shows the status Due
- the gray-colored dot shows the status Closed
- For Ticket Priority,
- the green-colored dot shows the status Normal
- the red-colored dot shows the status Higher
- the yellow-colored dot shows the status Medium
- The available statuses and its code are as follow
- Assign - ASG
- Canceled - CCL
- Closed - CLO
- Job Done By Support- JDS
- New - NEW
- Needs Info - NIF
- Postponed - POS
- Reassign - RSG
- Work In progress - WIP
- The available priorities and its code are as follow
- Higher - H
- Medium - M
- Normal - N
Agent [6]
- Shows the Agent's Name and UserId
- The details will only be displayed once the ticket has been assigned to an agent
Ticket Search
Search [1]
- Shows the input field for querying ticket's information
- Below shows the list of available terms that can be searched within the search field
- Ticket Id
- Ticket Type
- Ticket Status Code, Name
- Ticket's Description
- Requester's Name, Email, Staff Number, UserId
- A ticket with Closed or Canceled status can be searched here; e.g CLO or CCL
Overdue [2]
Due Today [3]
Clear [4]
Ticket View
Ticket Info
- [1] shows the Ticket ID, Service Name, Service Category, and Service Details
- Ticket ID is always available. However, Service Name only appeared if it has been set by Supervisor or ServiceDesk Manager
- Service Detail only appeared if both an Agent and Service Specification has been assigned. Assigning an Agent and Service Specification can be performed by an Agent, Supervisor or ServiceDesk Manager.
- [2] shows the Campus and Location of the ticket
- [3] shows the Description of the ticket. Clicking on the header can toggle open and close
- [4] shows the Specific Location of the ticket. Clicking on the header can toggle open and close
- [5] shows the Requester's Detail of the ticket.
- [6] shows the Date Created and Date Updated of the ticket.
- Attachment may be included by requester which appears below [5] and [6]. Clicking on the attachment will open a new window to view the attachment
- [7] shows an input field to provide progress, comment, or info for the ticket
- [8] shows an input field to upload attachments when providing progress, comment, or info for the ticket
- [9] shows the Submit button to submit the progress, comment, info, or attachments for the ticket. This button can be used alongside with Update Ticket button to update the ticket
- [10] shows the Activities of the ticket. Clicking the Toggle Activities button will open or close the Activities
Ticket Activities
- [1] shows the Agent's/Requester's Name and Ticket Status of the ticket
- [2] shows the description, progress, comment, or info of the ticket
- [3] shows the PIC of the ticket
- [4] shows the Attachments of the ticket
Ticket Details
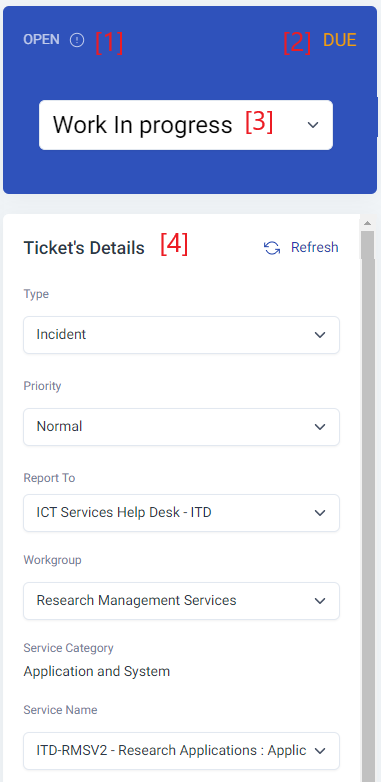
- [1] shows the ticket's State. It will show Open until the ticket's status is changed to Canceled or Closed. The ticket's State then will reflect a similar status
- [2] shows the status of Due or Overdue if the Due Date has been reached or exceeded respectively
- [3] shows the current Ticket Status. Agent, Supervisor, and ServiceDesk Manager can change its status
- [4] shows the overall ticket's details which can be changed by ServiceDesk Manager.
- All details can be changed by ServiceDesk Manager
- Since an Agent cannot change the details of the Ticket Type, Priority, and Service Name, it is the responsibility of the Supervisor to help make those changes on Agent's behalf.
- However, Supervisor cannot change the Report To and Workgroup. ServiceDesk Manager is responsible to help make those changes (Report To and Workgroup) on Supervisor's and Agent's behalf
- [5] shows the Service Specification of the ticket. If selected, the PIC must also be selected
- The Service Specification list is dependent on the Service Name
- As such, if the Service Name is not specified, the Service Specification list will show empty
- If that is the case, the Supervisor can help to specify the Service Name only or Service Name, Service Specification, and PIC altogether
- [6] shows the PIC of the ticket. If selected, the Service Specification must also be selected
- The list shows the Unit Members, Unit Supervisor, and ServiceDesk Manager of the same KCDIO
- If the ticket is wrongly assigned to the Unit or KCDIO, an Agent or Supervisor can assign the ticket to the ServiceDesk Manager. Providing justification via the comment section is recommended
- [7] shows Extend Due Date field.
- An Agent, Supervisor, or ServiceDesk Manager is allowed to extend the due date if the Due Date has been reached or exceeded or the Current Due Date needs to be extended for any particular reason
- [PLEASE EXTEND DUE DATE] will be shown if the Due Date has been reached or exceeded
- [8] shows the Current Due Date. The default color is yellow and will change to red if the Due Date has been reached or exceeded
- [9] shows Update Ticket button. This button can be used alongside with Submit button to update the ticket
Ticket Create
Create A Ticket

Describe the Ticket
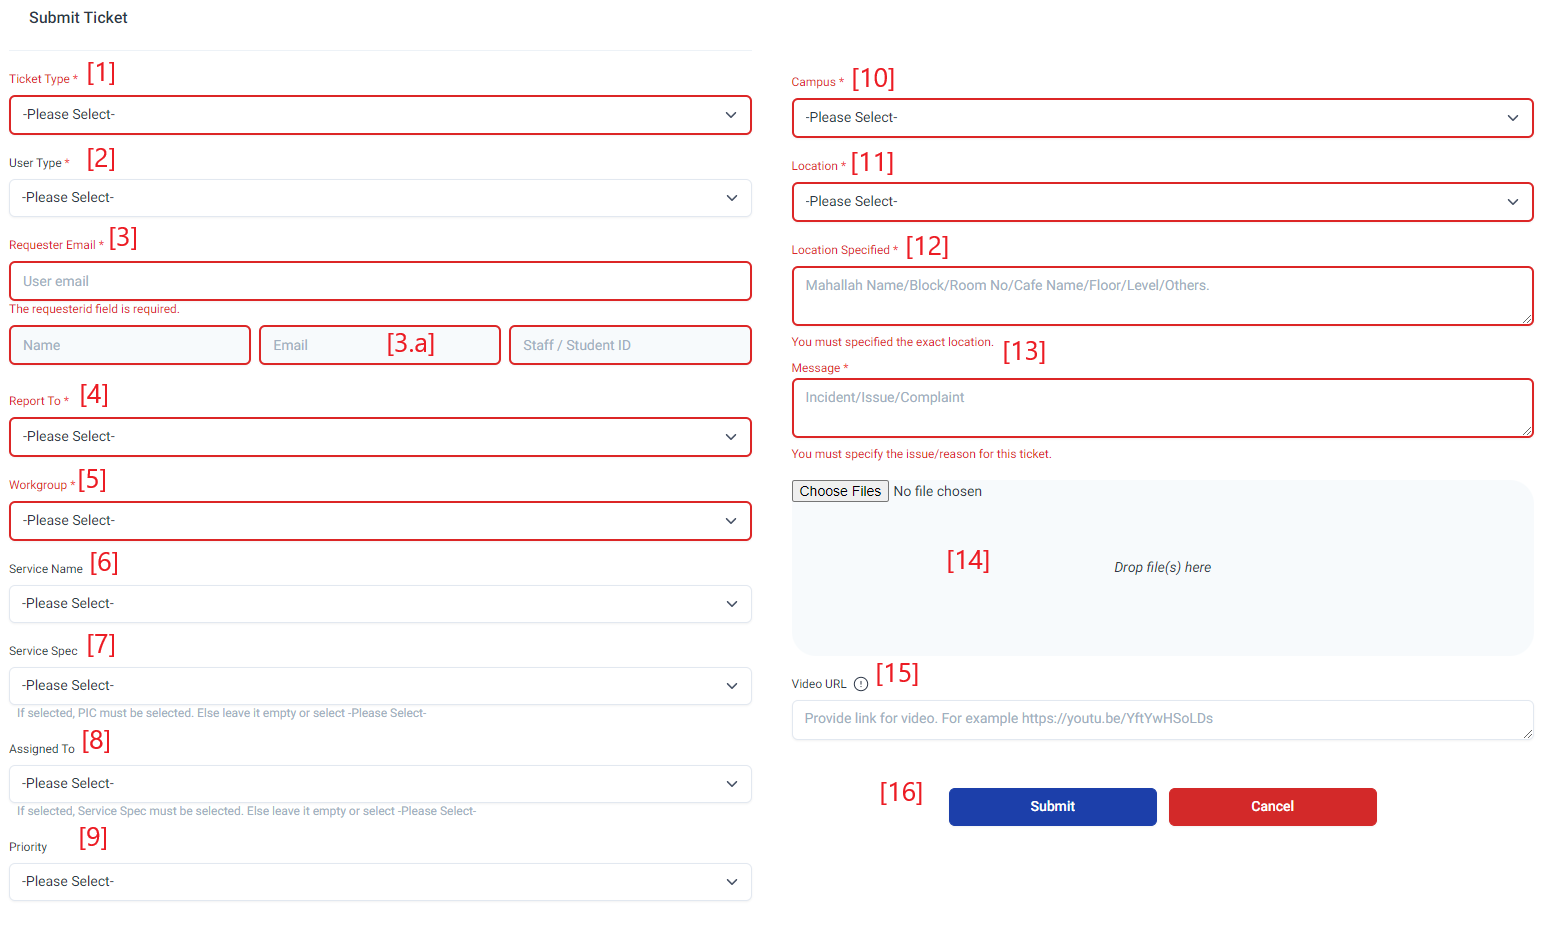
- [1] shows the list of available Ticket Type to be selected
- This is Required
- [2] shows the User Type to be selected; Staff or Student
- This is Required.
- Selecting the User Type must be done first before specifying the Email [3]
- [3] shows the Requester Email, either the Staff or Student
- This is Required
- The input accepts Staff's email and Students' live email. However, Staff No can be used as well if needed
- [3. a] shows the basic info of Staff or Students. If the Email input is valid and the staff or student was found based on the Requester Email, the basic info field [3. a] will be filled in automatically
- [4] shows the Report To which contains the list of available ServiceDesk Counters for the ticket to be reported to
- This is Required
- Selecting the Report To must be done first before specifying the Workgroup on [5]
- [5] shows the Workgroup which contains the list of Units available under the selected ServiceDesk Counters [4]
-
- This is Required
- Selecting the Workgroup must be done first before specifying the Service Name [6] or Assigned To [8]
-
- [6] shows the Service Name which contains the list of Services available under the selected Workgroup [5]
-
- This is Optional
- Selecting the Service Name must be done first before specifying the Service Spec [7]
-
- [7] shows the Service Spec which contains the list of Service Specifications available when selecting Service Name [6]
-
- This is Optional
- Service Spec must be selected if the Assigned To [8] is selected
-
- [8] shows the Assigned To which contains the list of Agents available based on the selected Workgroup [6]
-
- This is Optional
- Assigned To must be selected if the Service Spec [7] is selected
- If selected, the Ticket Status will be set to Assign. If not selected, the Ticket Status will be set to New
-
- [9] shows the Ticket Priority to be selected
-
- This is Optional
- If not selected, the Ticket Status will be set to Normal
-
- [10] shows the list of available Campuses to specify the campus, based on the requester's location or ticket description
- This is Required
- [11] shows the list of available Locations to pinpoint the location, based on the requester's location or ticket description
- This is Required
- [12] shows the Locations Specified to further specified the exact location, based on the requester's location or ticket description
- This is Required
- [13] shows the Message to describe the ticket, based on the requester's provided description
- This is Required
- [14] shows the Attachment to be included if provided by the requester
- This is Optional
- [15] shows the Video URL to be included if provided by the requester
- This is Optional
- [16] shows the Submit Button to create the ticket and Cancel Button to discard the ticket creation
Super Admin - Manage Module
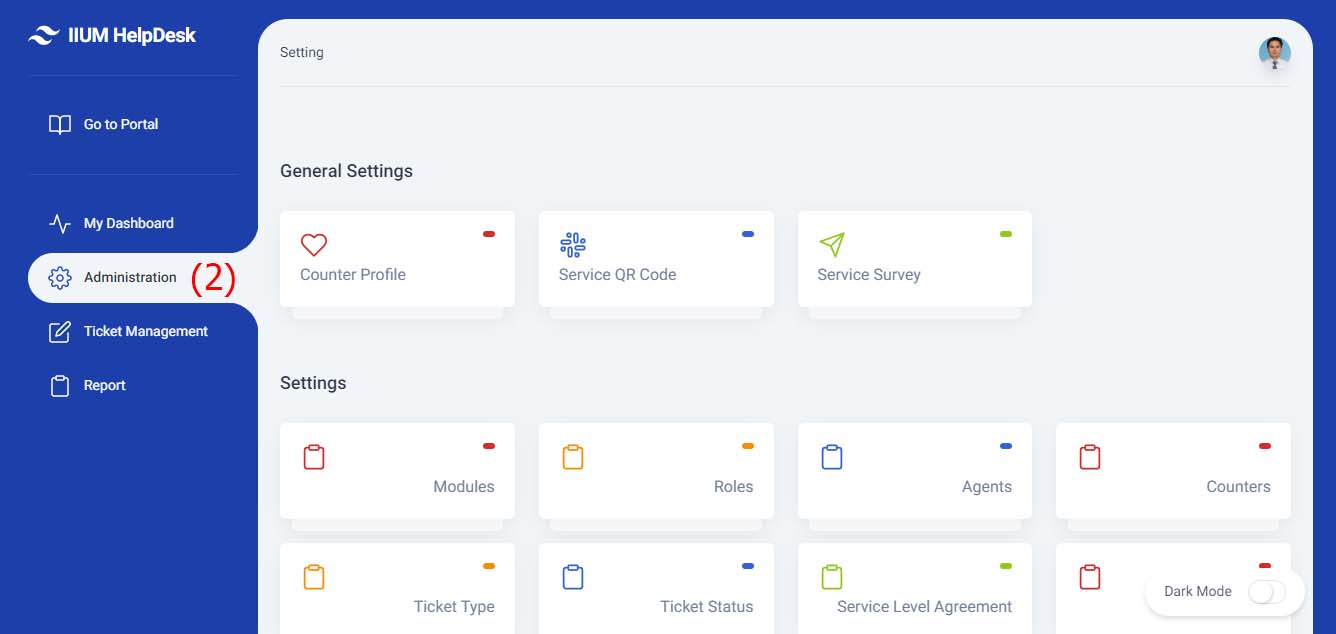
1. Click Administrator Tab
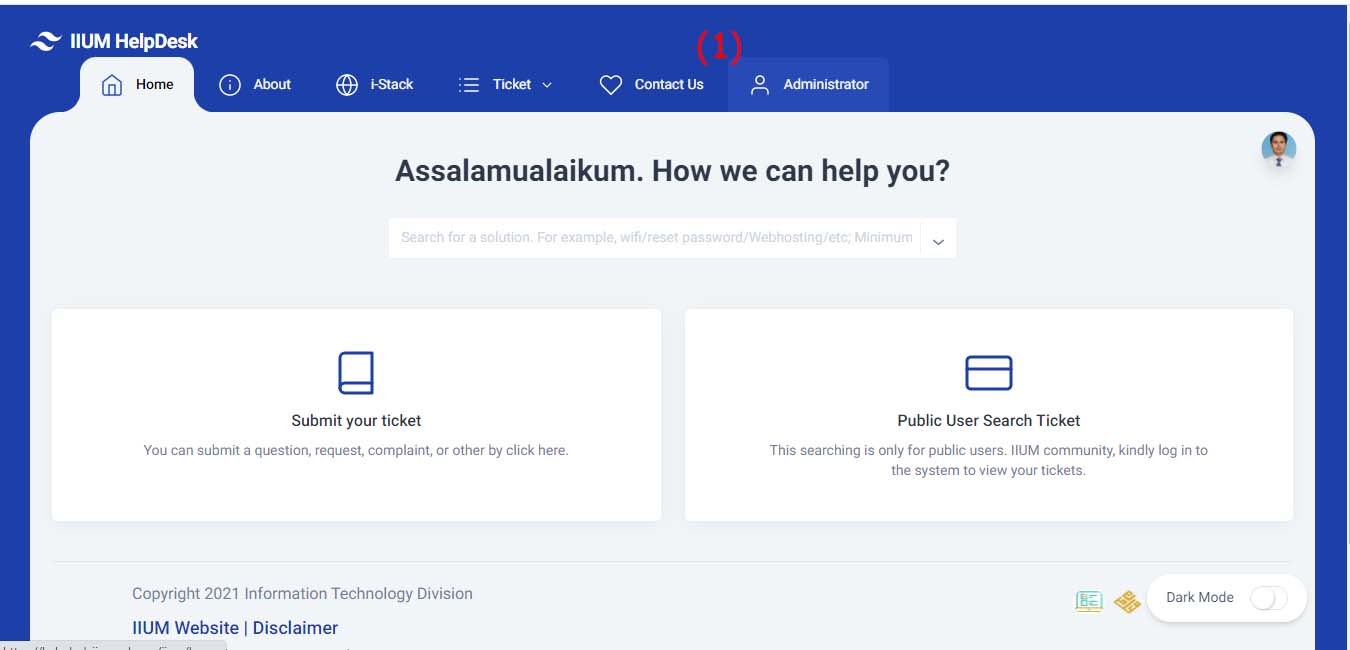
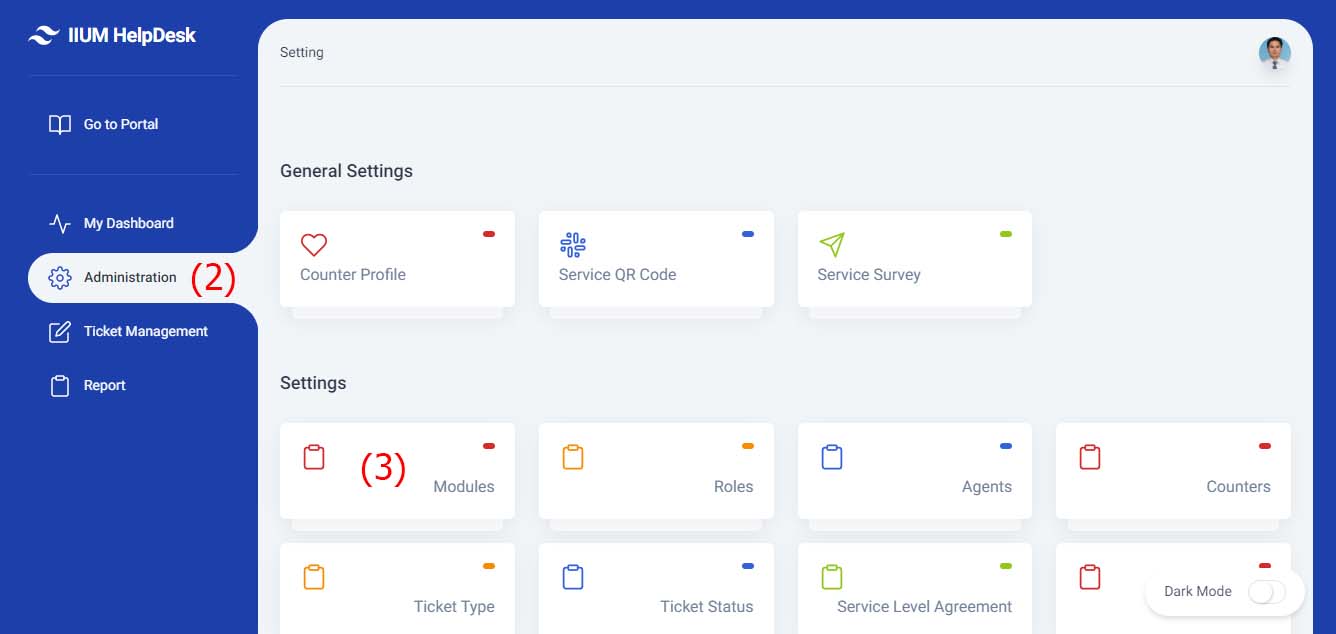
2. Click Administration Menu
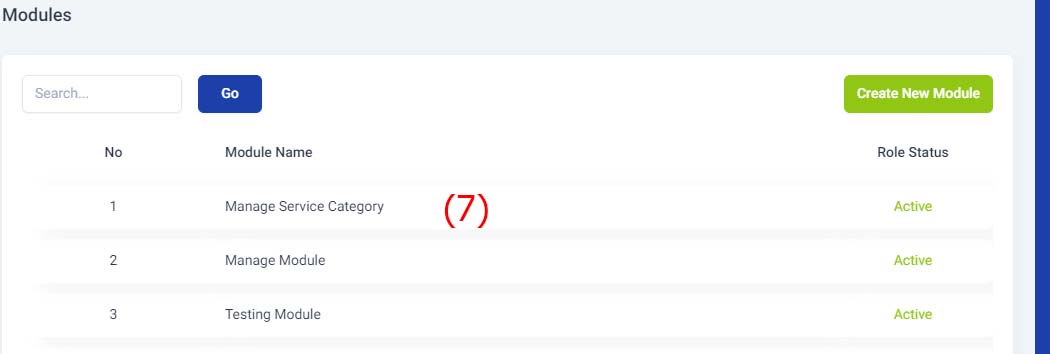
3. Click Modules Button
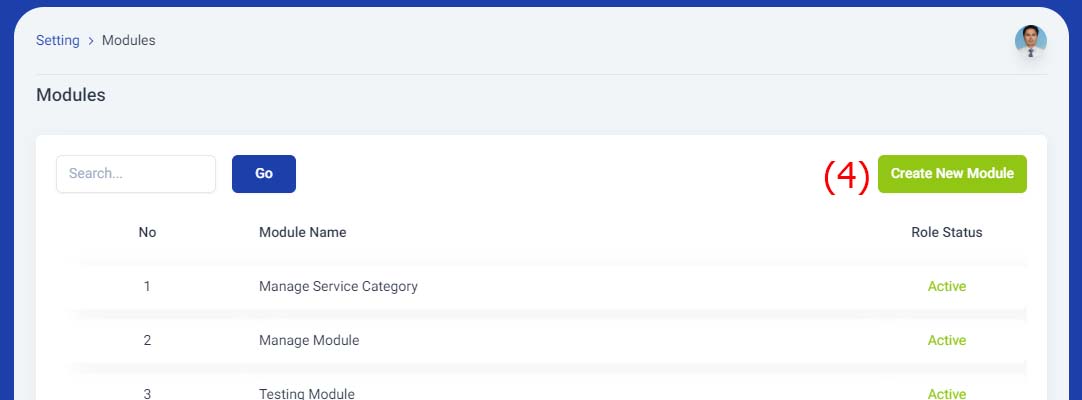
Create New Module
4. Click New Module Button
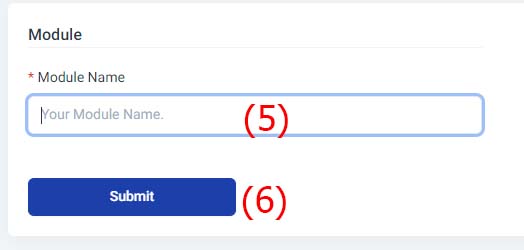
5. Fill in the Module Name
6. Click Submit button
Update Module
7. Click Module Name
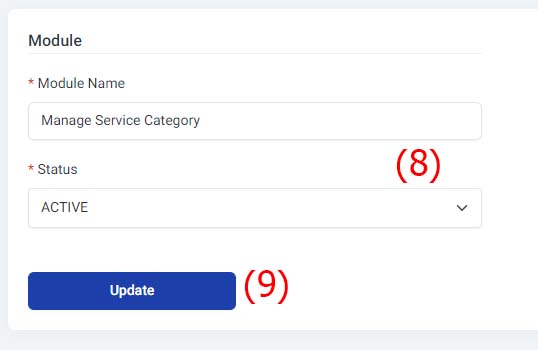
8. Update Module details
9. Click Update Button
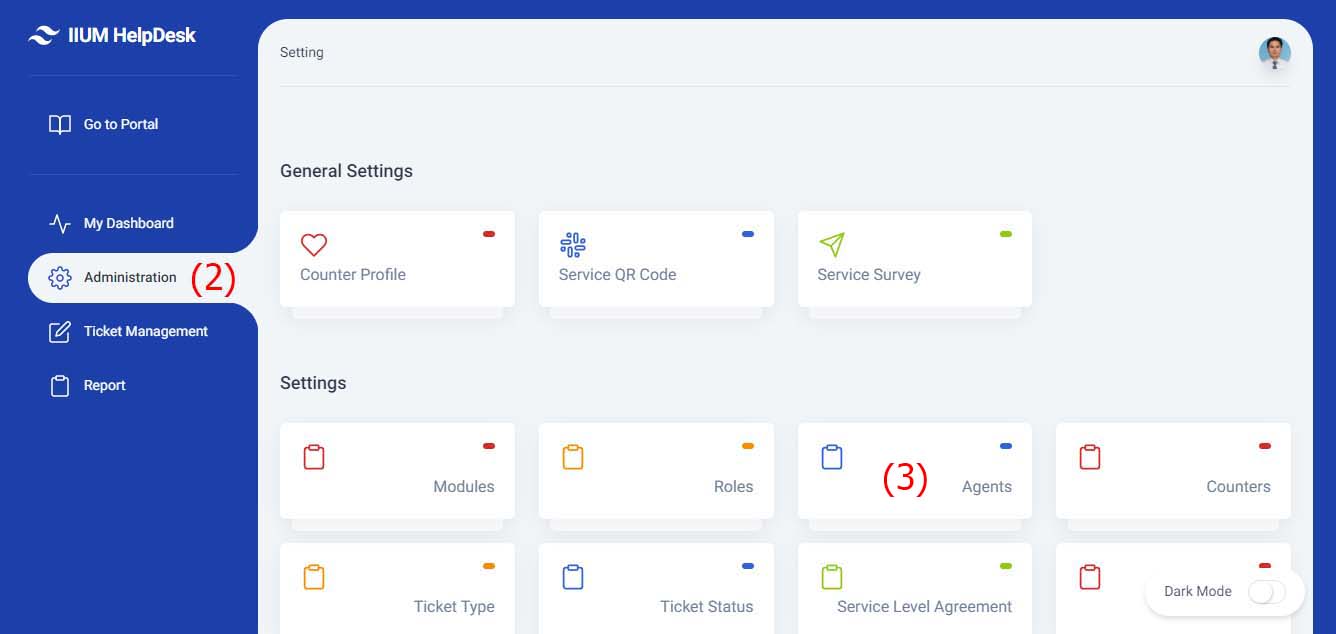
Super Admin - Manage Role
1. Click Administrator Tab
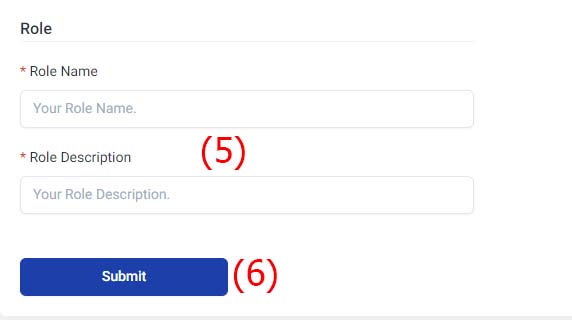
Create New Role
4. Click New Role Button
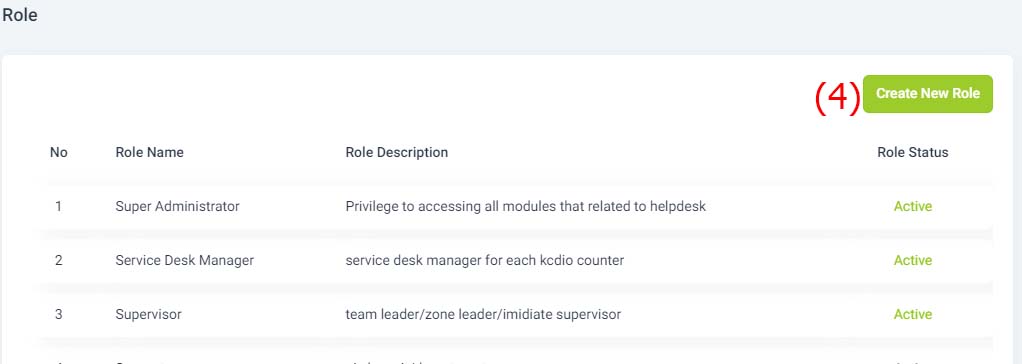
5. Key in Role Name & Description
6. Click Submit Button
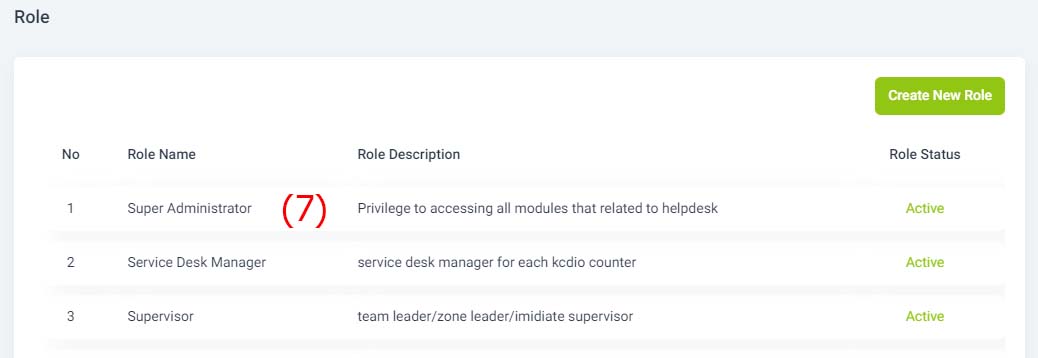
Update Role
7. Click Role Name
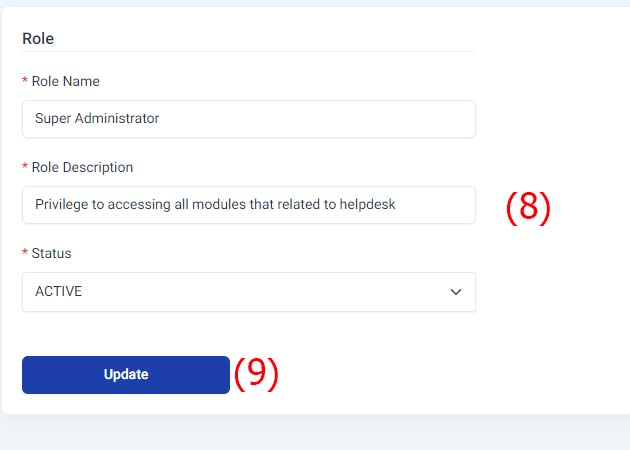
8. Update Role details
9. Click Update Button
Super Admin - Manage Agent
1. Click Administrator Tab
Create New Agent
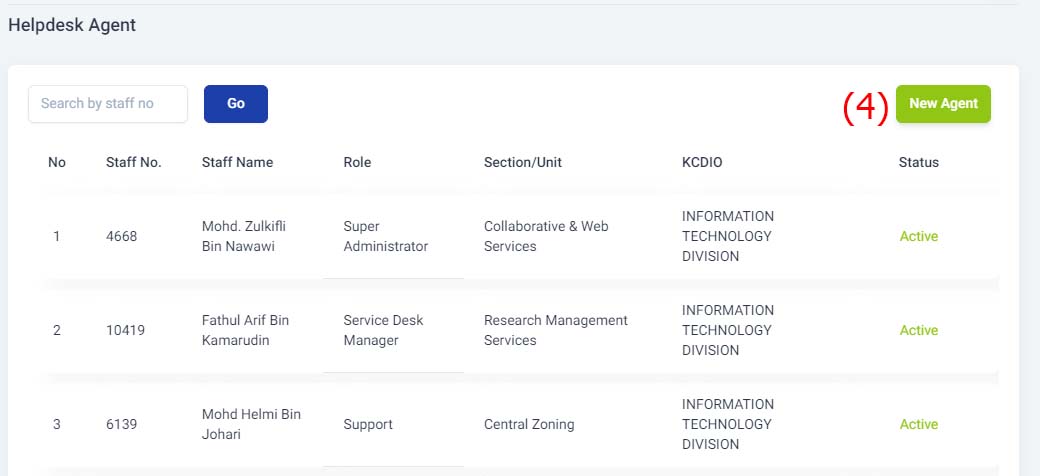
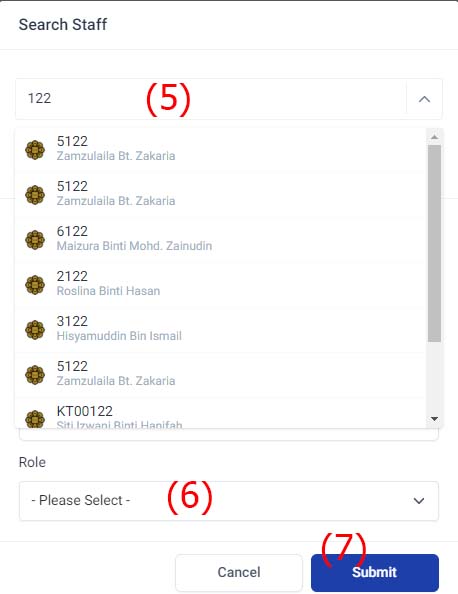
5. Key in agent's staff number & select from the listing
6. Key in role for agent
7. Click Submit button
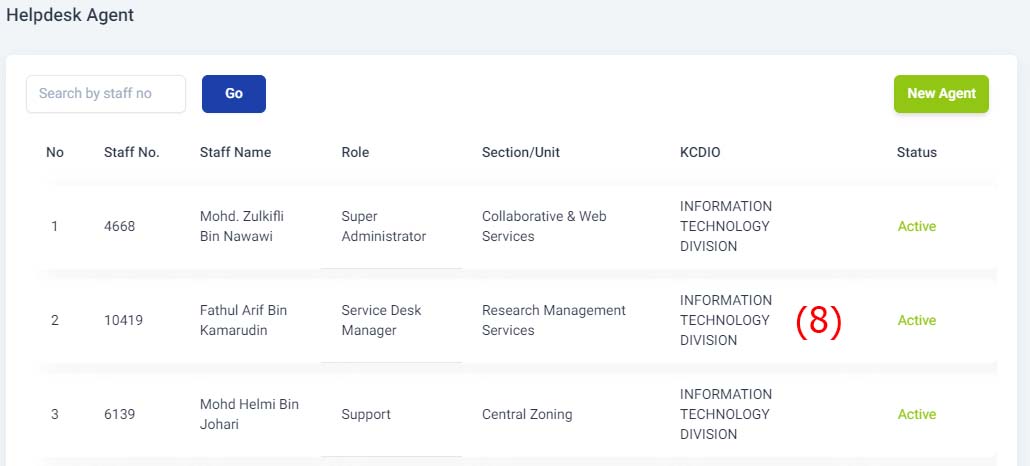
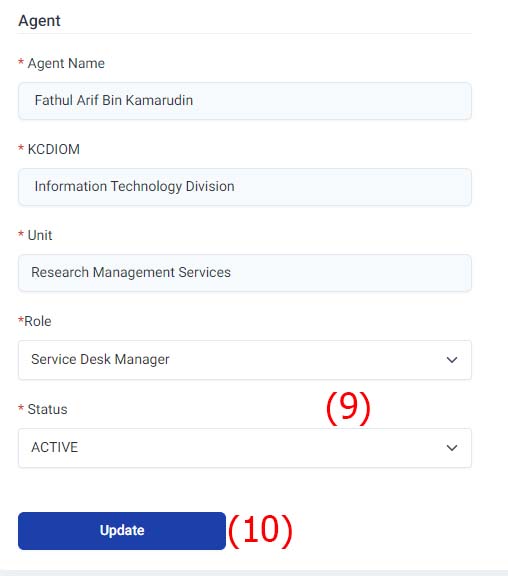
Update Agent
Super Admin - Manage Counters
1. Click Administrator Tab
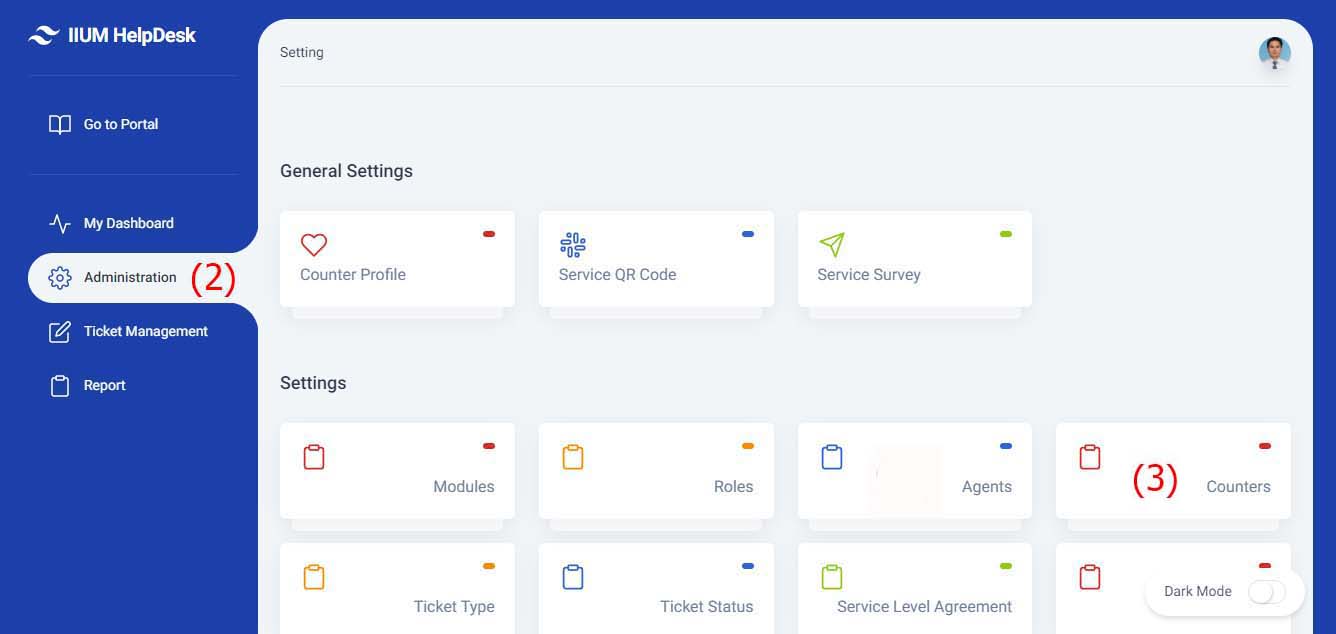
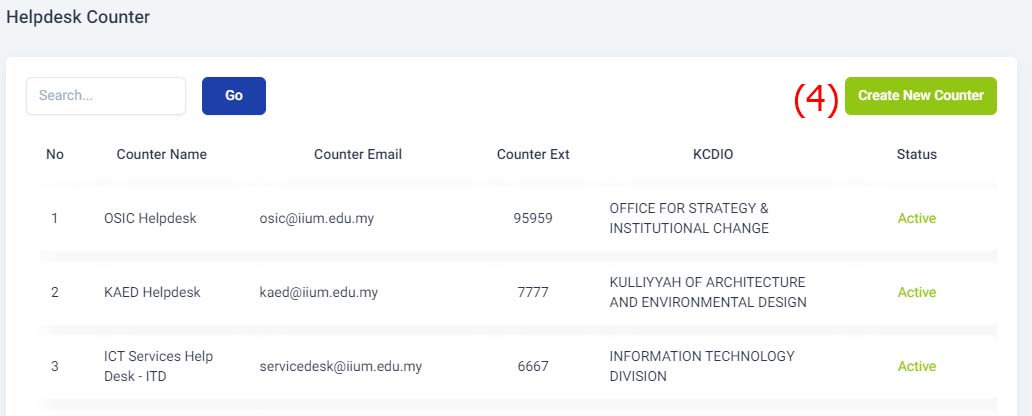
Create New Counter
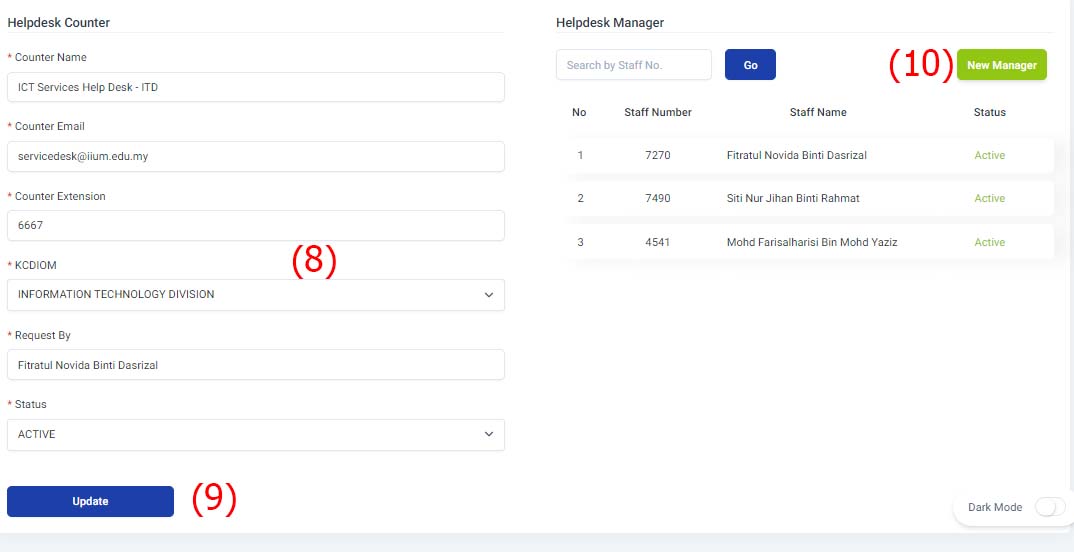
4. Click Create New Counter button
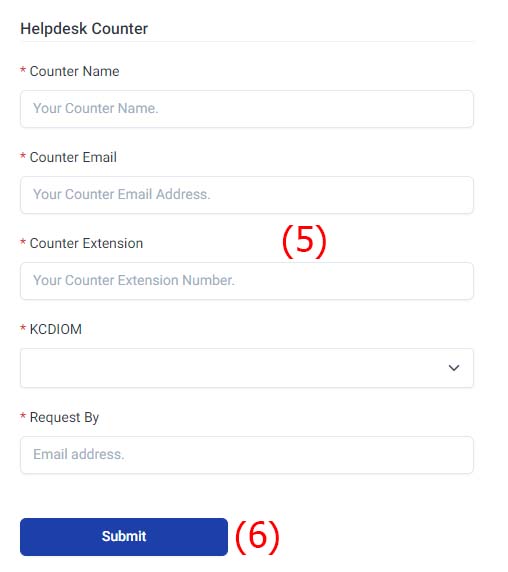
5. Key in all counter information
6. Click Submit button
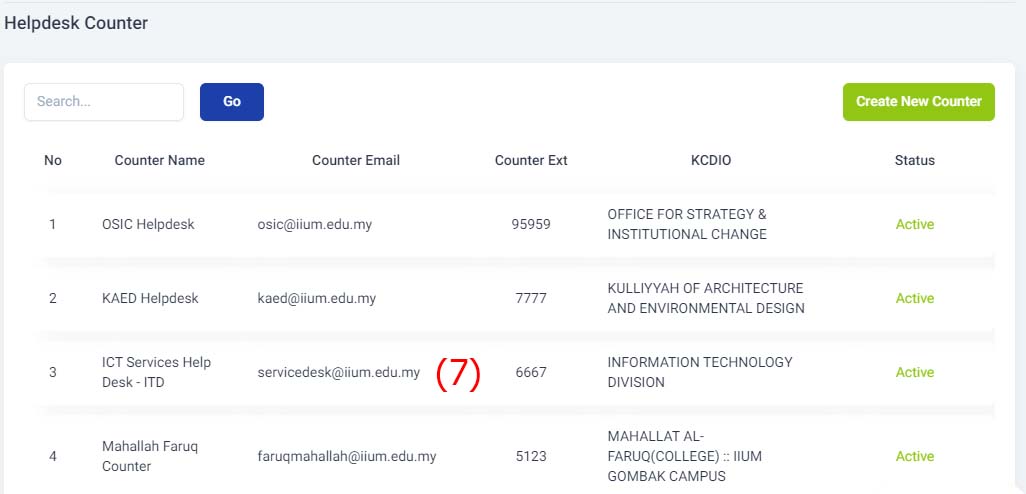
Update Counter
7. Select counter from the list
8. Update Counter information details
9. Click Update button
10. To add new counter manager, click button New Manager
Super Admin - Manage Ticket Type
1. Click Administrator Tab
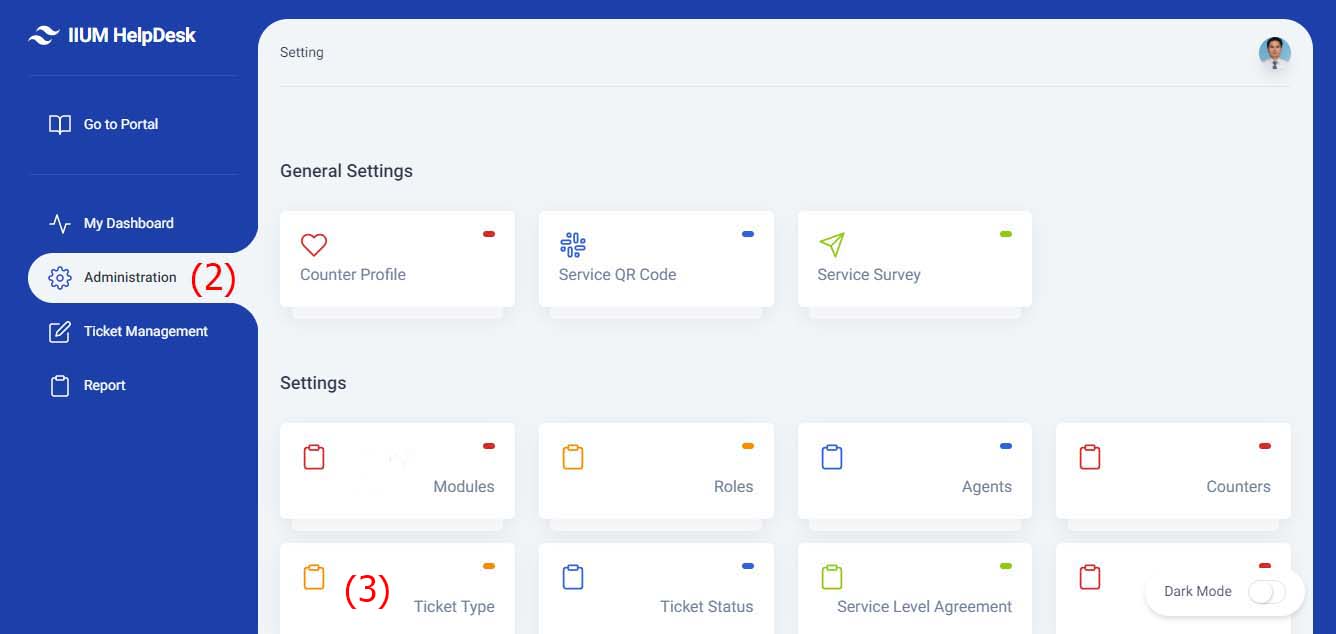
Update Ticket Type
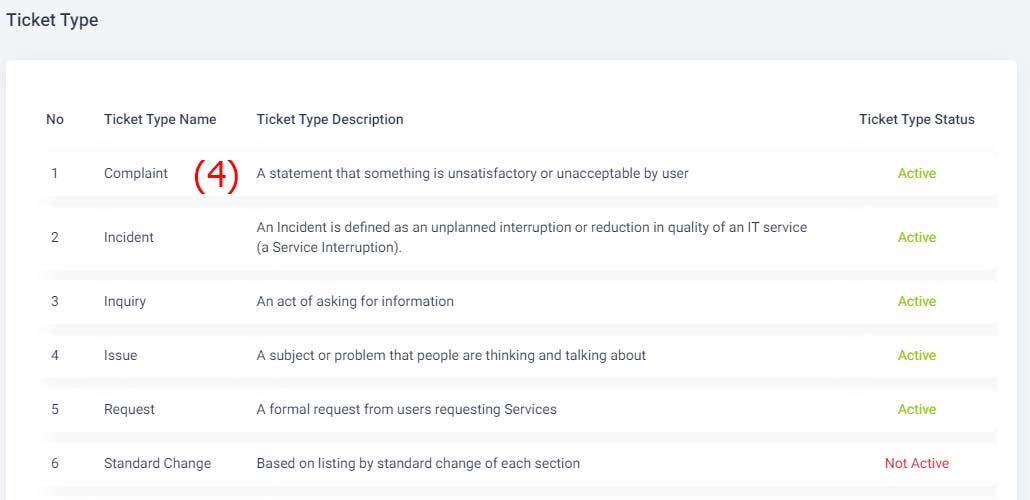
4. Click ticket type from listing
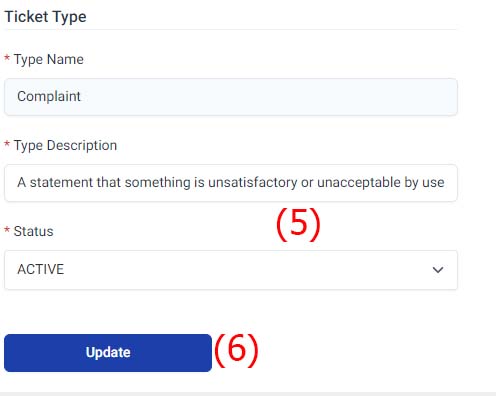
5. Update Ticket Type information
6. Click Update button
Super Admin - Manage Ticket Status
1. Click Administrator Tab
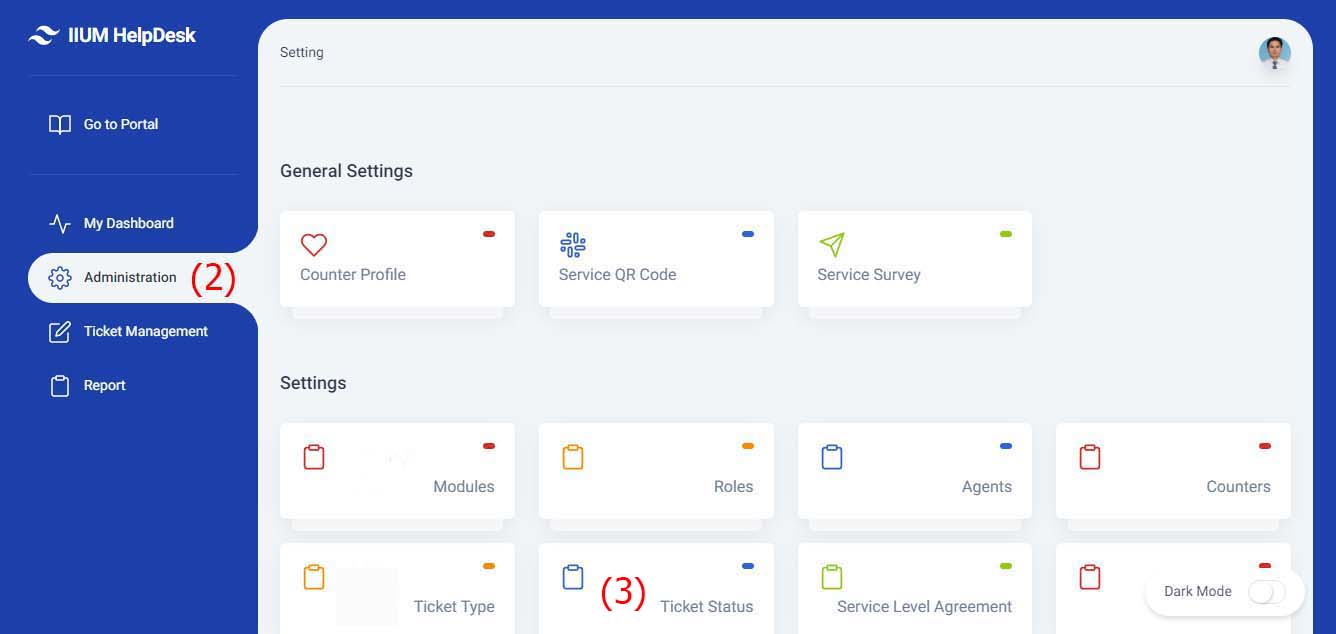
Update Ticket Status
4. Click Ticket Status from the list
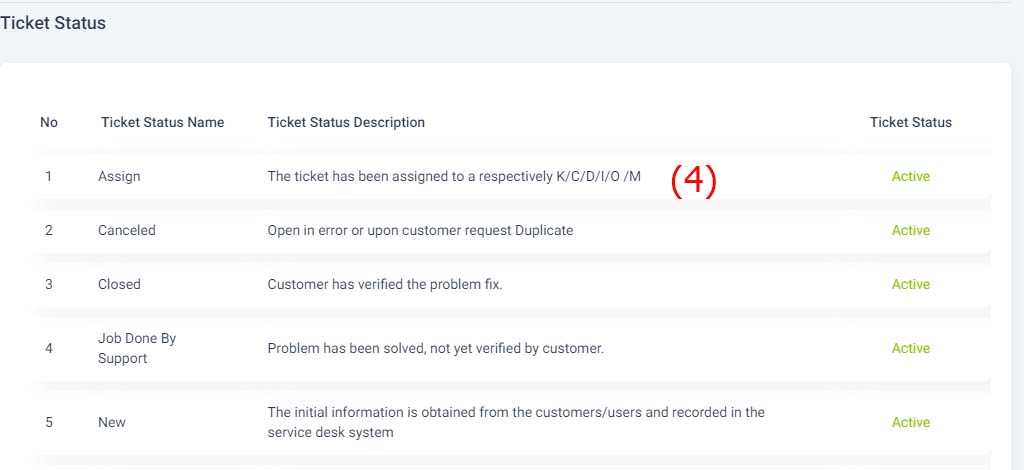
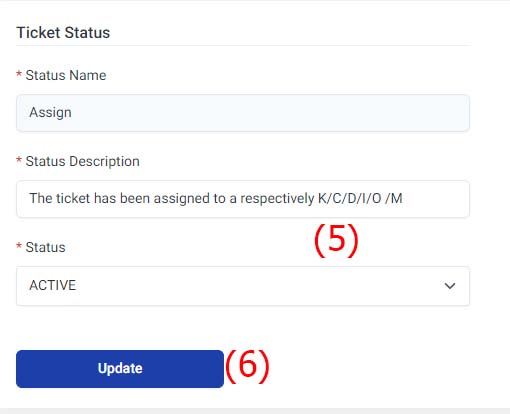
5. Update Ticket Status information
6. Click Update button
Super Admin - Manage Service Level Agreement
1. Click Administrator Tab
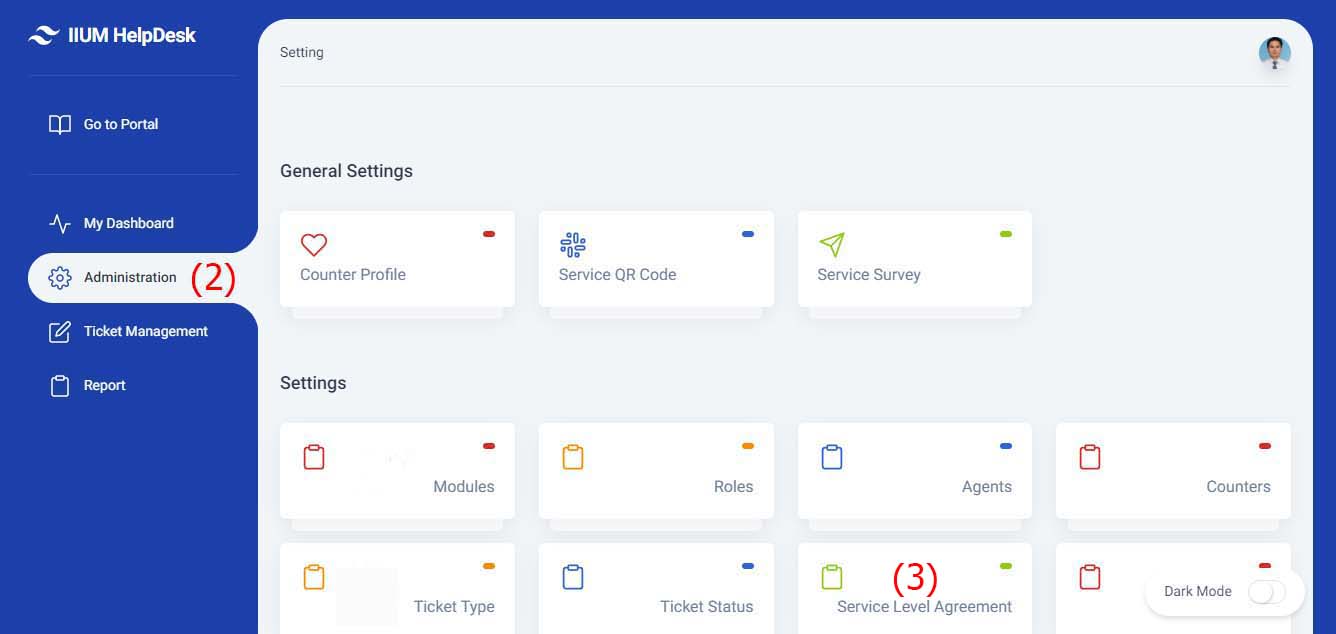
Create New SLA
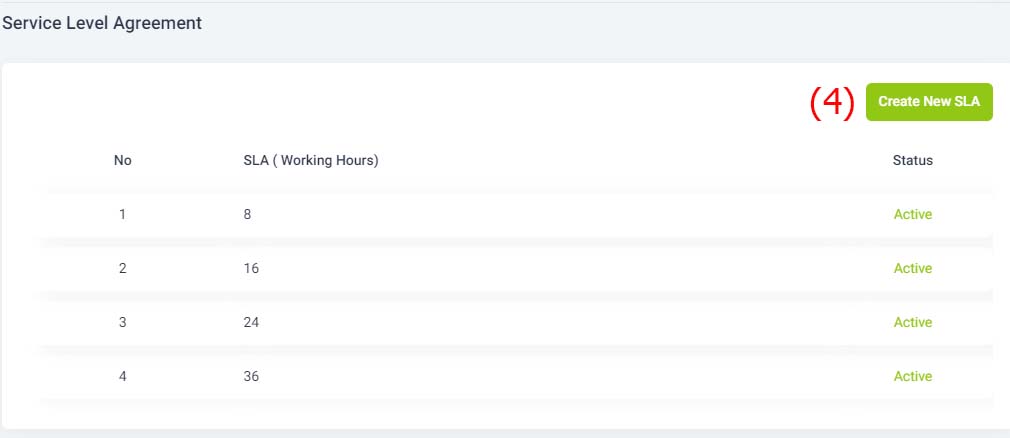
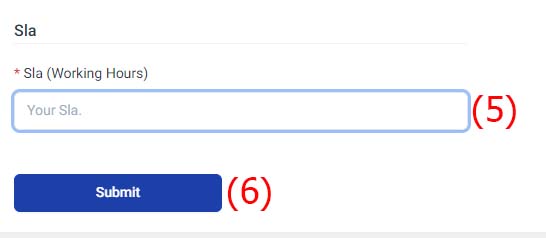
5. Key In new SLA
6. Click Submit button
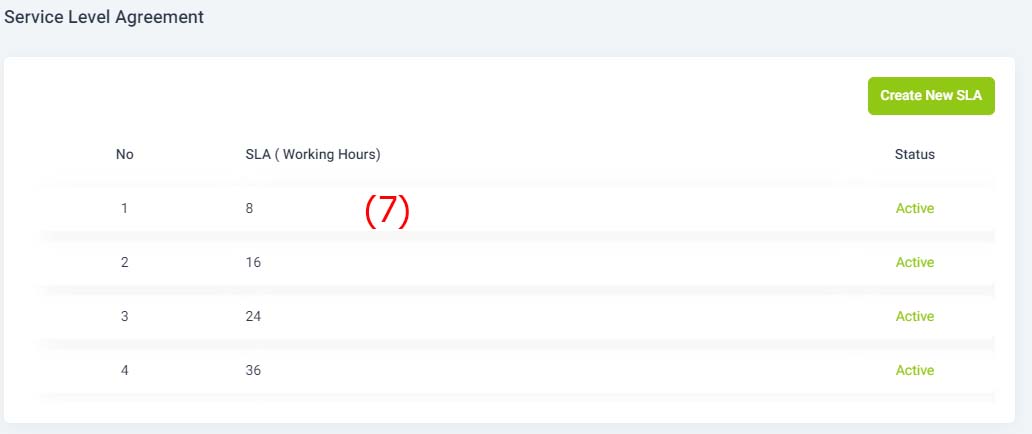
Update SLA
7. Click SLA from the list.
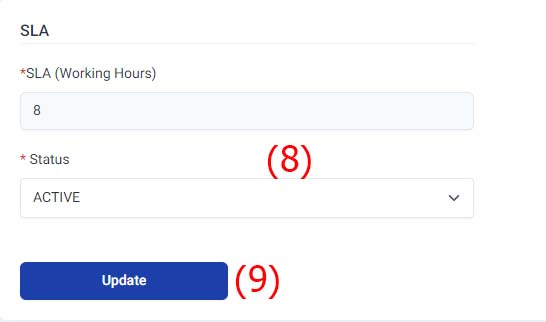
8. Update SLA details
9. Click Update button
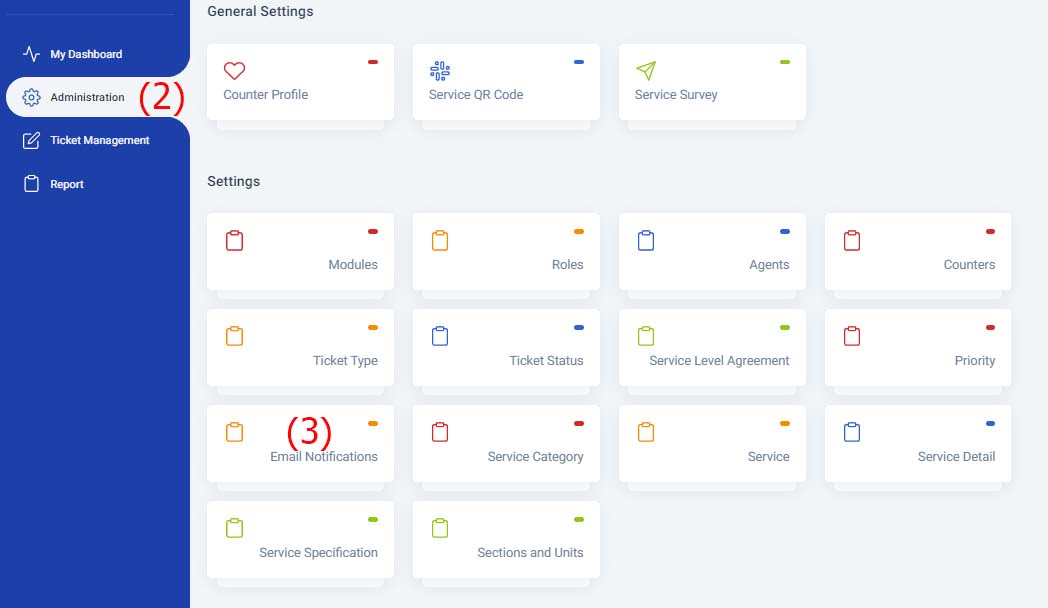
Super Admin - Manage Email Notifications
1. Click Administrator Tab
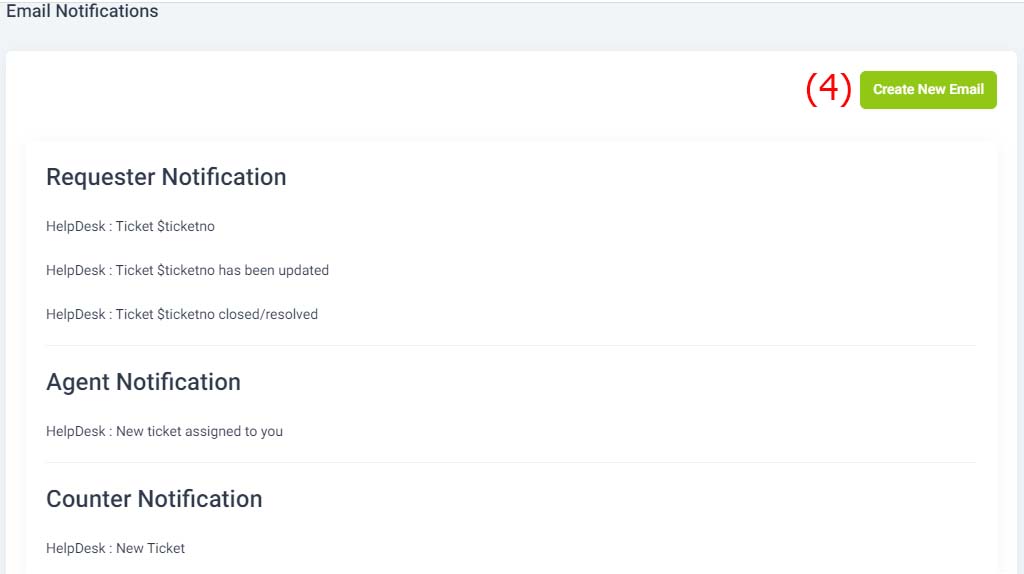
Create New Email Notification
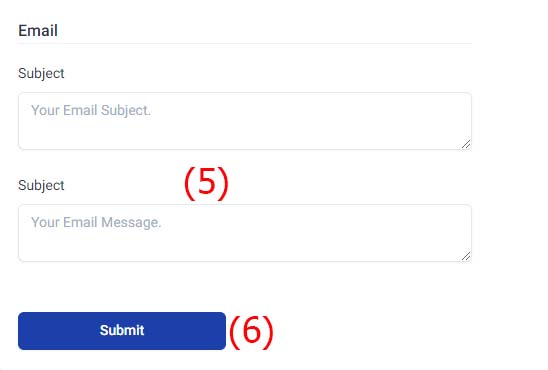
5. Key In Email Subject & Email Message
6. Click Submit button
Super Admin - Manage Service Category
1. Click Administrator Tab
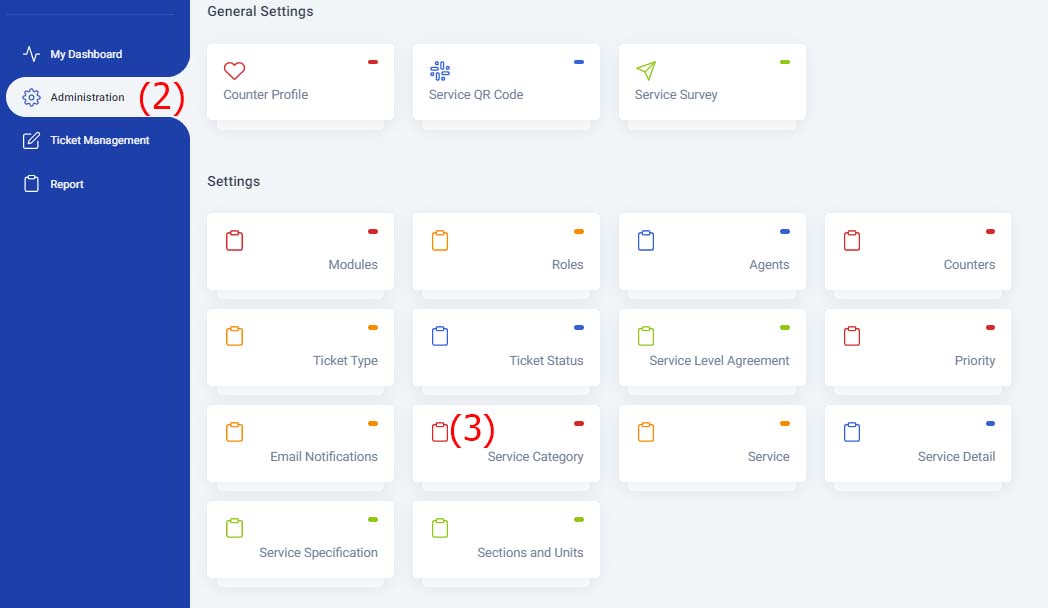
Create New Service Category
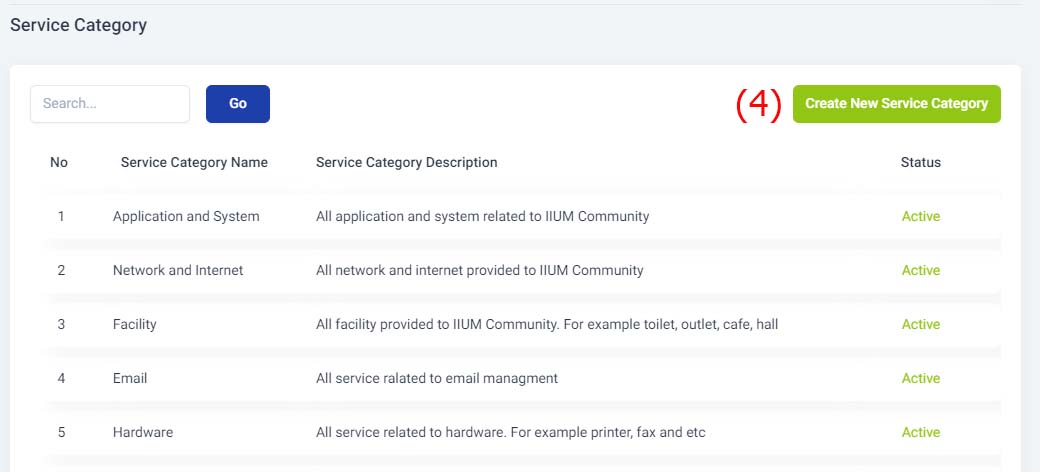
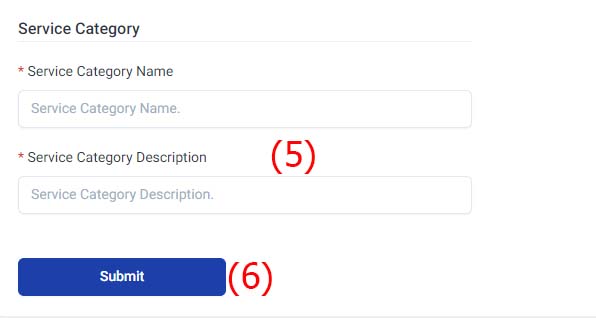
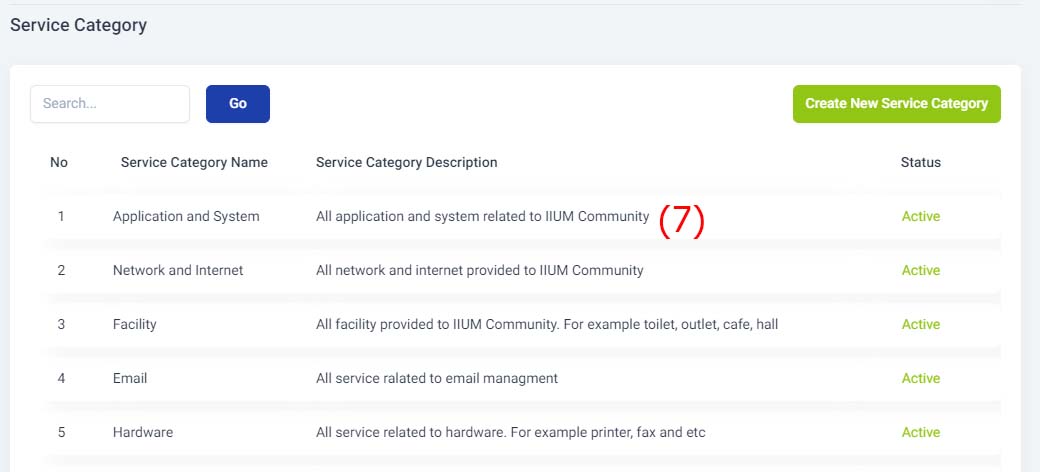
Update Service Category
7. Click Service Category from the list
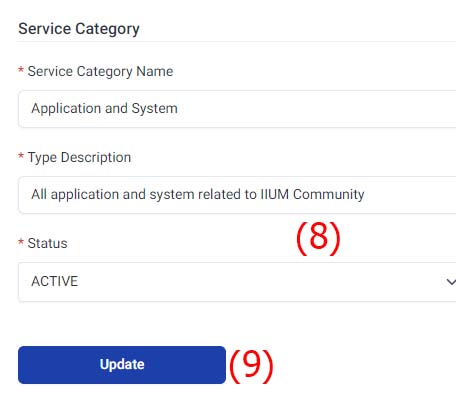
8. Update Service Category Name, Description & Status
Super Admin / Manager / Supervisor - Manage Service
1. Click Administrator Tab
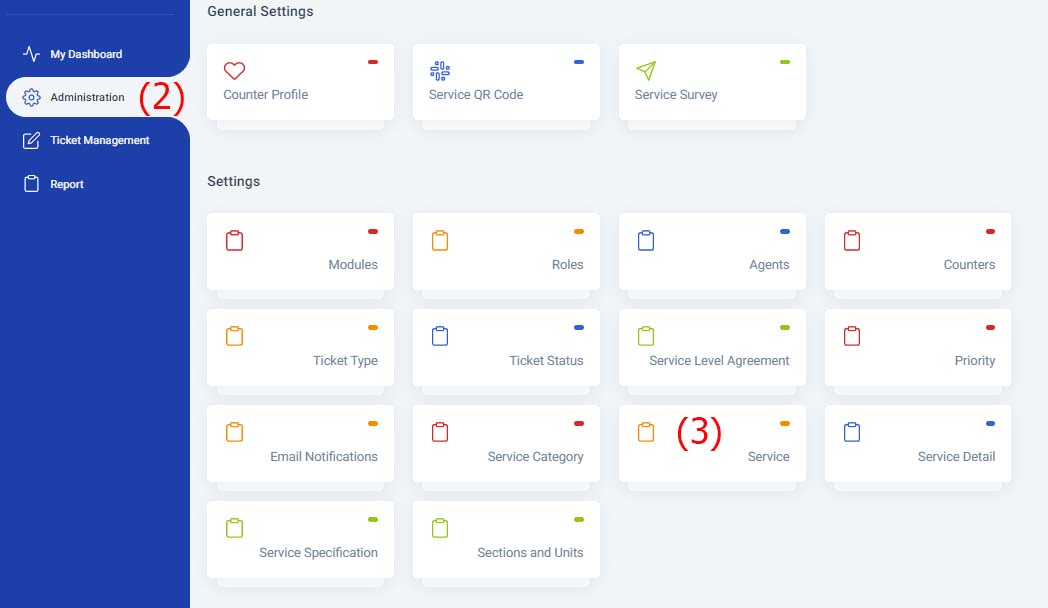
Create New Service
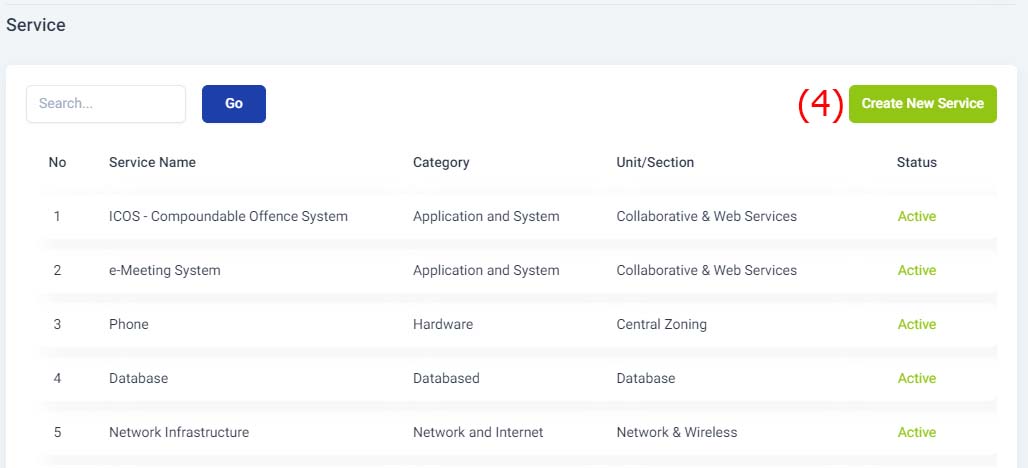
5. Key in Service Name , Category & Section/Unit
6. Click Submit button
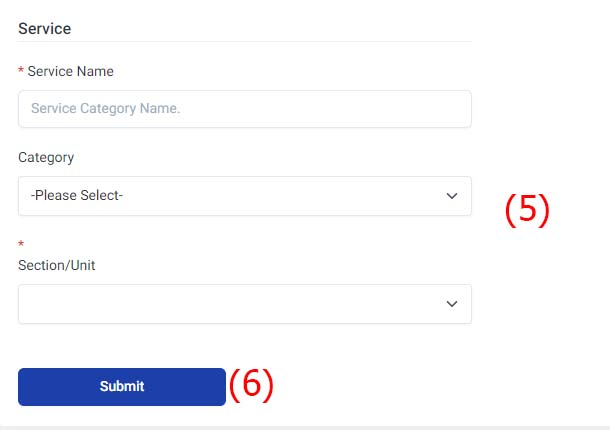
Update Service
7. Click Service from the listing
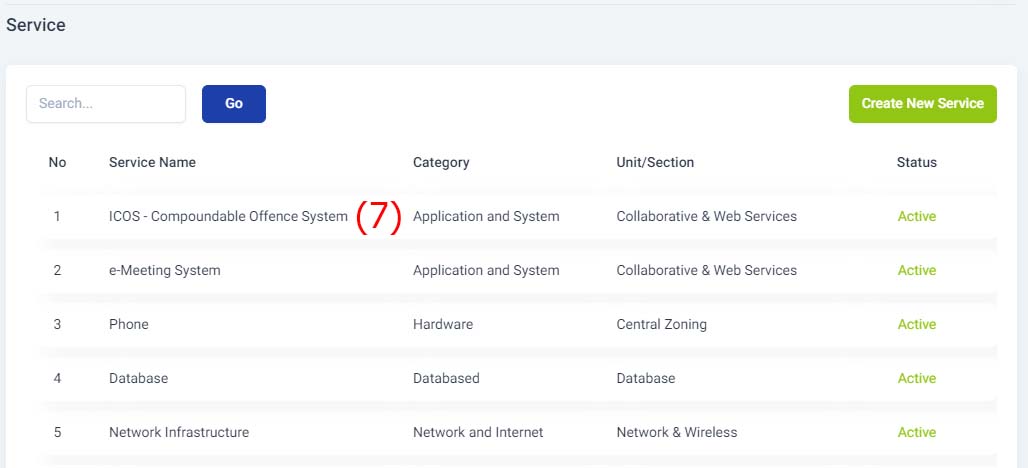
8. Update Service details
9. Click Update button.
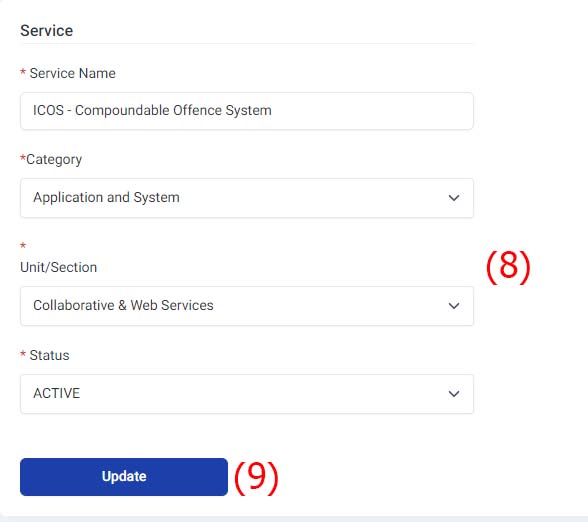
Super Admin / Manager / Supervisor - Manage Service Detail
1. Click Administrator Tab
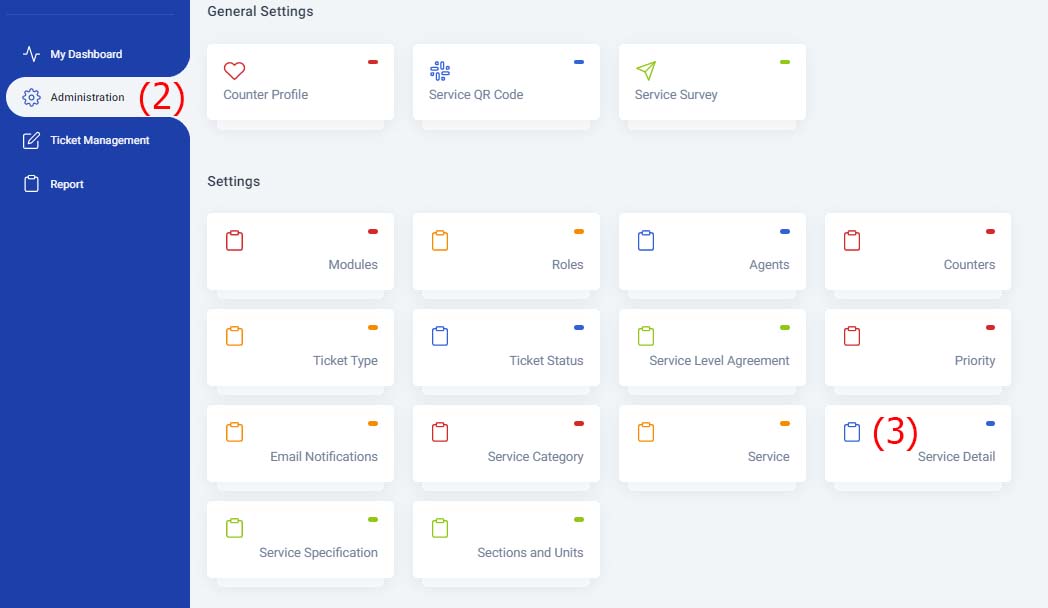
Create New Service Detail
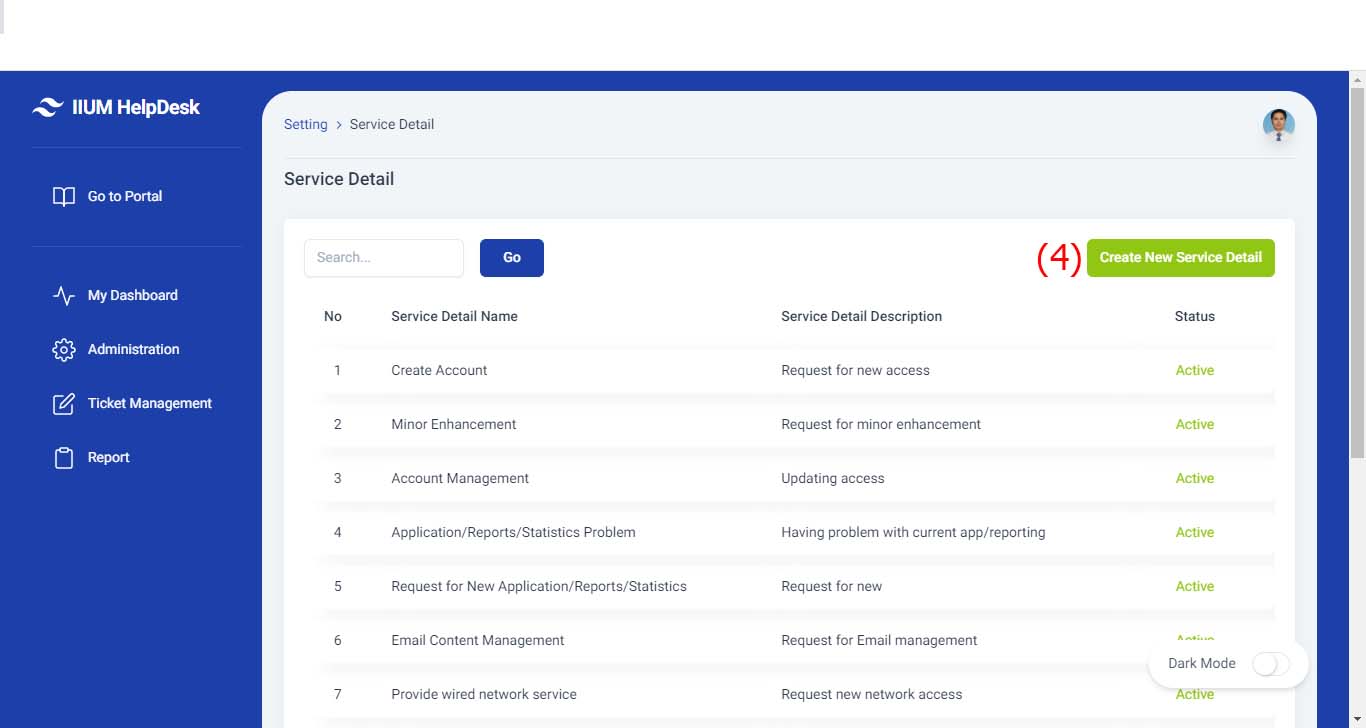
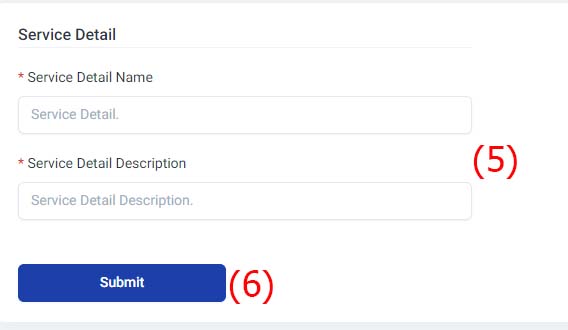
Update Service Detail
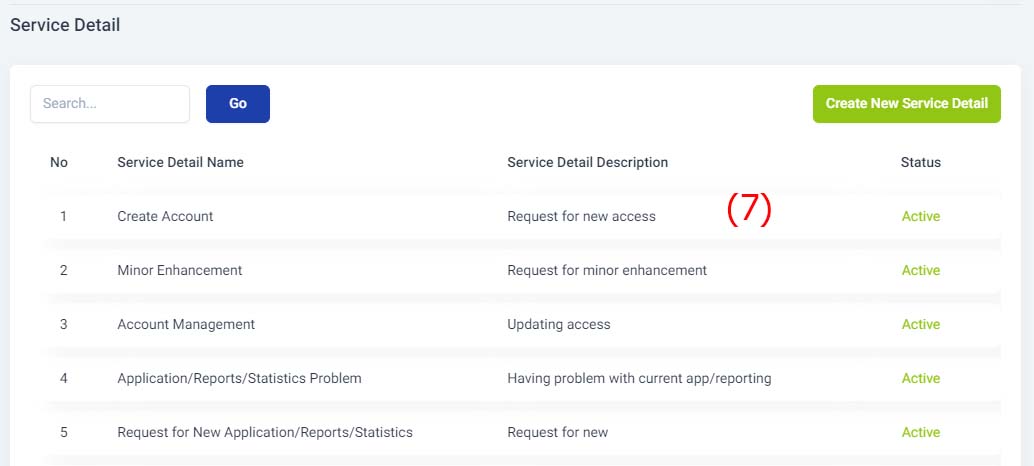
7. Click Service Detail from the listing
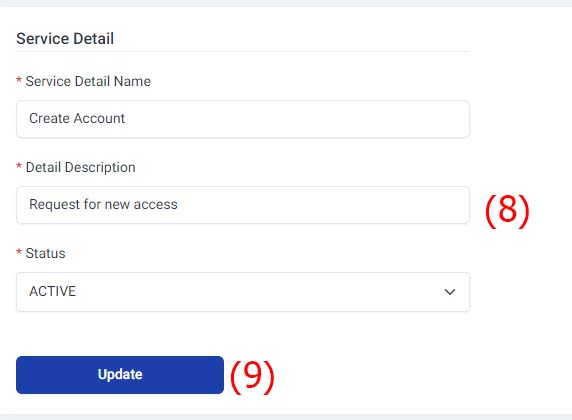
8. Update Service Detail
Super Admin / Manager / Supervisor - Manage Service Specification
1. Click Administrator Tab
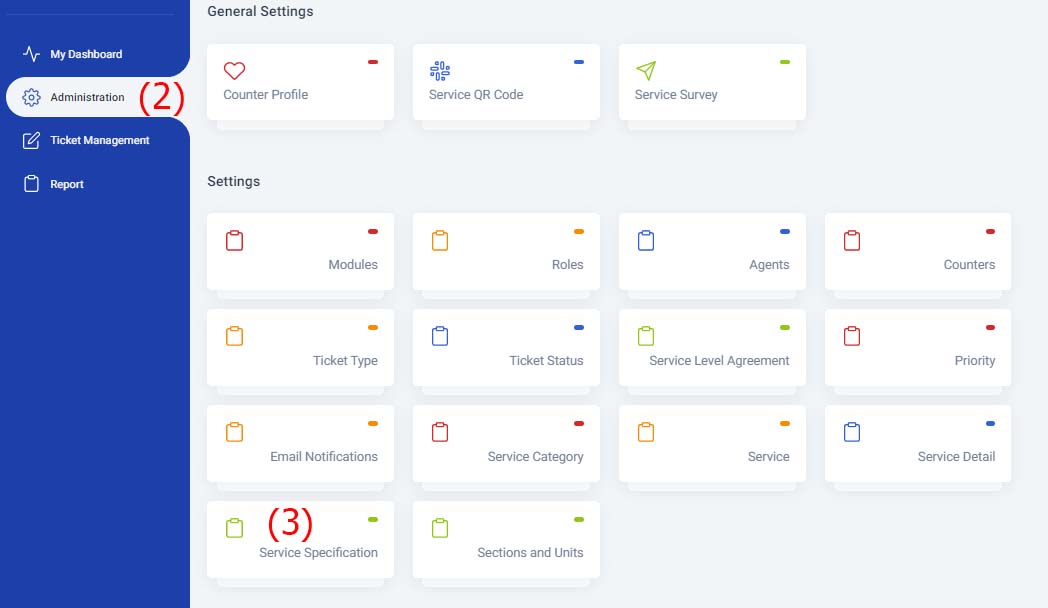
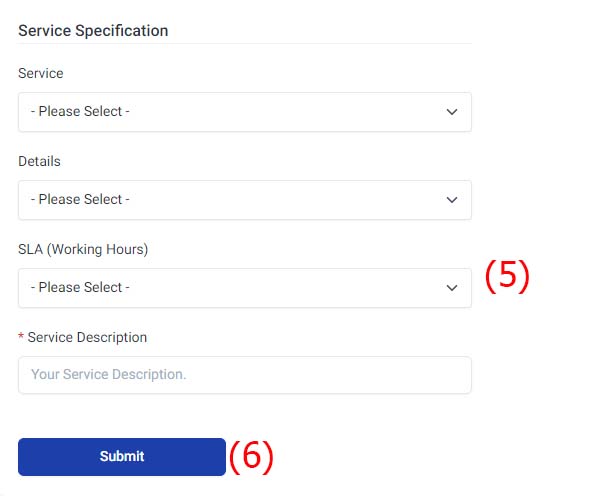
Create New Service Specification
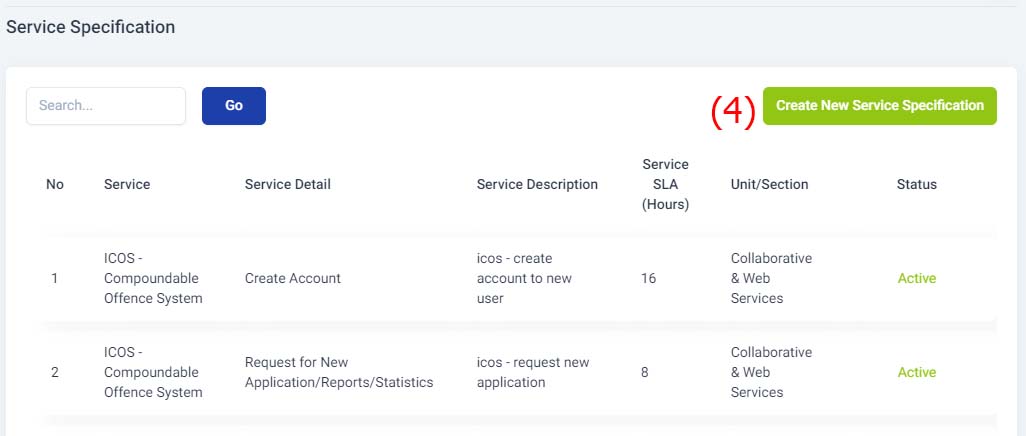
5. Key in Service Specification details
6. Click Submit button
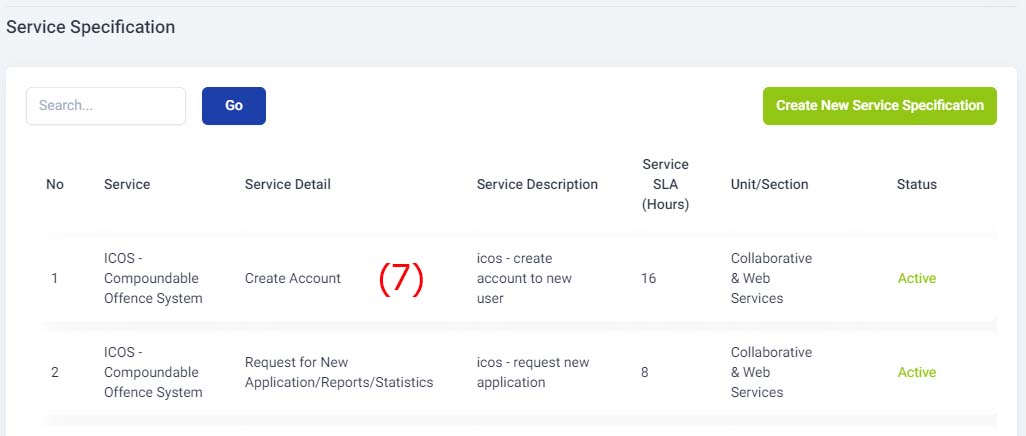
Update Service Specification
7. Click Service Specification from the list
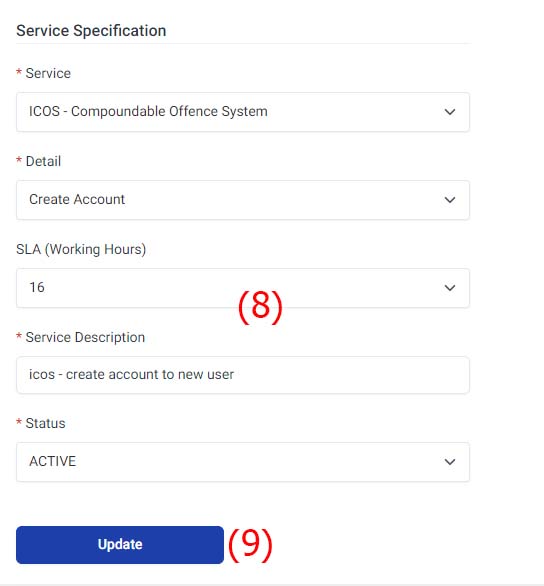
8. Update Service Specification Details
9. Click Update button
How to Clear Cache Browser (Google Chrome)
Kindly clear cache your browser
1. Open your browser; Google Chrome
2. On the top right panel, there is three dots vertically. Click this icon
3. Choose History
4. Click History

5. On the left panel, Click Clear Browsing Data

6. In Form
-
- Choose Time range
- Cookies and other site data : Tick Checkbox

- Cached image and file : Tick Check box

8. Close Browser
9. Open browser
10. Serve i-First
How can I view the section and unit under my KCDIO?
Managers, supervisors, and persons in charge can view the sections and units under their KCDIO through i-First.
1. At the top of the portal, click the Administrator menu.
2. Click the Administration menu.

3. Click Sections and Units to view the list and details.

4. The user can view the list of sections and units under their KCDIO.
5. Select a unit from the list, for example Administration and Finance (ITD).

6. The user can view the staff under the selected unit or section.
