Ticket Create
Create A Ticket

- Navigate to Ticket Management and click on the New Ticket button.
Describe the Ticket

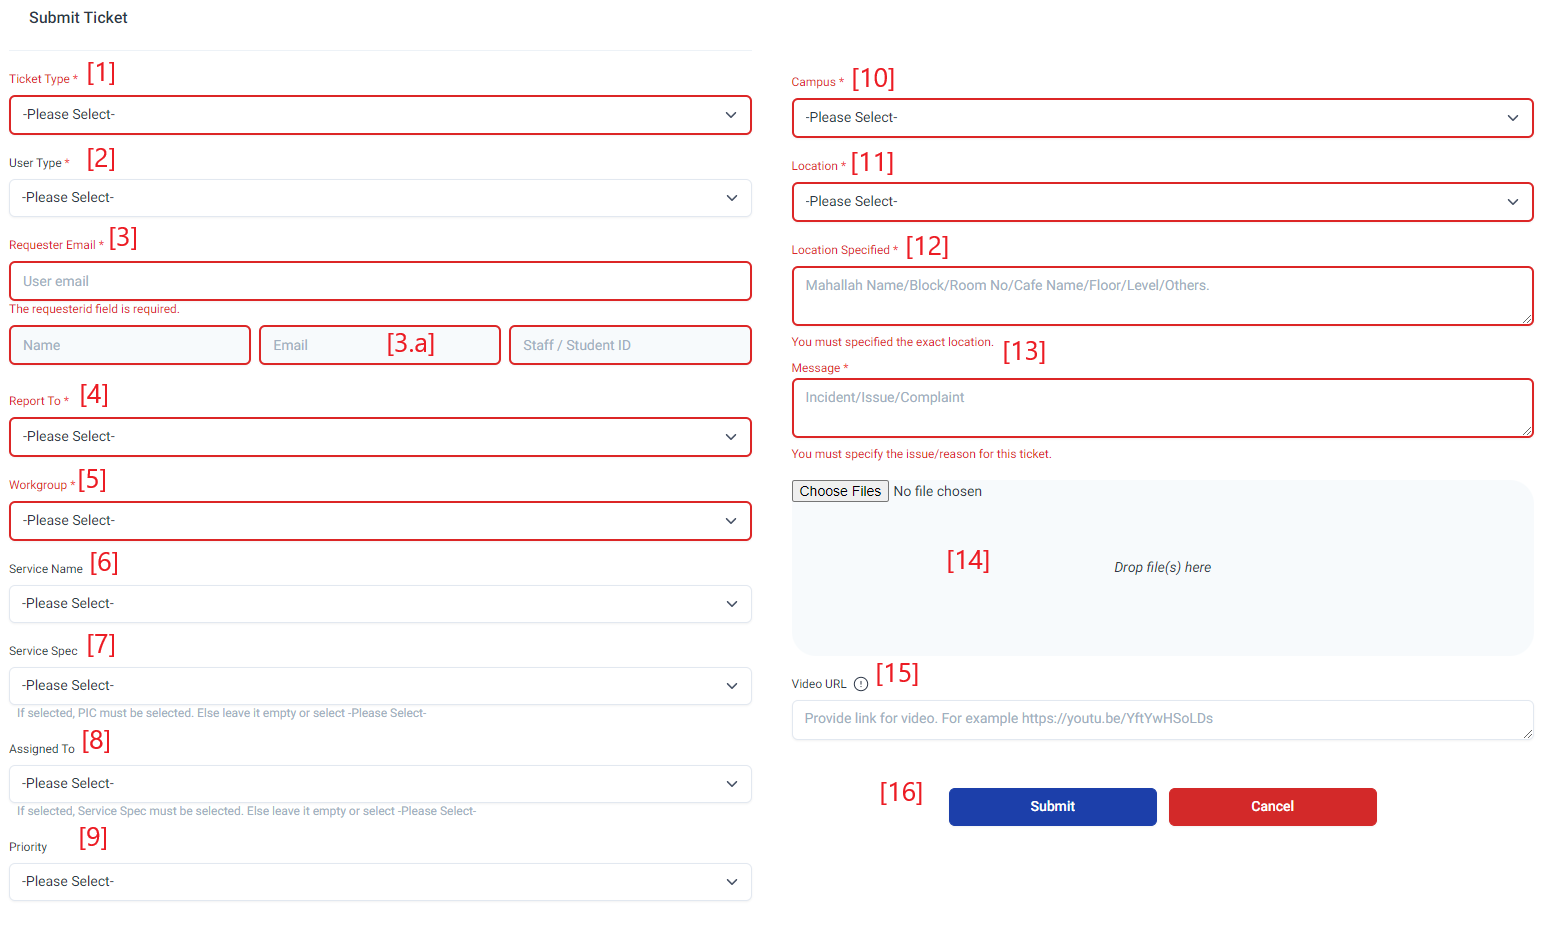
- [1] shows the list of available Ticket Type to be selected
- [2] shows the User Type to be selected; Staff or Student
- This is Required.
- Selecting the User Type must be done first before specifying the Email [3]
- [3] shows the Requester Email, either the Staff or Student
- This is Required
- The input accepts Staff's email and Students' live email. However, Staff No can be used as well if needed
- [3. a] shows the basic info of Staff or Students. If the Email input is valid and the staff or student was found based on the Requester Email, the basic info field [3. a] will be filled in automatically
- [4] shows the Report To which contains the list of available ServiceDesk Counters for the ticket to be reported to
- This is Required
- Selecting the Report To must be done first before specifying the Workgroup on [5]
- [5] shows the Workgroup which contains the list of Units available under the selected ServiceDesk Counters [4]
-
- This is Required
- Selecting the Workgroup must be done first before specifying the Service Name [6] or Assigned To [8]
- [6] shows the Service Name which contains the list of Services available under the selected Workgroup [5]
-
- This is Optional
- Selecting the Service Name must be done first before specifying the Service Spec [7]
- [7] shows the Service Spec which contains the list of Service Specifications available when selecting Service Name [6]
-
- This is Optional
- Service Spec must be selected if the Assigned To [8] is selected
- [8] shows the Assigned To which contains the list of Agents available based on the selected Workgroup [6]
-
- This is Optional
- Assigned To must be selected if the Service Spec [7] is selected
- If selected, the Ticket Status will be set to Assign. If not selected, the Ticket Status will be set to New
- [9] shows the Ticket Priority to be selected
-
- This is Optional
- If not selected, the Ticket Status will be set to Normal
- [10] shows the list of available Campuses to specify the campus, based on the requester's location or ticket description
- [11] shows the list of available Locations to pinpoint the location, based on the requester's location or ticket description
- [12] shows the Locations Specified to further specified the exact location, based on the requester's location or ticket description
- [13] shows the Message to describe the ticket, based on the requester's provided description
- [14] shows the Attachment to be included if provided by the requester
- [15] shows the Video URL to be included if provided by the requester
- [16] shows the Submit Button to create the ticket and Cancel Button to discard the ticket creation
267 peoples found this helpful
Does this helps you?
Yes
No

No Comments